
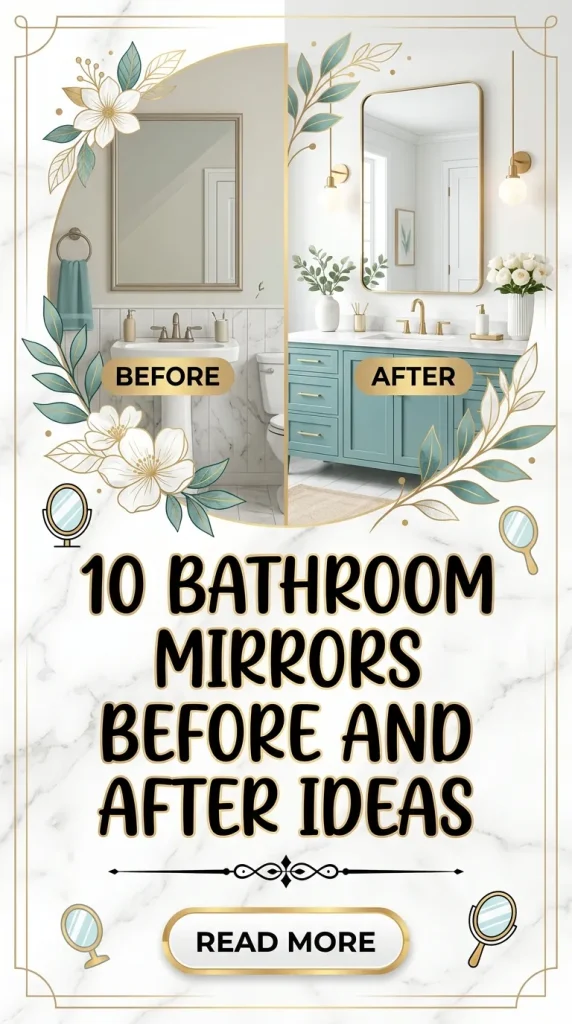
10 Bathroom Mirrors Before And After Ideas
Bathroom mirror makeovers have become one of the most popular Pinterest ideas for home decor upgrades because they combine functionality, organization, and visual transformation in a simple DIY project. A mirror often acts as the central focal point of a bathroom, influencing how light, space, and overall decoration appear within the room. Updating an outdated mirror can dramatically improve the atmosphere without requiring a complete renovation. Many homeowners now use creative ideas such as wooden frames, modern lighting, minimalist style borders, geometric accents, and decorative storage solutions to refresh old bathroom mirrors. These projects are beginner friendly and suitable for both large and small bathrooms. They also work well for budget ideas because many transformations rely on affordable materials and step by step planning rather than expensive remodeling. This article explores ten practical before and after bathroom mirror ideas that focus on aesthetic improvement, organization, and modern design inspiration. Readers will learn how to approach different mirror styles, prepare materials, execute simple makeover techniques, and create polished results that improve the appearance and functionality of bathroom spaces.
Why This Idea Is Trending or Useful
Bathroom mirror upgrades continue to trend across Pinterest inspiration boards because they provide noticeable visual impact with relatively low cost and effort. Many bathrooms contain builder-grade mirrors that lack character, texture, or decorative detail. Transforming these mirrors through DIY methods allows homeowners to personalize spaces while improving lighting reflection and overall room balance. Modern design trends also emphasize minimalist style and clean organization, making mirror renovations an effective way to update bathrooms without removing major fixtures. Another reason these ideas remain popular is accessibility. Most projects require simple materials, basic tools, and straightforward step by step execution methods suitable for beginners. The before and after effect creates strong visual contrast, which performs well in Pinterest content because viewers can clearly see the transformation. Mirror makeovers also contribute to better space perception by increasing brightness and reflecting decorative elements more effectively. Whether using wood, paint, lighting, or storage additions, these creative project ideas offer practical home decor improvements while allowing flexibility in style, color, and overall bathroom presentation.
Materials and Preparation
Preparing properly before starting a bathroom mirror makeover helps ensure cleaner installation and long-lasting results. Common materials include wood trim, adhesive strips, paint, primer, sandpaper, decorative molding, LED light strips, storage shelves, screws, wall anchors, and cleaning supplies. Depending on the selected design, additional materials such as metal accents, tiles, or waterproof sealants may also be required. Essential tools often include measuring tape, drills, screwdrivers, paintbrushes, levels, and utility knives. Preparation begins with thoroughly cleaning the existing mirror and surrounding wall area to remove moisture residue, dust, and oils. Accurate measurements are important because mirror framing and decorative additions require precise alignment. Planning also includes deciding whether the mirror transformation will focus on minimalist style, rustic decoration, modern design, or space-saving organization. Lighting conditions should also be evaluated before selecting finishes or frame colors. Bathrooms with limited natural light often benefit from brighter finishes and reflective materials. Careful planning allows the project to remain organized, budget friendly, and beginner friendly while reducing installation errors and unnecessary material waste.
MAIN IDEAS SECTION
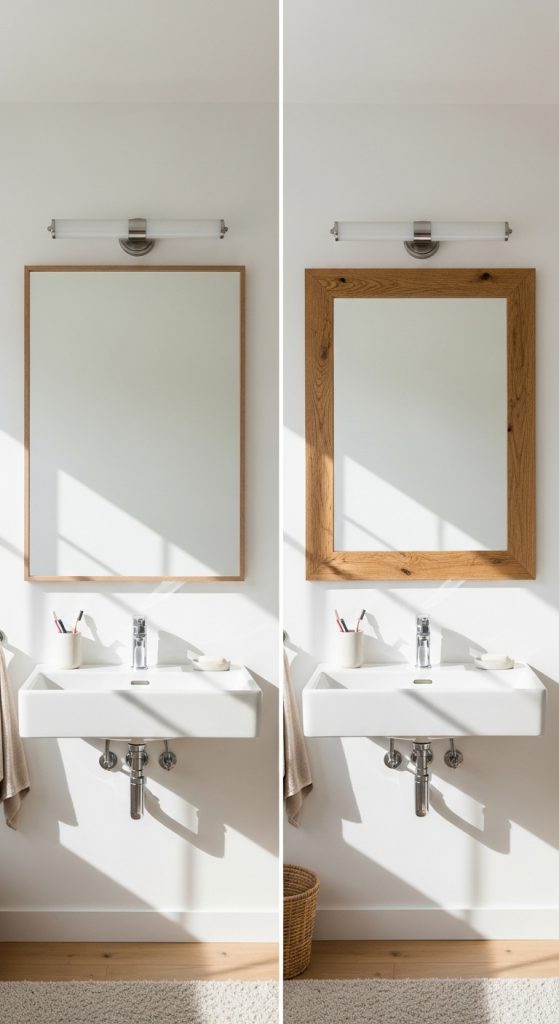
Idea 1: Rustic Wooden Frame Transformation
How to Create
A rustic wooden frame transformation converts a plain frameless bathroom mirror into a warm and textured focal point using natural wood materials. This before and after idea is widely used in Pinterest inspiration because it introduces depth, character, and handcrafted decoration without requiring complete mirror replacement. Rustic framing works especially well in bathrooms that feature neutral tones, farmhouse-inspired interiors, or natural textures. The contrast between the original plain mirror and the finished framed version creates a dramatic visual improvement while maintaining practicality. Wood tones such as walnut, oak, or weathered finishes enhance the aesthetic by softening sterile bathroom surfaces. The framed appearance also creates visual structure around the mirror, helping define the vanity area more clearly. This type of makeover remains beginner friendly because the project focuses mainly on measuring, cutting, and securing trim pieces around the existing mirror. The final appearance looks custom built while remaining accessible as an easy project for budget-conscious homeowners seeking modern rustic inspiration.
Begin the setup method by measuring all mirror edges carefully to determine the required wood trim lengths. Sand the wood pieces to create smooth edges and apply stain or paint before installation. Allow finishes to dry completely to prevent moisture damage inside the bathroom environment. Attach the wooden frame using strong construction adhesive or mounting brackets depending on mirror size and wall condition. Ensure all corners align evenly for a clean professional appearance. Seal exposed wood with waterproof protection to improve durability in humid conditions. After installation, clean the mirror surface thoroughly to remove fingerprints or dust residue. Decorative additions such as matte black hardware or subtle wall sconces can complement the rustic frame without overcrowding the space. This DIY tutorial creates a strong before and after transformation using simple materials and straightforward planning while adding warmth and visual balance to the bathroom.
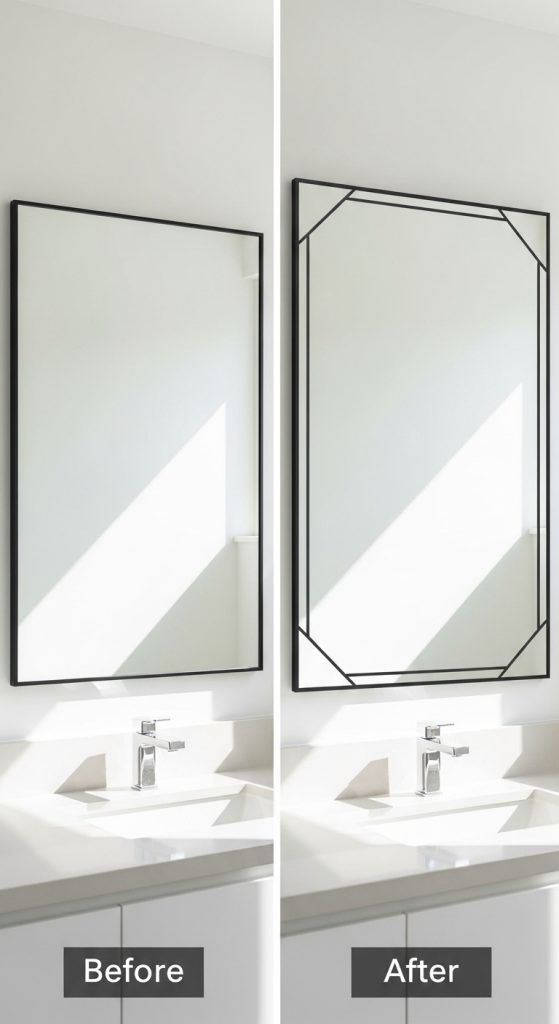
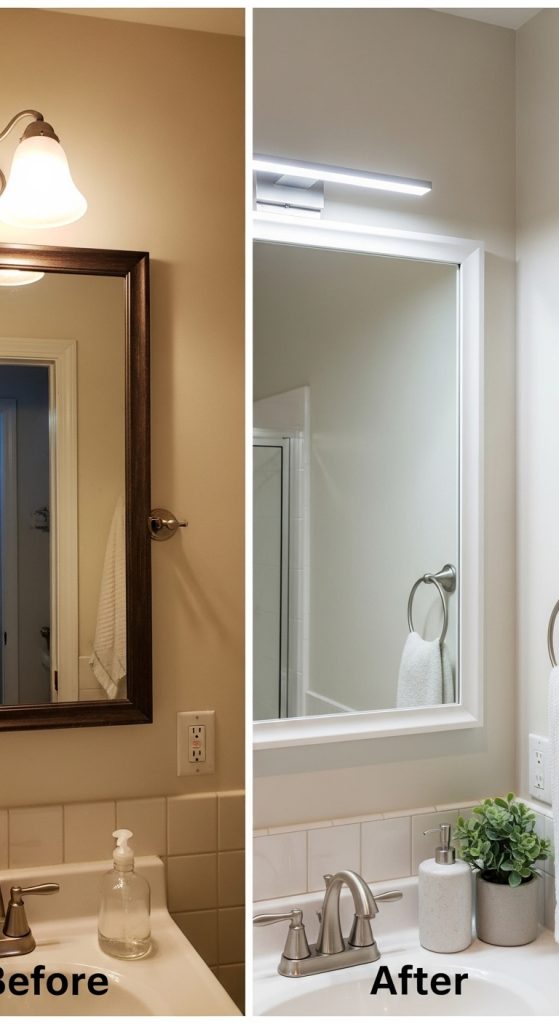
Idea 2: Minimalist Black Border Upgrade
How to Create
A minimalist black border upgrade creates a sharp and modern bathroom mirror transformation using clean geometric framing techniques. This idea focuses on adding slim black borders around an existing mirror to produce a sleek architectural appearance commonly seen in contemporary home decor inspiration. The before and after contrast becomes highly noticeable because the original frameless mirror often lacks definition against surrounding walls. Black framing introduces contrast and structure while complementing modern design styles that emphasize simplicity and organization. This aesthetic works especially well in white or neutral bathrooms where darker accents create visual depth without overwhelming the room. The streamlined appearance also supports minimalist style trends that prioritize clean edges and uncluttered decoration. This project remains practical because it does not require removing the original mirror, making it an accessible creative project for beginners interested in modern bathroom upgrades.
Start the step by step process by measuring the mirror perimeter accurately and selecting slim metal or painted wood trim in matte black finishes. Prepare the frame components by sanding and painting if necessary. Use painter’s tape around the mirror area to maintain clean installation lines. Secure the border pieces carefully using mirror-safe adhesive or lightweight mounting hardware. Check alignment continuously with a level to ensure symmetrical spacing around all edges. Once attached, allow the adhesive to cure fully before cleaning the mirror surface. Pairing the black border with matching cabinet handles or light fixtures helps unify the room design while maintaining visual consistency. This easy project creates a polished before and after effect using affordable materials and simple installation methods while significantly improving bathroom aesthetics.
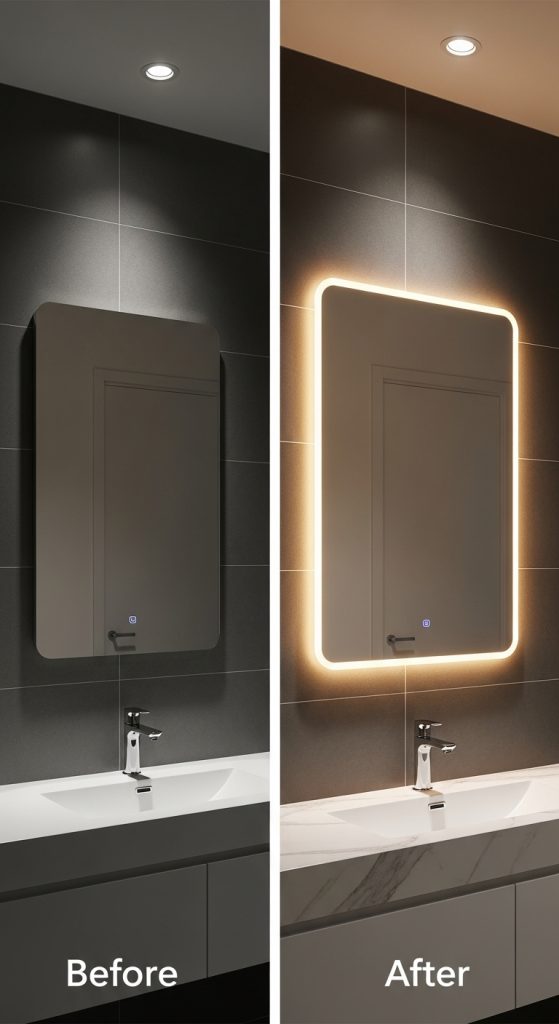
Idea 3: LED Backlit Mirror Makeover
How to Create
An LED backlit mirror makeover transforms a standard bathroom mirror into a modern illuminated centerpiece that improves both functionality and ambiance. This idea has become highly popular among trending ideas because lighting dramatically changes how bathrooms appear and function. Backlit mirrors create soft illumination around the mirror edges, reducing harsh shadows and improving visibility during grooming routines. The before and after transformation feels sophisticated and modern because the mirror gains depth and a floating visual effect. This design also enhances smaller bathrooms by increasing perceived brightness and openness. LED lighting works especially well in minimalist style interiors where hidden lighting features contribute to clean visual presentation. The combination of practical illumination and decorative impact makes this makeover highly suitable for Pinterest inspiration boards focused on modern design and aesthetic upgrades.
To create this setup, begin by selecting waterproof LED strip lighting suitable for bathroom use. Measure the mirror perimeter and attach LED strips evenly behind the mirror edges using adhesive backing or mounting clips. Ensure electrical connections remain protected from moisture exposure. Some installations may require spacing the mirror slightly away from the wall using mounting brackets to allow light diffusion behind the glass. Test lighting placement before securing all components permanently. Warm white lighting creates softer ambiance, while cool white tones provide brighter task lighting. Organize cords and power supplies carefully for a clean finished appearance. Once installed, the illuminated mirror creates a dramatic before and after result that improves both functionality and decoration. This DIY tutorial combines modern lighting techniques with practical bathroom enhancement while remaining achievable for beginners with careful planning.
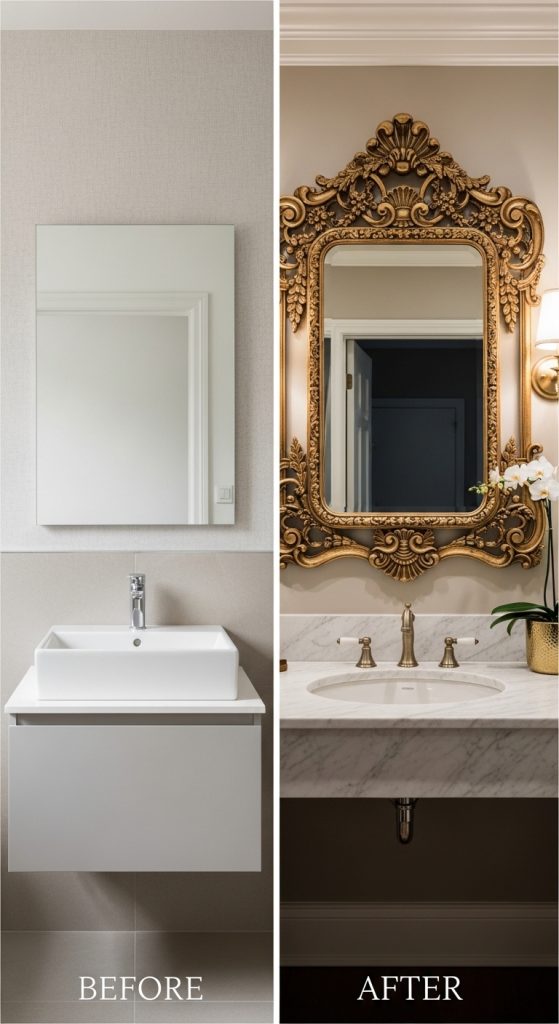
Idea 4: Vintage Gold Frame Revival
How to Create
A vintage gold frame revival introduces decorative elegance into a bathroom by transforming a plain mirror into a statement piece inspired by classic interior design. This before and after idea focuses on adding ornate gold framing or decorative molding to create richness and visual detail. Gold accents reflect light effectively, making bathrooms feel brighter and more refined without requiring extensive remodeling. This style works especially well in bathrooms with marble textures, neutral palettes, or soft decorative finishes. The transformation adds warmth and luxury while maintaining practical mirror functionality. Vintage-inspired framing also blends well with modern home decor when balanced carefully with simple accessories and organized layouts. This creative project remains accessible because it can often be completed using lightweight molding materials and metallic finishes rather than expensive antique pieces.
Begin the execution process by selecting decorative molding with subtle carved patterns or curved edges. Measure and cut each section carefully for accurate corner alignment. Apply gold paint or metallic finish evenly and allow adequate drying time before installation. Attach the frame around the mirror using strong adhesive designed for bathroom environments. Check all corners carefully to maintain balanced symmetry and prevent gaps. Once secured, clean the surrounding area and add complementary decorative elements such as soft lighting or neutral wall colors. The gold frame immediately changes the visual tone of the bathroom, creating a refined before and after transformation with minimal structural work. This beginner friendly DIY project combines aesthetic decoration with functional improvement while adding timeless visual character to the space.
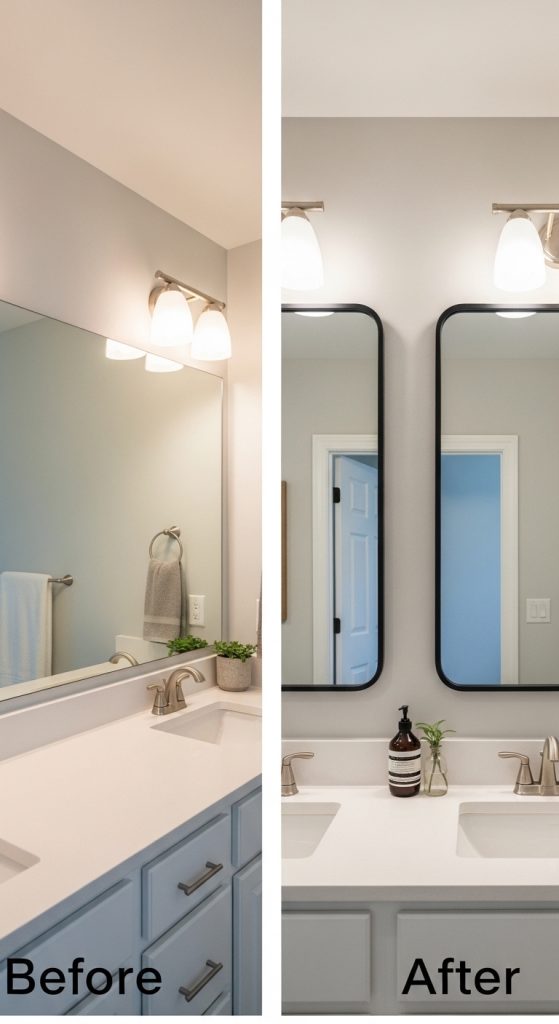
Idea 5: Double Mirror Vanity Conversion
How to Create
A double mirror vanity conversion replaces one large mirror with two smaller framed mirrors to create a more balanced and organized bathroom layout. This idea is especially useful for shared bathrooms where dual sink arrangements benefit from separate visual zones. The before and after difference becomes significant because the room gains symmetry, structure, and decorative depth. Individual mirrors also create opportunities for customized framing styles and lighting arrangements. This setup aligns with modern design trends that emphasize organized layouts and defined functional areas. Smaller mirrors often appear more intentional and decorative than oversized builder-grade mirrors, making the bathroom feel professionally styled while maintaining practical usability.
Start the setup method by removing the original large mirror carefully to avoid wall damage. Repair and repaint the wall surface if necessary before installing new mirrors. Measure sink placement accurately to ensure symmetrical alignment between both mirrors. Choose matching frames that complement the bathroom’s existing color palette and decoration style. Secure mirrors using wall anchors and mounting brackets designed for bathroom conditions. Add individual wall lights above each mirror to improve lighting balance and visual separation. The completed arrangement creates a strong before and after effect by making the bathroom appear more spacious, organized, and refined. This DIY tutorial offers both aesthetic and practical improvement while remaining achievable with careful planning and standard materials.
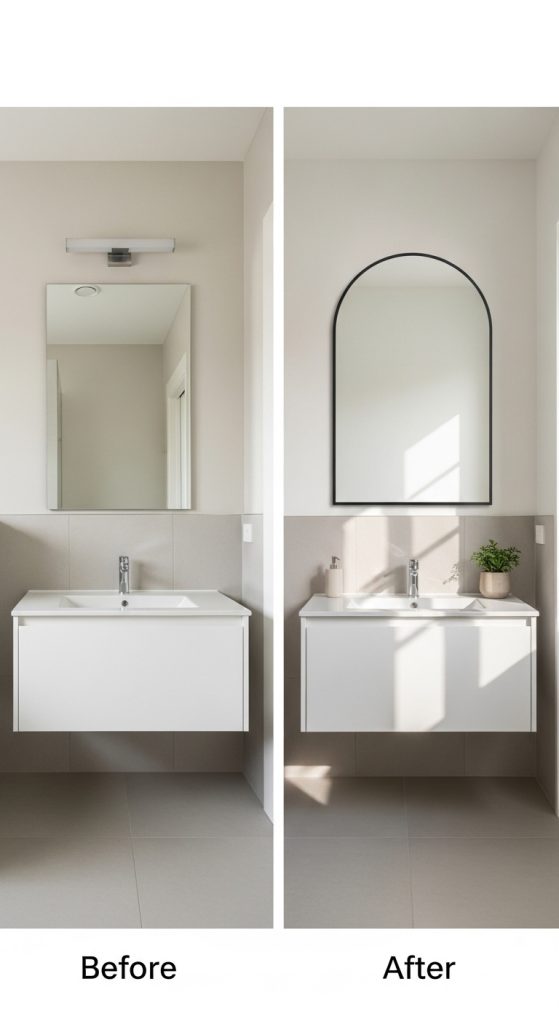
Idea 6: Arched Mirror Modernization
How to Create
An arched mirror modernization replaces sharp rectangular shapes with softer curved lines that create a more elegant and contemporary bathroom atmosphere. Arched mirrors have become increasingly popular in Pinterest ideas because they soften rigid bathroom layouts while introducing architectural interest. The before and after transformation appears dramatic because curved mirror tops immediately change the visual rhythm of the room. This design works particularly well in minimalist style interiors where simple forms and balanced proportions remain central to the aesthetic. Arched mirrors also help bathrooms feel taller by drawing attention upward and creating a more open visual flow.
To create this transformation, select an arched mirror that fits proportionally above the vanity area. Remove the previous mirror carefully and patch any visible wall damage. Position the new mirror using accurate measurements to maintain centered alignment. Secure mounting hardware firmly due to the mirror’s curved weight distribution. Pair the mirror with subtle wall lighting and clean countertop organization to maintain modern balance. Neutral wall colors and minimal decoration help emphasize the mirror shape without visual clutter. This easy project creates a refined before and after appearance while introducing softer geometry and contemporary style into the bathroom environment.
Idea 7: Floating Shelf Mirror Combination
How to Create
A floating shelf mirror combination adds both organization and decoration by integrating shelving directly beneath or beside the bathroom mirror. This idea improves functionality while enhancing visual presentation through layered styling opportunities. The before and after transformation is effective because the mirror area becomes more structured and practical instead of appearing empty or disconnected. Floating shelves allow storage for towels, containers, candles, or small decorative elements while maintaining open visual space. This design aligns with Pinterest inspiration focused on organization and aesthetic home decor improvements. It also supports small bathroom layouts where vertical storage becomes important.
Begin the step by step guide by measuring available wall space around the mirror. Install floating shelves securely using anchors appropriate for bathroom walls. Position shelves evenly to maintain visual symmetry and accessibility. Choose shelf materials that complement mirror framing and bathroom finishes. Once installed, organize decorative and practical items carefully to avoid overcrowding. Keep styling balanced using neutral colors and minimal decorative accents. The combination of storage and mirror enhancement creates a functional before and after makeover suitable for both modern and rustic bathrooms. This beginner friendly creative project improves organization while contributing to a cleaner and more polished bathroom atmosphere.

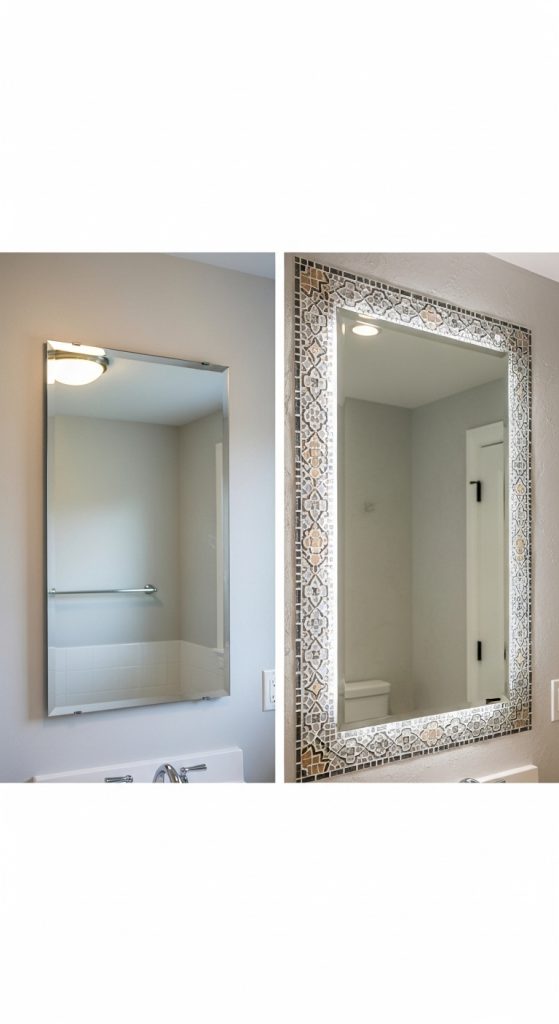
Idea 8: Mosaic Tile Border Accent
How to Create
A mosaic tile border accent upgrades a simple bathroom mirror using decorative tile framing that introduces texture, pattern, and color variation. This before and after idea works well for bathrooms needing visual interest without extensive renovation. Mosaic borders reflect light differently throughout the day, creating subtle movement and decorative depth around the mirror surface. Tile accents can support modern design, coastal decoration, or geometric aesthetics depending on color selection and layout style. This project also allows strong personalization because tile combinations can be customized according to bathroom themes and existing finishes.
To execute this DIY tutorial, begin by selecting moisture-resistant mosaic tiles suitable for bathroom use. Measure mirror edges carefully and plan the border layout before attaching tiles. Apply tile adhesive evenly around the mirror perimeter and press each section into place carefully. Use spacers if necessary to maintain consistent alignment. Once adhesive cures, apply grout and clean excess residue immediately for a polished finish. Seal grout lines to improve moisture resistance and long-term durability. The decorative border transforms an ordinary mirror into a customized focal point with noticeable before and after impact. This project combines creative ideas with practical decoration techniques while remaining accessible for beginners willing to follow careful planning steps.
Idea 9: Frameless Mirror to Cabinet Mirror Upgrade
How to Create
A frameless mirror to cabinet mirror upgrade improves both storage capacity and bathroom organization while modernizing the overall appearance. Many older bathrooms feature plain wall-mounted mirrors without hidden storage, resulting in cluttered countertops and limited functionality. Replacing the mirror with a mirrored cabinet creates a cleaner and more efficient layout while maintaining reflective benefits. The before and after difference becomes especially noticeable in small bathrooms where concealed storage improves visual organization. This makeover aligns with Pinterest ideas focused on practical home decor and space-saving solutions.
Begin the installation process by removing the original mirror carefully and checking wall support conditions. Measure the available wall cavity or mounting area accurately before selecting cabinet dimensions. Secure the mirrored cabinet firmly using appropriate anchors and hardware. Ensure doors align evenly and open smoothly without obstruction. Organize bathroom essentials inside the cabinet using small containers or dividers to maintain order. Exterior styling should remain simple to support minimalist style and clean visual presentation. The completed transformation improves both storage and aesthetic balance, making the bathroom appear larger, more organized, and professionally designed. This beginner friendly project delivers strong practical value while enhancing modern bathroom functionality.

Idea 10: Painted Frame Color Refresh
How to Create
A painted frame color refresh updates an outdated bathroom mirror by introducing new color finishes that align with current home decor trends. This idea is one of the simplest and most budget friendly mirror makeovers because it focuses on surface transformation rather than structural replacement. The before and after contrast can be dramatic when dark, faded, or worn frames receive modern neutral tones such as matte black, white, beige, or muted green. Fresh paint immediately improves visual cleanliness while allowing the mirror to coordinate with updated bathroom decoration and accessories.
Start the setup method by removing the mirror frame if possible or protecting surrounding areas with painter’s tape. Sand the existing surface lightly to improve paint adhesion and remove imperfections. Apply primer evenly before adding multiple thin paint coats for a smooth finish. Allow sufficient drying time between layers to prevent uneven texture. Once dry, reinstall or uncover the frame and clean all surfaces carefully. Matching painted accents such as shelves or towel hooks can strengthen visual consistency throughout the bathroom. This easy project requires minimal materials and basic tools while producing a highly noticeable before and after transformation suitable for beginners seeking affordable aesthetic improvement.
Common Beginner Mistakes and How to Avoid Them
Many bathroom mirror makeover projects fail due to poor preparation and inaccurate measurements. One common mistake involves selecting frame sizes or decorative additions without checking wall spacing or vanity proportions. Uneven alignment can make the finished project appear unbalanced and reduce visual quality. Another issue occurs when unsuitable adhesives or materials are used in humid bathroom environments, leading to warping or detachment over time. Beginners also often overlook lighting conditions when choosing frame colors or mirror placement. Dark finishes in poorly lit bathrooms may reduce brightness instead of improving aesthetics. To avoid these problems, measure carefully before purchasing materials and always use moisture-resistant products designed for bathroom use. Proper planning and organized installation significantly improve final results.
Practical Tips for Better Results
Consistent design planning creates stronger bathroom mirror transformations. Select mirror styles and frame finishes that complement existing bathroom colors, hardware, and flooring to maintain visual harmony. Test paint colors and lighting effects before final installation to ensure the desired aesthetic outcome. Use levels and measuring tools throughout the installation process to maintain balanced alignment. Waterproof sealants improve durability and help protect decorative materials from moisture damage. Regular cleaning also preserves reflective clarity and frame appearance over time. Combining organization with decoration creates bathrooms that feel both functional and visually polished while maintaining long-term usability.
Styling, Presentation, or Organization Ideas
Bathroom mirror styling works best when decorative elements remain balanced and uncluttered. Matching mirror frames with hardware finishes creates visual consistency across the room. Floating shelves, neutral storage containers, and subtle lighting additions can enhance the mirror area without overwhelming the design. Minimalist style arrangements often use clean lines and limited color palettes to maintain calm visual flow. Layered textures such as wood, metal, or tile accents introduce depth while supporting overall decoration themes. Organized countertops also help mirrors reflect a cleaner and brighter environment, improving the overall aesthetic presentation of the bathroom.
Budget or Time Planning
Bathroom mirror makeovers can range from simple weekend DIY projects to more detailed renovation-style upgrades depending on the chosen design. Painted frame refreshes and minimalist borders usually require fewer materials and less installation time, making them suitable for quick budget ideas. Larger projects such as cabinet mirrors or LED lighting systems require additional planning and electrical considerations. Creating a materials checklist before starting helps reduce unnecessary expenses and delays. Reusing existing mirrors whenever possible also lowers overall project costs while still achieving strong before and after transformations. Efficient planning keeps the process organized and manageable for beginners.
Creative Expansion and Advanced Inspiration
Bathroom mirror projects can expand into larger decorative upgrades by incorporating wall paneling, layered lighting systems, or integrated storage solutions. Combining mirrors with textured tiles, floating vanities, or smart lighting controls creates more advanced modern design concepts. Geometric mirror arrangements and oversized statement mirrors can also introduce dramatic visual impact in larger bathrooms. Additional decorative features such as hidden storage compartments, anti-fog systems, or mixed material frames provide opportunities for more customized creative ideas. These advanced variations build upon simple DIY foundations while allowing homeowners to create highly personalized and visually refined bathroom spaces.