10 Bathroom Grey And White Ideas
Designing a bathroom around a grey and white color scheme provides a timeless foundation that balances modern aesthetic appeal with practical functionality. Incorporating grey and white elements into residential spaces allows homeowners to create bright, clean environments that feel visually expansive and structurally balanced. In this comprehensive guide, readers will explore ten distinct layout concepts, material combinations, and spatial strategies specifically tailored for modern grey and white bathroom makeovers. You will learn how to select ideal tile formats, layer light and dark tonal values, organize storage fixtures, and integrate contrasting textures without sacrificing visual warmth. Mastering these interior decoration techniques helps convert basic sanitary spaces into sophisticated domestic retreats that retain high long-term value. Whether you are planning a complete residential renovation or seeking subtle home decor upgrades, these practical step by step ideas provide clear inspiration for every architectural layout.
Why Grey and White Bathrooms Are Trending and Useful
Neutral tone interiors, particularly grey and white palettes, remain exceptionally popular across modern Pinterest inspiration boards because they offer unmatched versatility and design longevity. From a practical standpoint, white surfaces reflect light efficiently, making compact powder rooms and master bathrooms appear noticeably larger and brighter. Grey tones introduce structural depth, grounding light surfaces and preventing pristine white fixtures from feeling overly clinical or sterile. This balanced color combination provides incredible DIY appeal and beginner friendly accessibility, as neutral materials align seamlessly across various architectural styles ranging from industrial modern to classic farmhouse. Renovating with grey and white materials also protects your long-term property investment, as neutral finishes adapt easily to changing seasonal accessories without requiring expensive structural overhauls. By pairing durable stone, ceramic, and metal finishes, homeowners can create an aesthetic environment that prioritizes everyday cleanliness and spatial order.
Materials, Tools, and Pre-Renovation Planning
Executing a successful bathroom design project requires deliberate planning, accurate spatial measurements, and proper material selection prior to installation. Essential building materials and decorative surfaces include ceramic subway tiles, marble floor slabs, grey porcelain tiles, moisture-resistant wall paints, brushed metal hardware, and sealed quartz countertops. Necessary installation tools comprise notched trowels, tile spacers, continuous spirit levels, silicon caulking guns, grout floats, measuring tapes, and heavy-duty utility blades. Before purchasing surfaces or demolishing existing fixtures, thoroughly inspect underlying plumbing lines and measure total floor and wall dimensions. Draft a clear layout plan that establishes functional zoning for wet shower areas, vanity storage, and clearance paths around doors. Selecting moisture-resistant wall paint finishes and waterproof grout formulations ensures your creative project maintains its structural integrity against daily humidity, steam, and heavy water exposure.
Ten Practical Design Concepts for Grey and White Bathrooms
Idea 1: Classic Carrara Marble and Bright White Vanity Layout
Execution Process
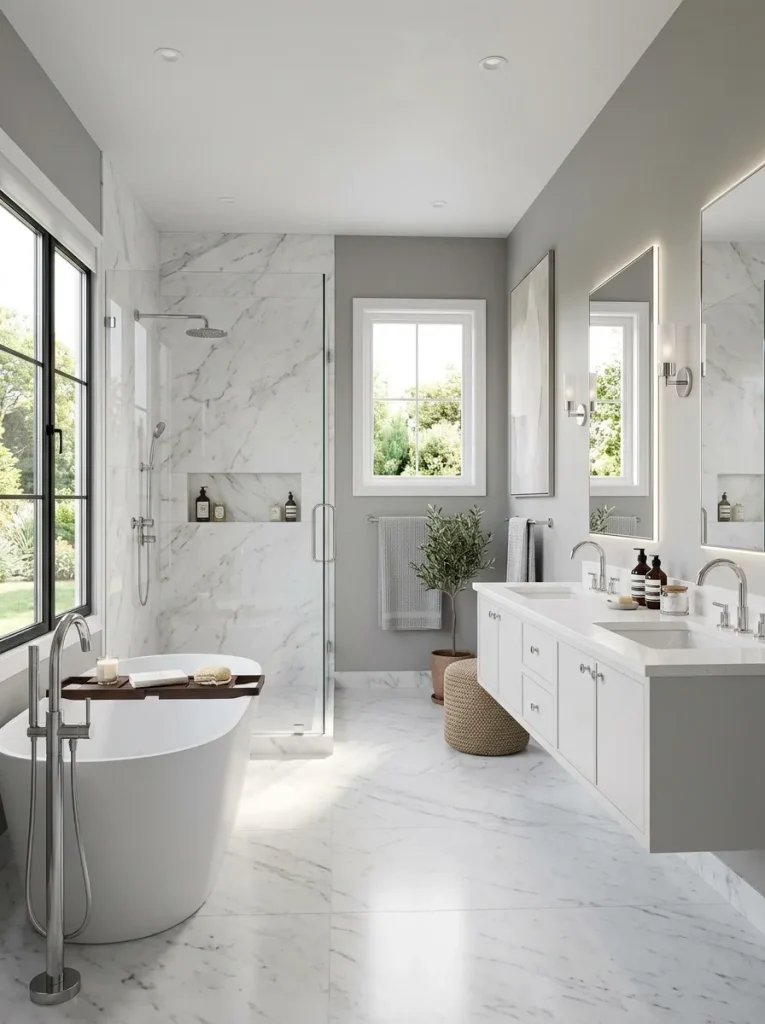
The Carrara marble and white vanity layout centers on timeless elegance, utilizing natural grey veining within white stone surfaces to establish refined visual texture. This concept relies on installing large-format Carrara marble tiles across primary shower walls while pairing them with a crisp, matte white floating vanity unit. The soft grey veins running through the marble naturally bridge the gap between white ceramic fixtures and deeper accent features. Using a soft dove grey wall paint around non-tiled areas softens overall illumination while keeping the space feeling open, bright, and luxurious. Polished chrome or brushed nickel faucets, towel bars, and cabinet hardware complete the design, reflecting surrounding ambient light throughout the room. This layout suits both spacious master bathrooms and compact guest ensuites, providing a sophisticated backdrop that remains continuously stylish.
To create this marble-inspired bathroom setup, begin by installing waterproof cement backer boards across all shower walls and vanity splash zones. Lay white Carrara marble tiles, using plastic tile spacers to ensure uniform one-eighth-inch grout lines across horizontal and vertical seams. Apply a light grey unsanded grout between the marble tiles to subtly highlight the natural stone pattern without creating harsh grid contrast. Secure a pre-assembled matte white wooden vanity against the main wall, topping it with a seamless white quartz countertop and an under-mount sink basin. Paint remaining drywall surfaces using a specialized satin-finish interior paint mixed in a pale dove grey tone. Install a frameless glass shower door and mount brushed metal hardware accessories securely into wall studs to complete the installation.
Idea 2: Modern Charcoal Hexagon Floor with White Subway Tile Walls
Step-by-Step Guide
Combining dark charcoal hexagon floor tiles with classic white vertical subway wall tiles establishes a striking geometric contrast that anchors the room visually. This modern design approach utilizes high-contrast tonal shifts to separate vertical wall surfaces from horizontal floor planes, creating an illusion of increased ceiling height. The dark grey hexagon tile base conceals daily floor dust while providing a secure, slip-resistant foundation when paired with dark grey grout lines. Glossy white subway tiles stacked vertically along shower enclosure walls bounce natural window light deeper into dark corners, keeping the space energizing and airy. Matte black or gunmetal grey fixture trims enhance the contemporary line work, framing mirror edges and shower glass panels cleanly. This beginner friendly concept transforms standard tile shapes into an architectural feature that elevates basic residential layouts effortlessly.
Start by preparing a level, clean subfloor using a self-leveling underlayment compound, followed by laying a waterproof uncoupling membrane across the entire floor. Position dark charcoal porcelain hexagon tiles starting from the room center, working outward toward perimeter walls using appropriate flexible thin-set mortar. Fill floor joints with a dark charcoal stain-resistant epoxy grout, wiping tile surfaces clean with a damp sponge before drying. Next, mark vertical plumb lines on shower walls and install three-by-six-inch glossy white ceramic subway tiles in a straight stacked pattern. Apply a bright white sanded grout between vertical wall tiles to maintain a pristine, seamless appearance across upper wall sections. Mount a simple rectangular mirror with a thin matte black frame above the sink area to reinforce the crisp geometric aesthetic.

Idea 3: Minimalist Light Grey Microcement Wall and White Porcelain Setup
How to Create
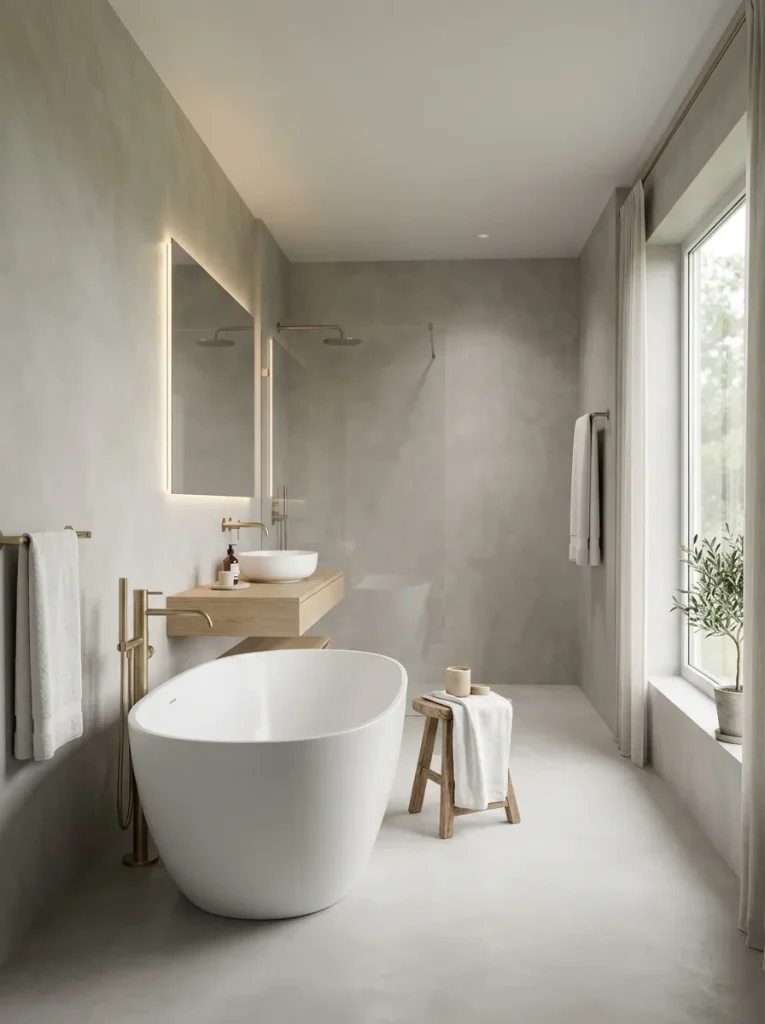
The minimalist light grey microcement design focuses on seamless, tactile surfaces that eliminate visual clutter associated with standard grout lines and tile grids. By applying a continuous layer of smooth, light grey microcement across main wall sections, the space achieves a sleek, spa-like aesthetic that feels open and uncluttered. Crisp white porcelain fixtures—such as a freestanding oval soaking tub, a vessel sink basin, and a low-profile toilet—stand out sharply against the soft grey textured background. This approach emphasizes clean architectural geometry, subtle lighting shadows, and streamlined organization, making it ideal for urban apartments and modern minimalist homes. The absence of tile joints makes daily maintenance exceptionally easy while establishing a tranquil, meditative environment dedicated to relaxation.
Execute this minimalist design by patching, sanding, and priming all drywall and cement surfaces to create an entirely smooth, debris-free base layer. Apply a specialist two-part light grey microcement coating across primary wall areas using a flexible stainless steel trowel in thin, sweeping motions. Once the initial coat cures, sand the surface gently with fine-grit sandpaper before applying a protective, waterproof matte polyurethane sealant layer. Install white porcelain floor tiles across the ground surface, utilizing white grout to preserve a clean, continuous horizontal plane. Position a freestanding white porcelain bathtub along the main featured microcement wall, anchoring floor-mounted chrome fill valves beside the tub rim. Complete the space with an illuminated LED mirror mounted flush against the grey wall, providing soft halo lighting across textured plaster surfaces.
Idea 4: Industrial Concrete Effect Tiles with Floating White Storage
Setup Method
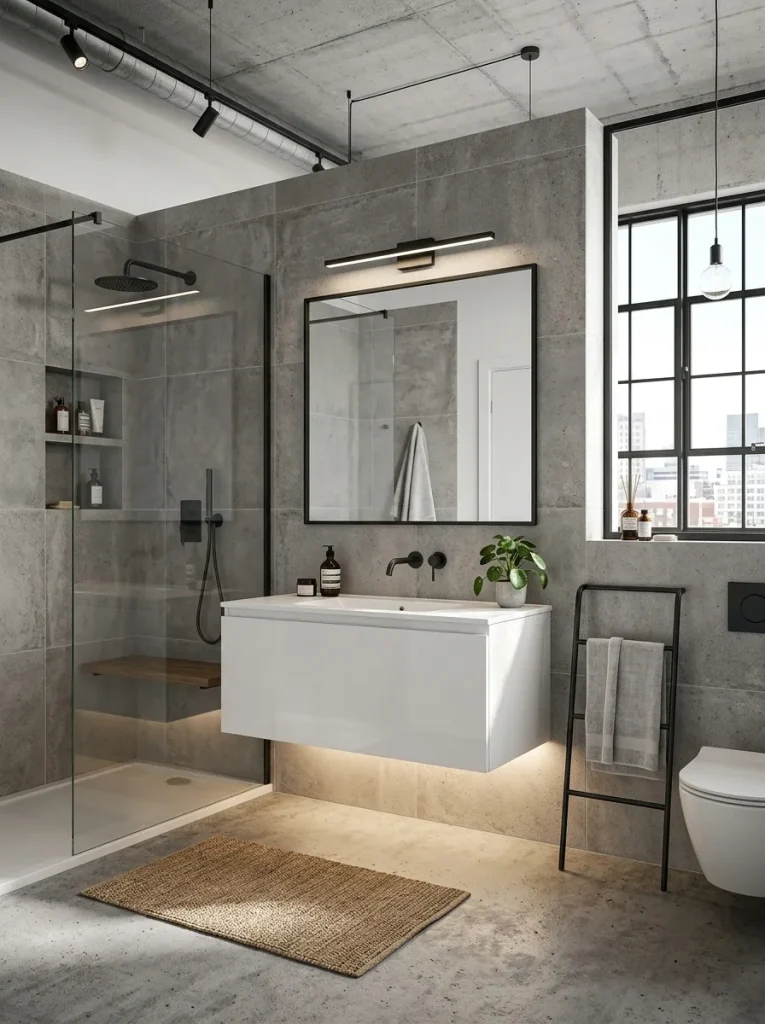
Industrial concrete effect styling blends raw, urban textural elements with refined modern storage solutions to achieve a balanced contemporary aesthetic. This concept utilizes medium-grey porcelain tiles manufactured with realistic concrete grain, weathering, and color variation across floor and wall accent zones. To balance the heavy industrial look of concrete textures, floating white storage cabinets with handleless push-latch doors are suspended along primary wall sections. The open floor space beneath floating furniture maintains visual airiness while allowing light to reflect off light grey tile surfaces. Integrated under-cabinet LED lighting casting a warm downward glow further softens raw concrete textures, transforming an industrial layout into an inviting, high-end residential space. This durable design is exceptionally resistant to wear, moisture, and staining over long usage periods.
Begin by fixing cement backer boards onto selected feature walls and floor areas to support heavy porcelain tiles. Lay large-format concrete-effect porcelain tiles using a staggered brick-bond layout, maintaining consistent one-sixteenth-inch joints between tile edges. Apply a neutral medium-grey grout that matches the primary tone of the concrete tile pattern to create a unified surface appearance. Mount heavy-duty steel wall brackets into wall studs, securing a glossy white floating vanity unit two feet above finished floor level. Connect plumbing lines beneath the floating cabinet, concealing pipework completely within internal drawer cutouts for a clutter-free look. Install warm-white LED strip channels along the underside of the floating vanity to project subtle accent lighting down onto the grey floor tiles below.
Idea 5: Traditional White Beadboard Wainscoting with Slate Grey Upper Walls
Construction Steps
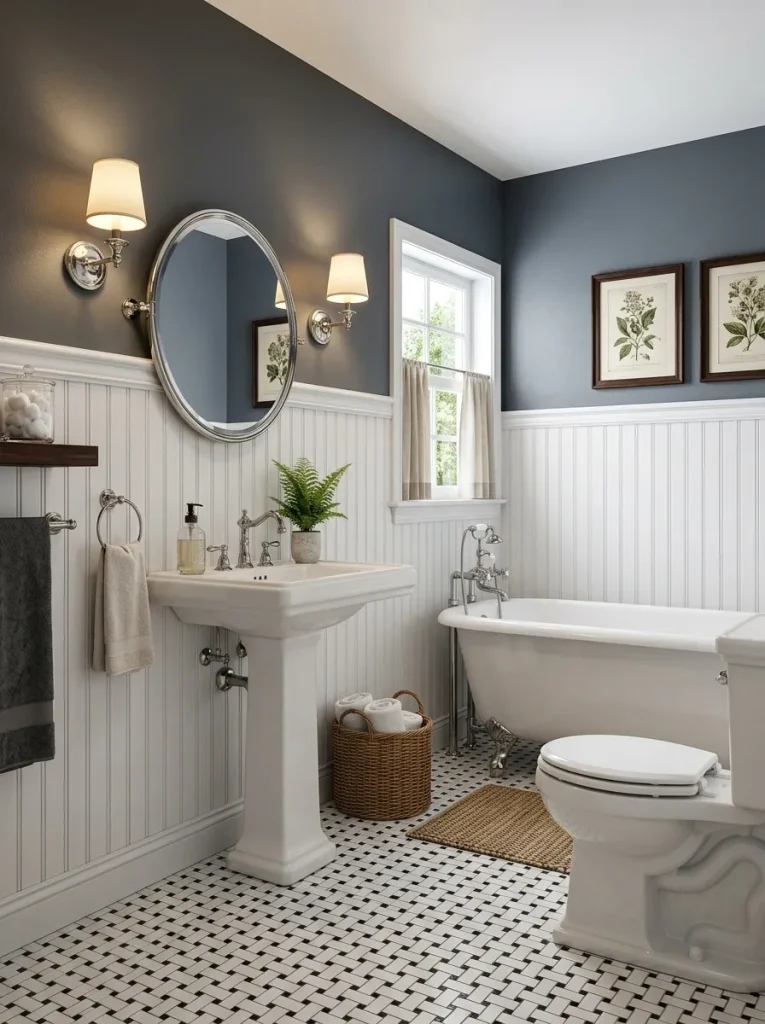
Combining classic white beadboard wainscoting with deep slate grey upper walls introduces historic charm, architectural depth, and crisp horizontal structure to home interiors. This traditional design divides vertical wall height into two distinct functional zones, using durable painted wood or PVC panelling across lower wall areas prone to water splashes. The bright white lower wainscoting reflects light around lower furniture areas, while deep slate grey paint on upper wall sections creates a dramatic, cozy backdrop for vanity mirrors and wall sconces. This classic aesthetic works exceptionally well in historic homes, farmhouse layouts, or cottage-style powder rooms seeking character upgrades. Paired with traditional white pedestal sinks, hex floor tiles, and polished chrome hardware, this concept delivers high visual impact using budget friendly materials.
To construct this traditional wall layout, measure four feet upward from the finished floor and snap a level horizontal chalk line along all perimeter walls. Secure moisture-resistant white PVC or painted MDF beadboard panels below the chalk line using panel adhesive and stainless steel finish nails. Cap the upper edge of the beadboard with a molded white chair rail trim, sealing all top joints and nail holes with waterproof acrylic painter caulking. Paint the upper drywall section above the chair rail in a rich, matte slate grey shade using a high-durability kitchen and bath paint formula. Lay a classic white and black porcelain basketweave tile floor, filling joints with light grey grout. Install a traditional white ceramic pedestal sink along the main wall, completing the space with a round chrome-framed pivot mirror.
Idea 6: Contemporary Grey Accent Wall with Frameless White Glass Enclosure
Execution Process
The contemporary grey accent wall design uses selective color placement to create a striking focal point within an otherwise light, white-dominated bathroom layout. By tiling or painting only the main rear shower wall in a rich, dark slate or graphite grey, the eye is drawn deep into the room, enhancing spatial depth perception. The remaining three walls are finished in clean, bright white ceramic tiles or moisture-resistant paint, keeping the overall room environment cheerful and well-lit. A frameless glass shower enclosure eliminates visual barriers, allowing the dark grey accent wall to remain fully visible from any vantage point in the room. This concept balances light and dark tones perfectly, offering a high-contrast aesthetic that feels spacious, modern, and carefully planned.
Construct this accent wall layout by selecting the rear shower wall as the main design focal point for dark tile application. Install twelve-by-twenty-four-inch graphite grey porcelain tiles horizontally across the target rear wall, aligning seams precisely using levelling clips. Apply dark grey grout between graphite tile joints, wiping clean to form a uniform, seamless dark backdrop. Tile adjacent side shower walls with large-format bright white ceramic tiles, using bright white grout to construct a stark visual contrast at inner wall corners. Install a custom frameless clear glass shower panel, securing it to floor and wall joints with minimal stainless steel or matte black mounting clamps. Mount a polished chrome rain showerhead fixture directly against the dark grey accent wall to complete the modern shower space.
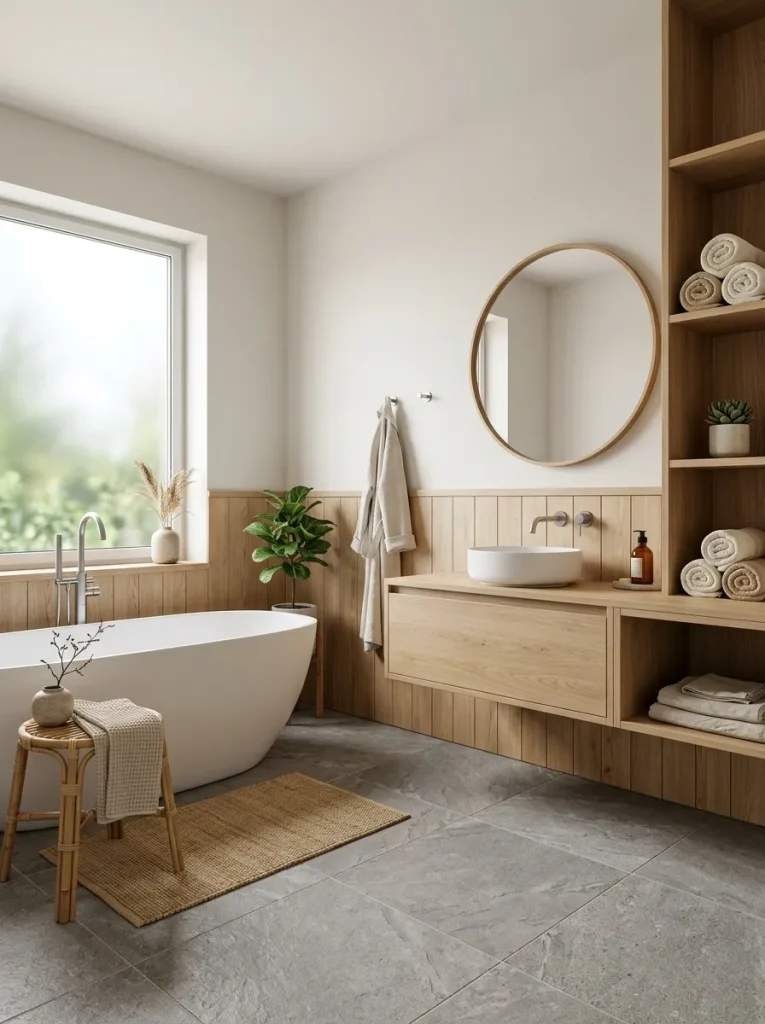
Idea 7: Japandi Wood and Grey Stone Balance with White Sanitaryware
How to Make
The Japandi design philosophy merges Japanese minimalism with Scandinavian warmth, utilizing light grey stone textures, warm wood tones, and crisp white porcelain fixtures. In this balanced bathroom concept, mid-tone grey matte stone tiles line the floor and lower shower zones, offering a quiet, organic foundation. Natural light-oak wood finishes are introduced through open shelving or vanity legs, introducing essential organic warmth that softens neutral grey and white surfaces. Smooth white ceramic basins, minimalist white tub designs, and simple wall-hung toilets maintain clean functional silhouettes without overwhelming the senses. This design style prioritizes natural light, clutter-free counter spaces, and tactile material harmony, making it ideal for homeowners seeking a peaceful, restorative home environment.
Execute the Japandi layout by laying mid-grey matte stone porcelain tiles across floor surfaces, extending the same tiling three feet up main walls to establish a protective wainscot line. Grout the stone tiles using a matching grey flexible grout compound to achieve a calm, unbroken floor plane. Paint upper wall surfaces in an off-white or soft alabaster paint finish to complement the cool tones of the grey stone base. Position a light oak wooden vanity unit against the main wall, mounting a vessel-style round white ceramic sink basin on top of a water-sealed quartz surface. Install simple wall-mounted matte white or brushed nickel faucet hardware directly above the sink basin. Place open oak wooden wall shelves stocked with neatly rolled white cotton towels and small potted greenery to finish the natural look.
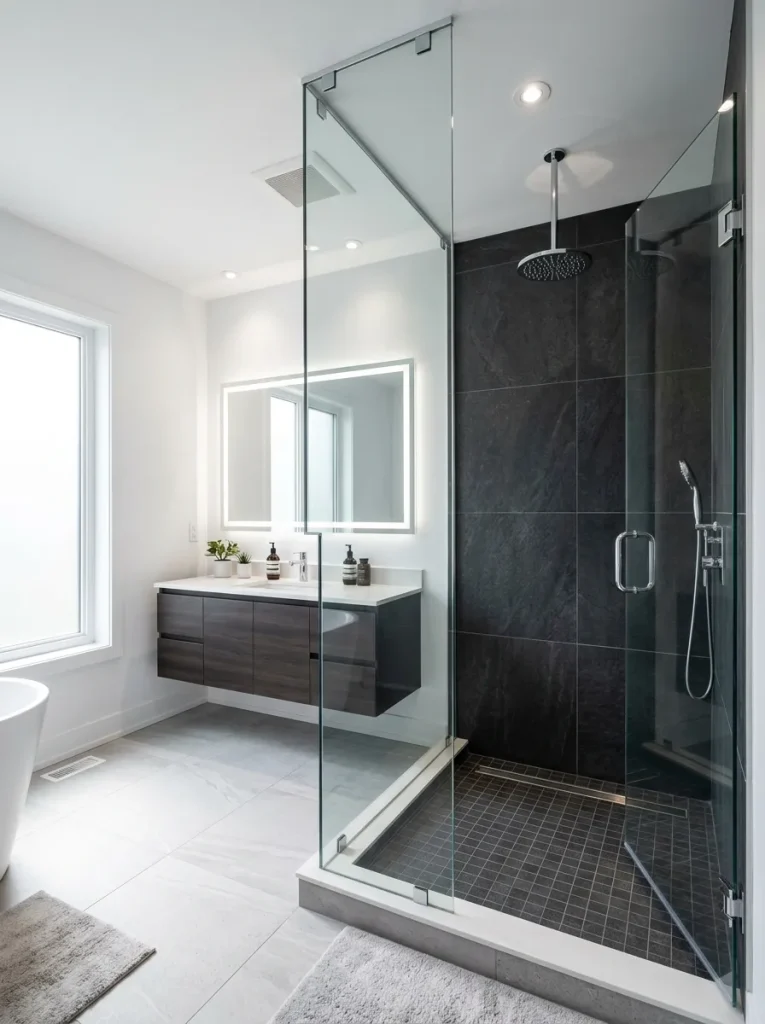
Idea 8: Monochromatic Light Grey Herringbone Pattern Feature
Step-by-Step Guide
The monochromatic herringbone layout utilizes classic pattern geometry rather than bold color changes to generate subtle, sophisticated design interest. By laying uniform light grey rectangular subway tiles in a forty-five-degree herringbone pattern, walls gain dynamic visual texture while maintaining a calm, monochromatic color palette. Glossy light grey tiles catch light at varying angles across the zigzag pattern, creating subtle highlights and shadows that shift throughout the day. Surrounding floor surfaces and vanity areas are kept simple in crisp white finishes to allow the herringbone feature wall to remain the primary visual highlight. This technique works exceptionally well behind vanity sinks or inside shower niches, introducing high-end custom craftsmanship to standard residential layouts.
To assemble a herringbone feature wall, draw a true vertical centerline on your target wall using a laser level or plumb line to guide tile alignment. Cut light grey three-by-twelve-inch ceramic subway tiles at forty-five-degree angles, placing the first center point tile precisely along the vertical guide line. Continue laying tiles outward in an interlocking zigzag sequence, utilizing two-millimeter tile spacers to maintain precise spacing along diagonal seams. Fill tile joints with a crisp white unsanded grout to highlight the intricate geometric zigzag pattern clearly across the wall section. Install bright white floor tiles with matching white grout across the remaining floor area to preserve visual balance. Mount a simple round LED-backlit mirror centered over the herringbone tile design to highlight tile texture with soft ambient illumination.
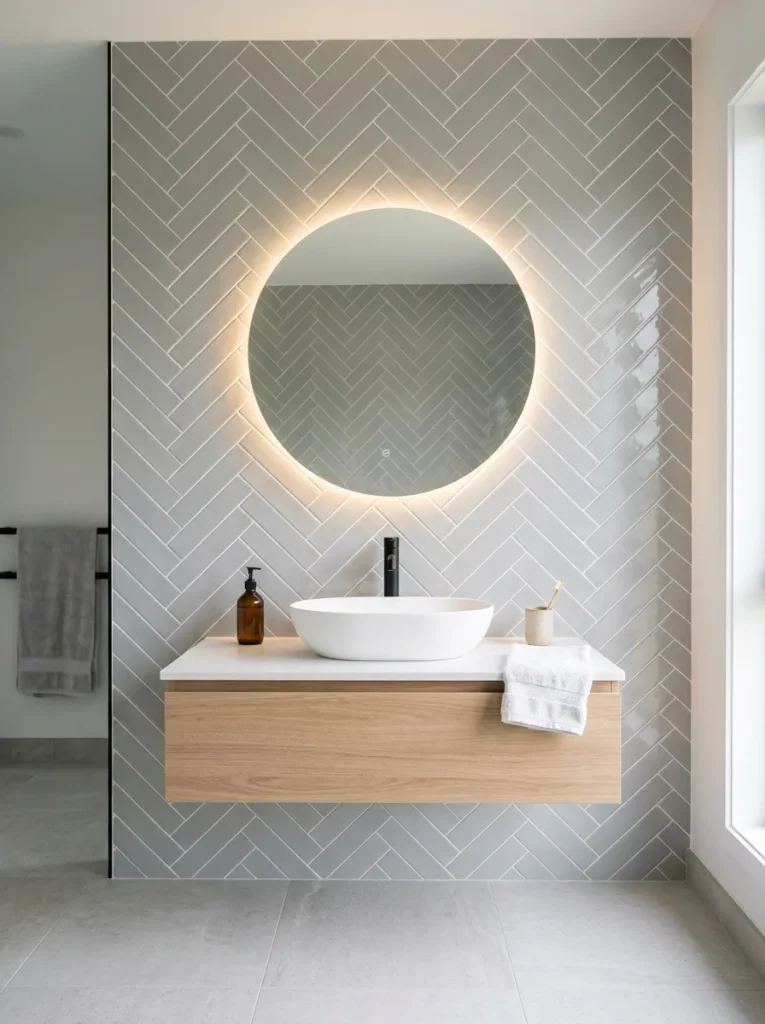
Idea 9: Retro White Octagon Tile Floor with Cool Grey Panel Accents
Setup Method
The retro octagon floor design reimagines classic early twentieth-century tile patterns within a clean, modernized grey and white context. This layout features traditional white ceramic octagon floor tiles interspersed with tiny black or dark grey square accent cabochons, creating a historic floor grid pattern. To modernize the look, surrounding walls are wrapped in smooth, cool-grey vertical wall paneling finished with flat shaker-style trim lines. The crisp geometric floor pattern adds charm and retro character underfoot, while cool grey wall panels provide a sophisticated, contemporary framing structure. Finishing the space with classic white porcelain pedestal sinks, exposed chrome plumbing lines, and bevel-edged mirrors produces a charming vintage-modern hybrid design that feels rich in detail.
Construct this retro-inspired space by laying pre-meshed white octagon and dark grey dot mosaic tile sheets across a level, waterproofed subfloor. Align mosaic sheet edges carefully to maintain uniform spacing across grid patterns, filling joints with a medium-grey sanded grout for high contrast and durability. Install water-resistant vertical MDF wall panels along surrounding walls, painting them in a smooth, satin cool-grey color tone. Add flat white baseboards and matching top molding along panel edges to frame the grey wall sections cleanly against the floor and ceiling. Position a traditional white ceramic pedestal sink over the retro tiled floor, connecting exposed chrome supply lines and bottle traps beneath the basin. Hang a bevel-edged oval glass mirror above the pedestal sink using vintage chrome mounting brackets.
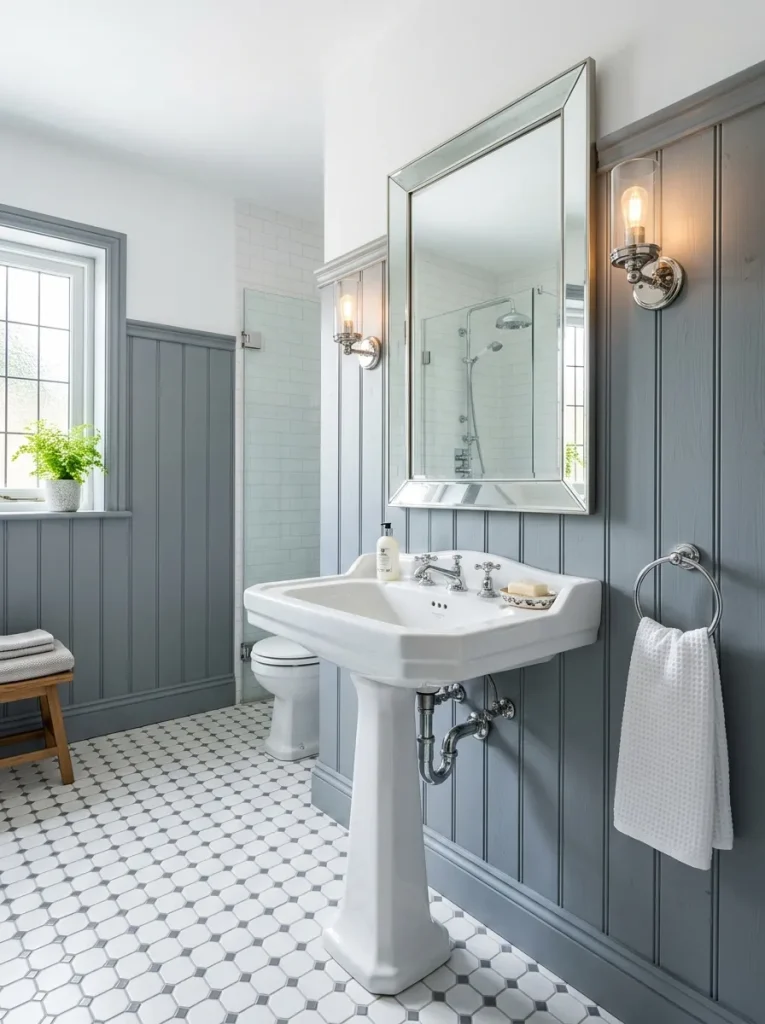
Idea 10: Urban Loft Slate Grey Slab Floor with Glossy White Metro Grid
How to Create
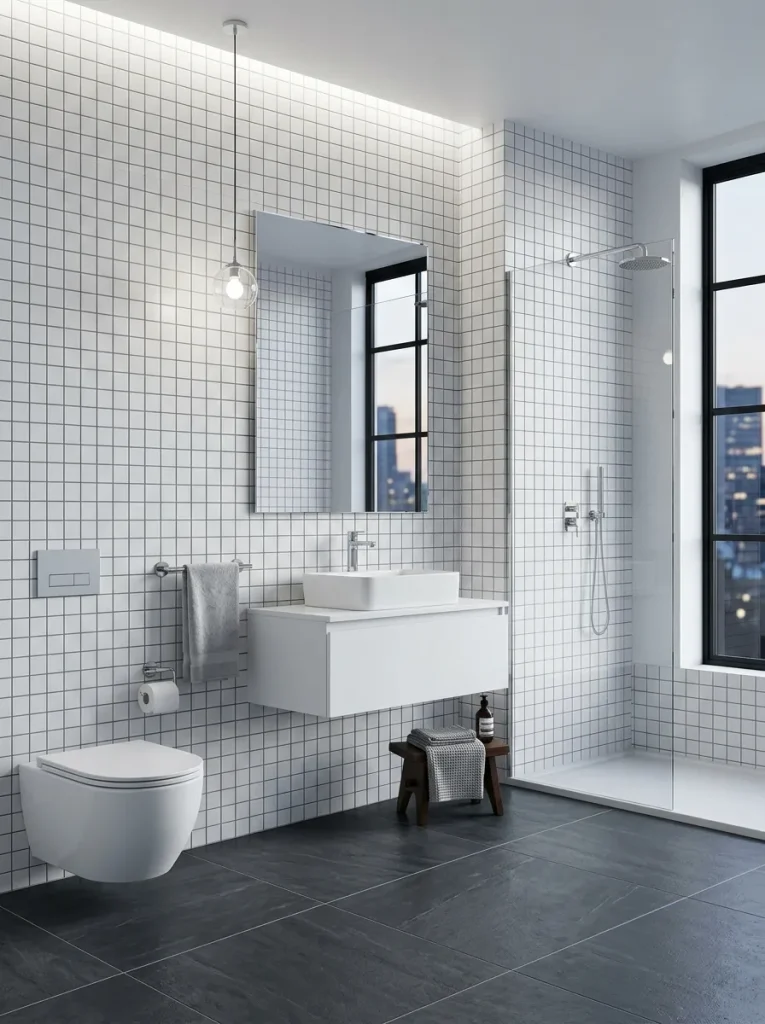
The urban loft bathroom concept combines large-format dark slate grey floor slabs with pristine glossy white grid-tiled walls to achieve an architectural, high-contrast look. Large dark slate slabs minimize grout lines on floor surfaces, creating a heavy, grounding foundation reminiscent of modern loft spaces. Walls are fully tiled from floor to ceiling using square white ceramic tiles laid in a clean, straight stack grid pattern rather than a traditional offset brick layout. Applying a light grey grout along white wall grid seams highlights the precise alignment, adding a graphic structure that feels modern, orderly, and spacious. Exposing sleek chrome fixtures, clear glass panels, and simple white vanity elements completes an urban design that prioritizes high utility and bold visual lines.
Begin construction by laying large twelve-by-twenty-four-inch dark slate grey porcelain floor slabs across a fully prepared, waterproofed ground floor. Secure slabs using heavy-duty thin-set mortar, filling joints with a dark slate grout to create a continuous, low-maintenance floor expanse. On surrounding walls, mark grid layout lines and install four-by-four-inch glossy white square ceramic tiles in a straight, non-staggered grid formation. Apply a pale grey grout across white grid wall tiles to subtly emphasize clean horizontal and vertical line work throughout the space. Mount a wall-hung white vanity unit featuring chrome bar handles, topping it with an integrated white acrylic sink countertop. Install a tall, wall-mounted white storage cabinet alongside a frameless rectangular mirror to maintain organized, clutter-free counter surfaces.
Common Beginner Mistakes and How to Avoid Them
When executing a grey and white bathroom design, beginners often make spatial planning and material selection errors that compromise both durability and visual appeal. A primary mistake involves selecting incorrect grout colors; using bright white grout on dark grey floor tiles creates an overwhelming grid pattern that shows dirt quickly, while overly dark grout on white wall tiles can look aggressive if applied carelessly. Another frequent error is failing to balance light and dark values; applying dark charcoal tones across all walls and floors in a small windowless bathroom makes the space feel cramped and dark. Homeowners also frequently forget to evaluate lighting color temperatures, as cold blue LED bulbs render grey surfaces looking icy and metallic rather than soft and warm. To prevent these mistakes, test tile samples and paint swatches directly under your bathroom lighting before buying materials. Use dark grout primarily on floors, keep dark grey shades focused on accent walls or lower surfaces, and choose warm-white bulb illumination between 2700K and 3000K to maintain an inviting atmosphere.
Practical Tips for Achieving Professional Results
Achieving a high-end, professional finish in a grey and white bathroom requires focus on precise alignment, proper waterproofing, and clean surface transitions. Always ensure walls are plumb and floors are level before installing large-format porcelain tiles, as underlying unevenness causes visible tile lippage along seams. Utilize plastic levelling clips alongside standard tile spacers when laying large grey floor slabs to keep adjacent tile edges entirely flush. When applying grout, clean tile faces promptly using a damp hydro-sponge to prevent stubborn grey grout haze from drying across white ceramic surfaces. Seal all natural marble tiles and stone grout lines with a penetrating sealer to prevent water staining, soap scum buildup, and discoloration over time. Ensure clean, waterproof silicone caulking lines are applied along all internal corners, where vanity tops meet walls, and around base shower trays. Finally, incorporate textured bath linens—such as waffle-weave grey towels or plush white cotton bath mats—to add physical warmth and softness to hard tiled surfaces.
Styling, Presentation, and Organization Ideas
Organizing and presenting a completed grey and white bathroom effectively relies on functional storage, visual balance, and thoughtful decorative styling. Keep vanity countertops uncluttered by storing daily toiletries inside deep vanity drawers equipped with clear acrylic organizers or woven storage baskets. Utilize open wall shelving to display functional items as decorative accents, such as stacking neatly folded white hand towels alongside grey ceramic soap dispensers. Group small grooming items on a natural stone or marble tray beside the sink basin to maintain order while protecting counter surfaces from water rings. Introduce small organic accents, such as potted aloe vera, snake plants, or eucalyptus stems in white ceramic vases, to bring vibrant natural color into neutral grey spaces. Grouping decorative objects in odd numbers—such as a set of three grey storage canisters of varying heights—creates an appealing visual rhythm. These disciplined organization strategies ensure your neutral bathroom remains functional, photogenic, and visually peaceful.
Budgeting, Sourcing, and Time Planning
Executing a bathroom renovation efficiently requires clear budget management, strategic material sourcing, and realistic time planning. Allocate your overall budget across major expense categories: tiling and waterproofing materials (35%), vanity and sanitaryware fixtures (30%), plumbing and installation labor (20%), and lighting accessories (15%). To manage costs effectively without sacrificing visual quality, utilize standard white subway tiles on large wall areas and reserve expensive natural marble or concrete-effect tiles for smaller accent zones or shower niches. Source materials early to prevent project delays, ordering ten percent extra tile volume to account for cutting waste and future repairs. Plan a structured renovation timeline: complete plumbing rough-ins and waterproofing during Week 1, install wall and floor tiling during Week 2, mount vanity units, toilets, and glass enclosures during Week 3, and complete paint touch-ups and accessory styling during Week 4. Following this structured project timeline prevents costly delays and ensures a smooth, organized construction process.
Creative Expansion and Advanced Inspiration
Once you master basic grey and white bathroom layouts, you can explore advanced design variations and smart technology integrations that enhance everyday comfort. Consider installing thermostatic underfloor heating cables beneath grey porcelain floor tiles to keep hard floor surfaces warm during winter months. Advanced homeowners can integrate smart digital shower valves that allow precise temperature control, alongside fog-free illuminated mirrors featuring touchless dimming and integrated Bluetooth speakers. You can also experiment with custom lighting setups, such as embedding waterproof LED channels inside recessed shower niches or installing low-level nightlights beneath floating vanities. For future stylistic updates, a neutral grey and white base allows you to easily refresh the room’s mood simply by switching accent towel colors—transitioning from soft sage green in spring to rich mustard yellow or navy blue in winter. Building on a timeless neutral foundation ensures your home decor remains highly adaptable, modern, and visually impressive for years to come.