10 DIY Canvas Art Painting Ideas

Creating custom canvas artwork serves as an exceptionally transformative method to personalize home decor while exploring your artistic potential. Blank walls present a major design challenge in residential interiors, often requiring significant financial investments when purchasing mass-produced retail paintings. This comprehensive DIY tutorial delivers ten distinct structural and aesthetic methods to execute original canvas paintings without the need for advanced fine arts training or expensive gallery tools. Readers will explore a variety of practical techniques ranging from geometric color blocking and structural texture pasting to minimalist watercolor washes and metallic leaf gilding. Implementing a well-planned creative project enhances overall home decoration, establishes a clear focal point in living spaces, and solves the common issue of finding art that matches a specific color palette. Each featured concept provides clear guidance on managing paint viscosity, selecting appropriate application tools, and achieving a beautifully balanced final presentation. By customizing the colors, scale, and textures used on the canvas, homeowners can seamlessly integrate their work into a modern design layout, turning a basic room into an artfully curated environment that reflects personal style.
Why Handmade Canvas Art Dominates Contemporary Interior Design Trends
The ongoing popularity of handmade canvas painting within modern Pinterest ideas highlights its exceptional ability to blend practical household value with highly expressive interior styling. In contemporary layout planning, homeowners view large-scale walls not merely as structural dividers, but as blank vertical fields for clean minimalist style or bold colorful statements. These handmade updates carry tremendous DIY appeal because they break complex artistic concepts down into manageable, step-by-step surface changes that require zero specialized fine arts experience. From a design perspective, introducing textured canvas surfaces creates an immediate illusion of depth, warmth, and architectural intention within plain, boxy rooms. These trending ideas emphasize resourcefulness and high-impact aesthetics, demonstrating how simple budget ideas can drastically shift the visual mood of an entire house. This specific creative project provides beginners with an achievable entry point into home styling, building essential hands-on skills with basic materials while producing a highly visible, premium asset that enhances the daily living experience and sparks visual inspiration.
Technical Materials Procurement and Workspace Configuration
Achieving a flawless, long-lasting finish on an easy project requires systematic material preparation and a highly organized workspace before applying any paint or compound. The primary materials vary by project choice but generally include stretched cotton canvases in various dimensions, heavy-body acrylic paints, matte or gloss gesso primers, and architectural joint compounds for creating texture. Essential tools for these transformations include high-density foam rollers, synthetic flat trim brushes, flexible steel palette knives, low-tack painter’s tape, and protective clear acrylic sealers. To prepare the workspace safely, set up a sturdy, level easel or clear a large section of level floor, covering the surface completely with a heavy canvas drop cloth to capture stray paint splatters or paste drips. Wipe down the blank canvas with a dry microfiber cloth to eliminate fine dust particles that could interfere with paint adhesion, and arrange your mixing cups and water jars within arm’s reach. Proper planning involves evaluating the scale of the wall where the artwork will hang, ensuring the canvas dimensions align harmoniously with your furniture proportions.
Idea 1: Minimalist Textured Plaster Ridges with Palette Knives
How to Create
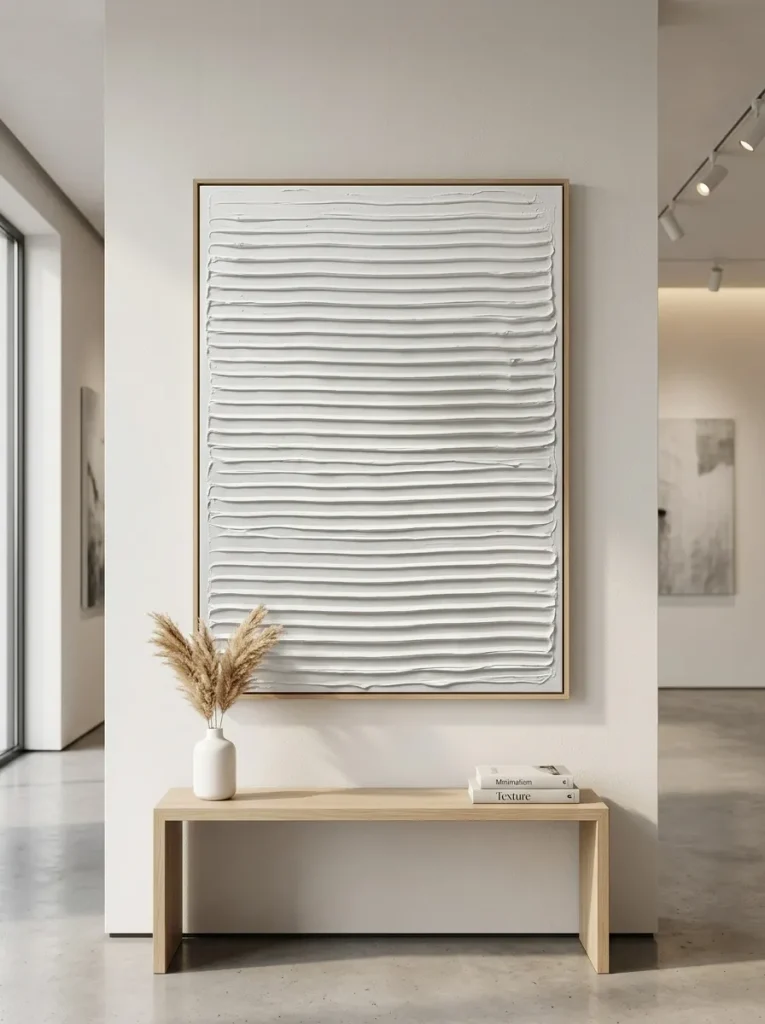
The minimalist textured plaster ridge design establishes a sophisticated, sculptural architectural look by focusing entirely on physical depth and shadow play rather than complex color mixing. This concept relies on applying a thick layer of structural paste or joint compound across a raw canvas, using a flexible palette knife to create deep, repeating lines or organic waves. The stark physical ridges catch ambient room light throughout the day, casting subtle shadows that shift visually depending on the angle of the sun or indoor light fixtures. This timeless style fits beautifully into neutral living rooms, modern offices, and open-concept bedroom zones alike, offering a balanced aesthetic that brings warmth to bare spaces. The monochrome layout excels at creating a high-end gallery feel on a modest budget, making it an excellent choice for narrow or dimly lit hallways.
The execution process begins by securing a large stretched canvas flat on a protected work table to ensure a stable working surface. Scoop a generous amount of pre-mixed architectural joint compound or professional heavy-body acrylic modeling paste directly onto the center of the canvas using a wide steel trowel. Spread the compound evenly across the entire fabric surface until you achieve a consistent thickness of roughly one-quarter of an inch, covering the front and outer edges completely. Take a notched palette knife or a coarse-toothed grout comb and drag it firmly through the wet paste in a single, continuous sweeping motion to form clean, parallel ridges. Allow the textured compound to dry completely for twenty-four hours in a well-ventilated room until the plaster hardens into a rigid, chalky white state. Finish the piece by applying two coats of a premium matte white latex paint or an ultra-flat protective clear coat to seal the porous texture from humidity.
Idea 2: Structured Geometric Color Blocking using Low-Tack Tape
How to Create
The structured geometric color block design introduces a bold modern design element into standard rooms by treating the canvas as a balanced grid of intersecting geometric planes. This style uses sharp angles, perfectly straight lines, and a cohesive three-color palette to create deep abstract shapes that visually anchor surrounding furniture arrangements. By utilizing precise masking techniques, this approach turns a plain canvas into a crisp graphic statement piece that complements contemporary home decor. The layout looks best when utilizing contrasting colors, such as a deep navy blue paired with soft ochre and a neutral cream base, keeping the artwork engaging without cluttering the room.
To execute this creative project step by step, coat the entire surface of the canvas with a solid base coat of light grey or white gesso primer, allowing it to dry for a full day. Use a long metal ruler and a graphite pencil to lightly sketch intersecting diagonal and horizontal lines across the canvas, ensuring the geometric shapes flow logically across the frame. Apply high-quality low-tack painter’s tape precisely along the outside edges of your sketched lines, pressing the tape down firmly with a plastic brayer or putty knife to prevent wet paint from seeping underneath. Use a small, high-density foam roller to apply a smooth, thin layer of your first accent acrylic paint inside the masked sections. Once dry, gently peel the tape away, reposition it over the dry edges to isolate the remaining blank shapes, and apply your second and third paint colors to complete the balanced geometric pattern.

Idea 3: Metallic Gold Leaf Gilding over Abstract Acrylic Washes
How to Create
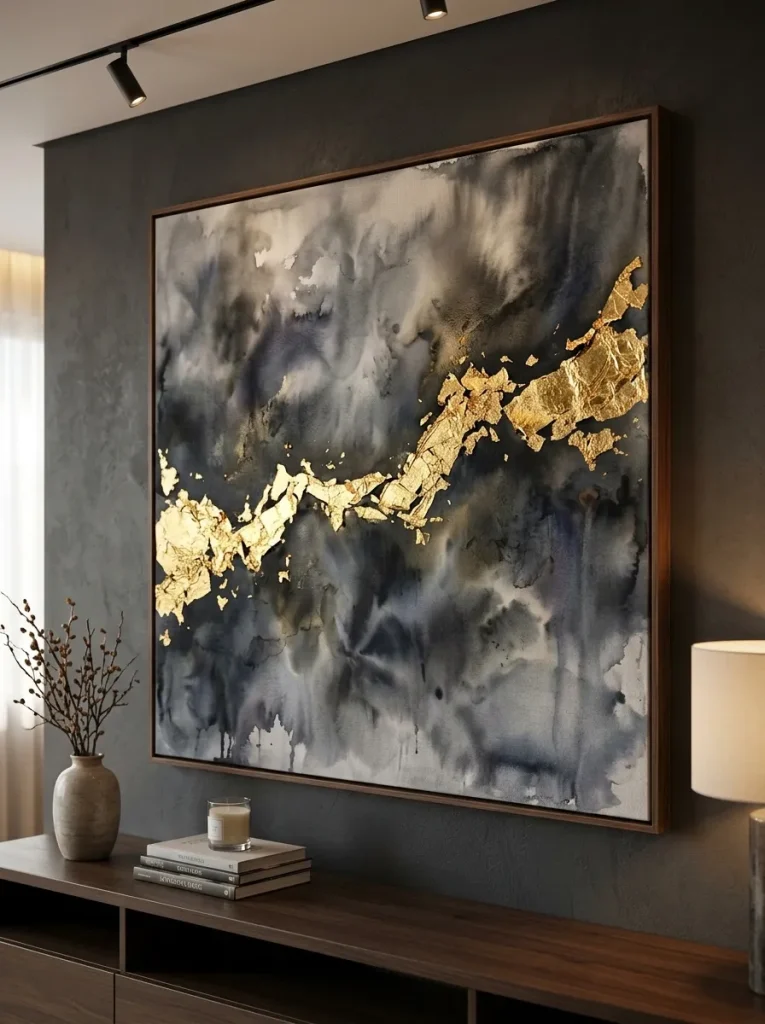
The metallic gold leaf gilding method brings luxurious warmth, rich reflective texture, and excellent visual contrast to modern home decor by blending fluid acrylic paints with real metal leafing. This layout features a fluid, abstract background wash made of soft grays, whites, or deep charcoals, which is then accented by sharp, jagged paths of highly reflective gold or copper leaf sheets. The addition of metallic elements across the canvas center gives the artwork a high-end, professional look that catches candlelight and warm interior lamps beautifully. This project is highly practical for dark rooms, as the reflective gold surfaces bounce light forward, making enclosed spaces feel significantly brighter and more dynamic.
The setup method begins by mixing fluid acrylic paints with a small amount of water or thinning medium inside clean plastic cups to reduce paint viscosity for a smooth application. Pour the thinned paint onto a large canvas, using a damp sponge or a wide synthetic wash brush to blend the shades together into a soft, cloud-like abstract background pattern. Allow the acrylic wash to dry completely for three hours, ensuring no damp patches remain on the woven cotton surface before introducing the delicate gilding components. Paint a random, organic path across the center of the dry canvas using a clear water-based metal leaf adhesive sizing, letting the glue sit undisturbed for fifteen minutes until it becomes tacky to the touch. Carefully lower sheets of gold leaf paper onto the tacky adhesive zones, pressing them down gently with a dry, ultra-soft mop brush to ensure full contact. Gently sweep away the excess loose gold leaf flakes with the soft brush, revealing a sharp, shimmering metallic vein running across the abstract painting.
Idea 4: Fluid Acrylic Paint Pouring with Cell-Creating Mediums
How to Create
The fluid acrylic paint pouring method brings an organic marbleized texture and a dynamic contemporary feel to plain rooms by utilizing the natural movement of liquid pigments. This design relies on mixing multiple liquid acrylic paints with a specialized pouring medium, which lowers surface tension and allows the colors to slide over one another without mixing into a muddy brown shade. Adding a few drops of liquid silicone to the paint mixtures causes beautiful, round cell structures and lacy patterns to pop up spontaneously as the paint flows across the canvas. This beginner friendly project is a smart way to create complex, fluid artwork without needing advanced sketching or brushwork skills.
To bring this inspiration to life, arrange four clean plastic cups on your work table, pouring a different shade of high-flow acrylic paint into each individual cup. Add equal parts of a professional pouring medium to each paint cup, stirring the liquid slowly with wooden craft sticks for two minutes to prevent air bubbles from forming. Add three drops of pure liquid silicone oil to two of your main color cups, leaving the background colors oil-free to encourage natural cell formation later. Pour all the separate paint mixtures into a single large plastic cup, layering the colors on top of one another without stirring them together. Quickly flip the layered cup upside down onto the center of a stretched canvas, let it sit for ten seconds, then lift the cup straight up to release the liquid paint. Gently tilt the canvas in different directions to spread the paint over the outer edges, watching the silicone create beautiful, cell-like organic patterns across the surface.
Idea 5: Minimalist Botanical Silhouettes on High-Contrast Backgrounds
How to Create
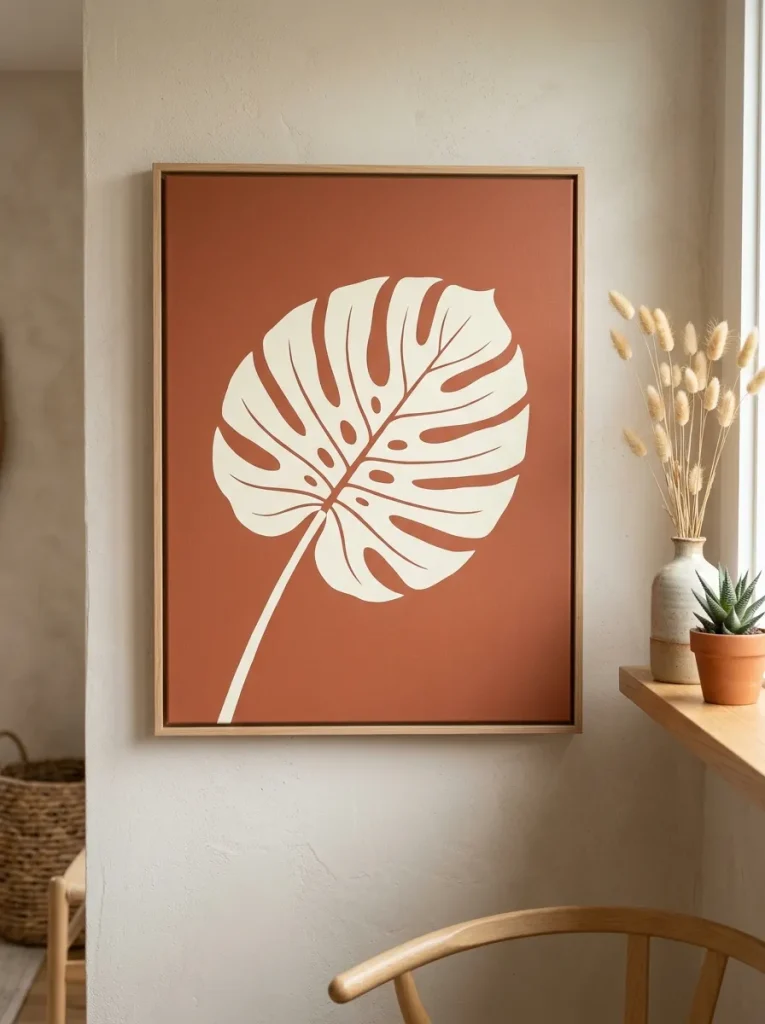
The minimalist botanical silhouette design applies a beautiful, clean plant progression across the canvas, where delicate organic shapes contrast sharply against a solid background color block. This design concept uses simple, high-visibility shapes—such as tropical monstera leaves, delicate palm fronds, or sweeping eucalyptus branches—rendered in a single solid tone. The visual result is a crisp graphic look that fits perfectly in minimalist style bedrooms, modern dining spaces, and bright Scandinavian-themed rooms. This project keeps a clean, cohesive look because it relies on clean silhouettes, ensuring the final artwork looks intentional and highly professional.
The creation process begins by painting the entire front surface and outer edges of a canvas with two coats of a rich matte background paint, such as a deep forest green, charcoal black, or warm terracotta. Allow the background layer to dry for four hours until the surface is completely dry and non-sticky to the touch. Use a piece of white artist’s chalk to lightly sketch the outer lines of your chosen botanical leaves onto the center of the dark painted background. If you make a sketching mistake, simply wipe the chalk lines away with a damp cloth and redraw the pattern without damaging the underlying paint layer. Use a fine-tipped synthetic detailing brush to carefully outline the chalk sketch using a high-visibility contrasting color paint, such as a bright cream or metallic gold. Fill in the interior of the botanical silhouette with even, consistent brush strokes, applying a second coat if needed to ensure a solid, opaque look across the canvas.

Idea 6: Textured Impasto Floral Blooms with Heavy-Body Acrylics
How to Create
The textured impasto floral design brings the vibrant, tactile feel of thick oil paintings into your home by using heavy-body acrylic paints to sculpt thick flower petals that project forward from the canvas. This method uses flexible steel palette knives instead of traditional brushes, scooping up thick paint paste and carving it onto the fabric surface to create realistic three-dimensional roses, peonies, or daisies. The finished project looks like expensive gallery artwork, adding rich physical texture and depth to plain, flat walls. This approach works wonderfully for adding personality to a master bedroom or traditional entry hall, serving as a beautiful artistic focal point that pairs perfectly with classic home decor.
To execute this project step by step, paint the background of your canvas with a thin, neutral acrylic color wash using a wide flat brush, allowing it to dry completely before sculpting. Squeeze large amounts of premium heavy-body acrylic paint onto a smooth plastic palette board, keeping the colors separate to maintain clean blending. Scoop up a small marble-sized dollop of thick pink or white paint onto the flat underside of a teardrop-shaped palette knife. Press the loaded knife firmly against the canvas at a thirty-degree angle, then lift the steel blade away with a quick, wiping motion to leave a thick, raised petal shape behind. Repeat this sculpting process in a tight circle, layering the raised paint petals over one another to build up a thick, realistic three-dimensional flower bloom. Use a small detail knife to add thick green paint stems and leaves around the flower centers, letting the thick painting cure undisturbed for three days until the core hardens.
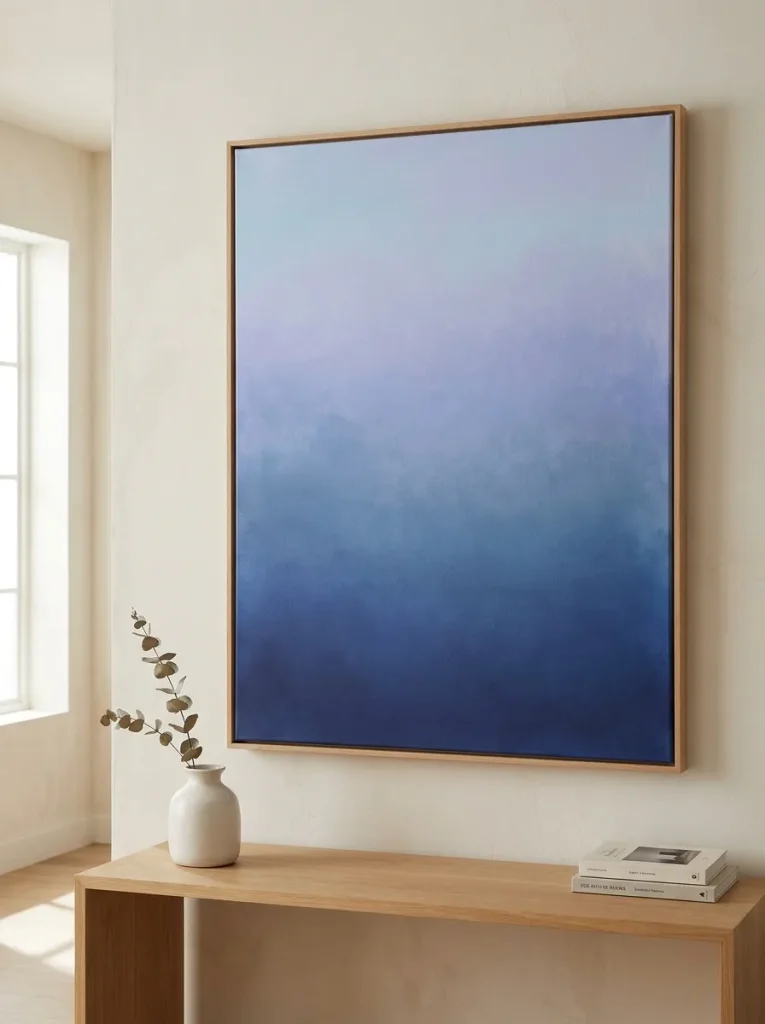
Idea 7: Monochromatic Color Field Gradations with Blending Sponges
How to Create
The monochromatic color field gradation design brings a soothing, minimalist style to interior spaces by blending a single color family into a smooth, seamless gradient wash across the canvas. This technical method eliminates all sharp lines, figures, and patterns, replacing them with a soft color fade that shifts beautifully from a dark, rich tone at the bottom to a light tint at the top. The smooth color field creates an atmosphere of calm and open space, making it an excellent design choice for relaxing bedrooms, cozy home offices, and modern meditation corners. The finished canvas mimics the shifting light of foggy mornings or summer sunsets, providing a soft background that blends easily with surrounding home decor.
The application process begins by choosing one main acrylic color, such as a deep indigo blue or a warm sage green, and a large tube of pure mixing white acrylic paint. Squeeze a thick line of the pure dark paint along the bottom edge of a large canvas, and squeeze a matching line of pure white paint along the top edge. Wet a large, high-density sea sponge or a wide synthetic blending brush with clean water, squeezing out the excess moisture until the tool stays slightly damp. Starting at the bottom edge, drag the damp sponge horizontally back and forth across the canvas, working your way upward to pull the dark pigment into the middle zone. Move to the top edge and use a clean section of the damp sponge to drag the white paint downward, blending the two paths together in the center to create a smooth, seamless color transition. Apply light, feather-like brush strokes across the center seam to eliminate any harsh streaks, letting the gradient dry flat to maintain perfect color balance.
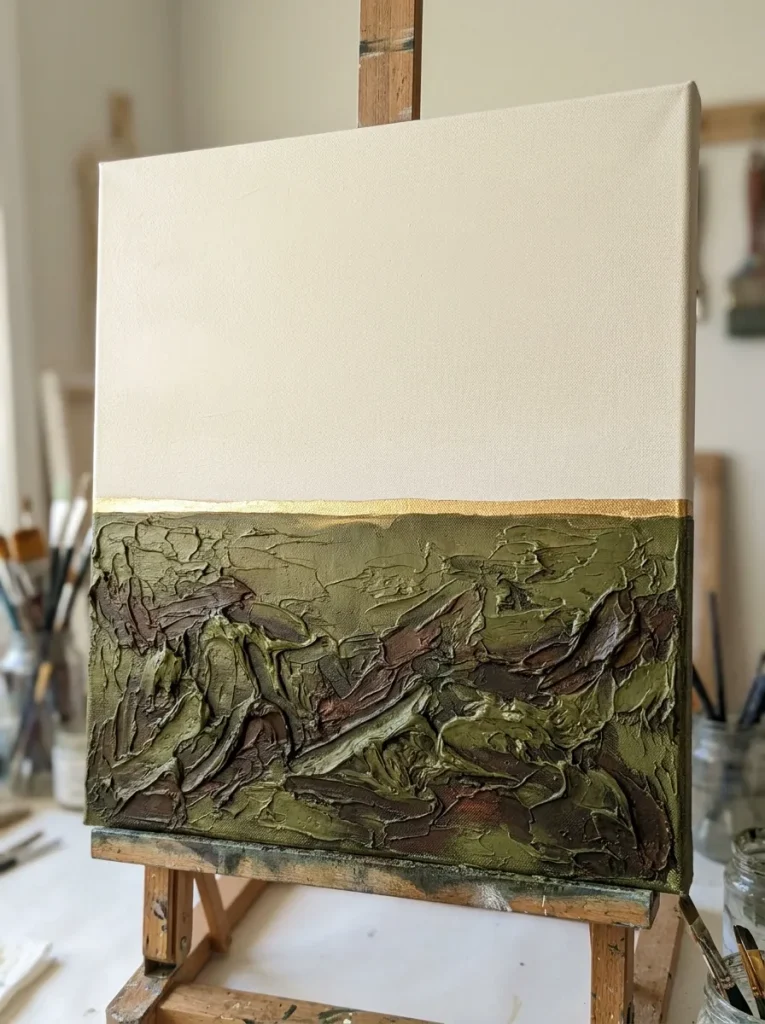
Idea 8: Abstract Landscape Horizons with Mixed Media Pastes
How to Create
The abstract landscape horizon design combines bold color choices with structural texturing pastes to create an impressive view of mountains, oceans, or open fields. This concept involves dividing the canvas horizontally into two separate zones, using thick modeling paste on the lower half to represent rough earth textures, while keeping the top half smooth to represent a clear sky. The visual contrast between the smooth, flat sky and the rough, raised terrain creates an immediate sense of depth and scale, making small rooms feel wider and more open. This project is highly customizable, allowing you to use neutral grays or vibrant sunset tones to match your existing color scheme.
The execution process begins by using a long T-square ruler and a pencil to draw a straight horizontal line across the center of a stretched canvas to mark your horizon. Apply a thick layer of acrylic modeling paste below this pencil line using a jagged plastic scraper, sculpting rough ridges and valleys to mimic rocky hills or ocean waves. Allow the textured lower half to dry completely for twelve hours, ensuring the paste hardens into a solid foundation before you start painting. Paint the smooth top half of the canvas with light, horizontal strokes of a soft sky-blue or cream acrylic paint, using a wide brush to keep the look clean. Once the sky is dry, paint the textured lower half with deep earth tones like burnt umber, charcoal, or deep olive green, using a dry brush technique to highlight the tops of the plaster ridges. Finish the piece by adding a thin, continuous line of metallic gold paint right along the horizon line to tie the two sections together beautifully.

Idea 9: Stenciled Mandala Patterns with Metallic Acrylic Mediums
How to Create
The stenciled mandala pattern design brings an elegant, detailed look to square canvases by adding complex repeating geometric shapes over a solid background. This method uses large, laser-cut plastic stencils to print perfectly balanced circular patterns, star arrays, or bohemian motifs across the canvas surface. The use of shimmering metallic paints like champagne gold, copper, or bronze creates a beautiful contrast against a dark matte background, catching light shifts as you walk past the artwork. This project is highly durable and easy for beginners to complete, as the pre-cut stencils deliver sharp lines and complex details without requiring advanced freehand drawing skills.
To complete this creative project, paint your entire canvas with two coats of a premium matte acrylic paint in a rich dark tone like charcoal grey or deep navy blue. Center a large, square plastic mandala stencil precisely over the dry canvas surface, securing all four outer edges with low-tack painter’s tape to prevent the pattern from shifting. Pour a small amount of premium metallic gold or bronze acrylic paint onto a plastic palette board, loading a dense foam pounce brush with very little paint to prevent bleeding. Dab the foam brush straight down over the stencil cutouts using light, vertical pressure, making sure not to push wet paint under the edges of the plastic design. Carefully peel the stencil away from one corner while the paint is still slightly damp, revealing a sharp, detailed metallic pattern running across the canvas. Allow the metallic paint to dry for two hours, then apply a thin layer of protective clear gloss sealer to preserve the shimmering metal finish.

Idea 10: Linear Tape Resists with Watercolor-Style Acrylic Splatters
How to Create
The linear tape resist design adds a fun, modern energetic touch to plain rooms by combining sharp, unpainted white canvas lines with wild, colorful paint splatters. This design uses thin lines of high-adhesion masking tape arranged in complex grids or starburst patterns directly on the raw, unprimed canvas fabric before any paint is introduced. Colorful, thinned acrylic paints are then splattered, dripped, and washed across the entire canvas surface in a free, abstract style. When the tape lines are pulled away at the end of the tutorial, they reveal clean, bright white canvas lines beneath, creating a beautiful contrast against the wild color splatters.
The setup method starts by placing a blank, unprimed cotton canvas onto a large plastic drop cloth on the floor to catch flying paint drips during the splattering process. Arrange long strips of one-quarter-inch thin masking tape across the canvas in a random, intersecting web pattern, pressing the tape down firmly with your fingers to ensure a tight seal. Thin down three different shades of bright acrylic paint inside separate cups using plenty of water until the paint reaches a thin, ink-like consistency. Dip a stiff-bristled utility brush into your first color cup, holding the brush over the canvas and flicking the bristles with your thumb to create wild, energetic splatters. Repeat this splattering process with your second and third paint colors, letting the wet drips run and blend naturally across the taped surfaces. Allow the wet splatters to dry for six hours, then carefully peel away the masking tape lines to reveal the sharp, bright white geometric shapes underneath.

Common Beginner Mistakes and How to Avoid Them
When managing a DIY canvas painting project, avoiding common technical errors ensures a durable finish that resists fading and stays looking great for years. The most frequent mistake is painting directly onto raw, unprimed cotton canvases without applying a base coat of gesso primer first. Unprimed canvas fibers absorb moisture rapidly, causing acrylic paints to look dull, dry unevenly, and use up twice as much paint as a properly primed surface. Always use pre-gessoed canvases or apply two thin base coats of professional white gesso primer before starting your design to keep your colors vibrant and smooth. Another common pitfall is applying thick layers of modeling paste or joint compound too fast, which leads to deep cracks and shrinking as the core dries. Keep your textured plaster layers under one-quarter of an inch thick, or build up deep textures using multiple thin layers, allowing each pass to dry completely before adding the next. Finally, rushing the final drying times can cause the new paint to smudge or wrinkle when you apply a clear topcoat sealer too soon. Always wait a full forty-eight hours before applying a final acrylic sealer to ensure your new artwork stays protected from dust and sunlight.
Practical Tips for Achieving High-End Artistic Results
| Painting Challenge | Recommended Practical Solution | Expected Artistic Outcome |
|---|---|---|
| Paint bleeding underneath tape lines | Seal the edges of your painter’s tape with a thin coat of clear matte gel medium before applying your accent colors | Perfectly sharp, crisp paint lines with zero color bleeding across geometric shapes |
| Modeling paste cracking during drying | Keep the canvas away from direct heat sources and heaters, letting the thick plaster dry slowly in a cool room | A smooth, solid textured surface with zero shrinking or hairline cracks across the design |
| Acrylic paint drying too fast to blend | Mix a few drops of acrylic paint retarder medium directly into your pigments on the palette board | Extends the working wet time by twenty minutes, allowing you to create smooth color gradients |
| Canvas fabric sagging under thick paste | Spray clean water onto the back side of the raw cotton canvas using a fine misting spray bottle | The wet cotton fibers shrink tightly as they dry, instantly straightening a sagging canvas frame |
Styling, Presentation, and Wall Organization Ideas
Presenting your finished handmade canvas artwork beautifully involves styling the surrounding room layout and wall space to complement your new design feature. For a clean, minimalist style look, display a series of three matching gradient or textured canvases side by side in a clean horizontal row, keeping exactly three inches of open space between the frames. Install low-profile wooden float frames around your finished canvas paintings to give them an elegant, gallery-grade border that matches the wood tones of your dressers or tables. Use modern directional picture lights mounted right above the top frame to cast a warm glow downward, highlighting the deep ridges of your textured plaster paintings at night. Group small abstract canvases together alongside framed family photos and floating shelves on a main living room wall to create a personalized gallery wall. Keeping the surrounding furniture organized and free of clutter ensures your custom painting remains the true design focus of your home’s interior.
Strategic Budget and Time Planning
| Project Management Phase | Key Action Items & Milestone Tasks | Estimated Time Investment | Allocated Budget Requirements |
|---|---|---|---|
| Phase 1: Planning & Sourcing | Measure wall space, choose your color palette, and buy canvases, heavy-body acrylics, and tape | 1 hour total planning time | Low cost using standard arts and crafts supplies |
| Phase 2: Canvas Priming | Apply two thin base coats of gesso primer to raw canvas frames and sand down smooth | 30 minutes active work | Economical investment for basic white gesso bases |
| Phase 3: Active Painting | Sculpt textured pastes, apply painter’s tape for grids, or blend smooth color field gradients | 2 hours active creation | Variable cost depending on choice of metallic leafing or pastes |
| Phase 4: Curing & Sealing | Allow the paint to dry completely and apply two layers of protective clear acrylic gloss topcoat | 48 hours passive drying | Minimal cost for high-quality clear spray sealers |
Creative Expansion and Advanced Design Inspiration
Once you feel comfortable with basic canvas painting and taping techniques, you can take your home decor skills further by exploring advanced design upgrades that add value and luxury. Consider building extra-large custom floating wooden frames using thin oak or walnut slats to encase your large abstract paintings for a high-end designer look. Experiment with advanced mixed-media projects, combining your thick impasto acrylic florals with delicate embroidery threads stitched straight through the stretched canvas fabric for a unique modern texture. You can also upgrade standard flat color fields by embedding thin pieces of translucent mica flakes or crushed quartz crystals directly into the wet modeling paste to create a shimmering stone texture. For an impressive modern touch, explore creating a matching multi-panel polyptych painting where a single abstract landscape or fluid pour design flows continuously across four separate canvases hung in a grid. These advanced adjustments turn a simple weekend craft into a high-end art collection, transforming your living space while highlighting your custom handmade craftsmanship.