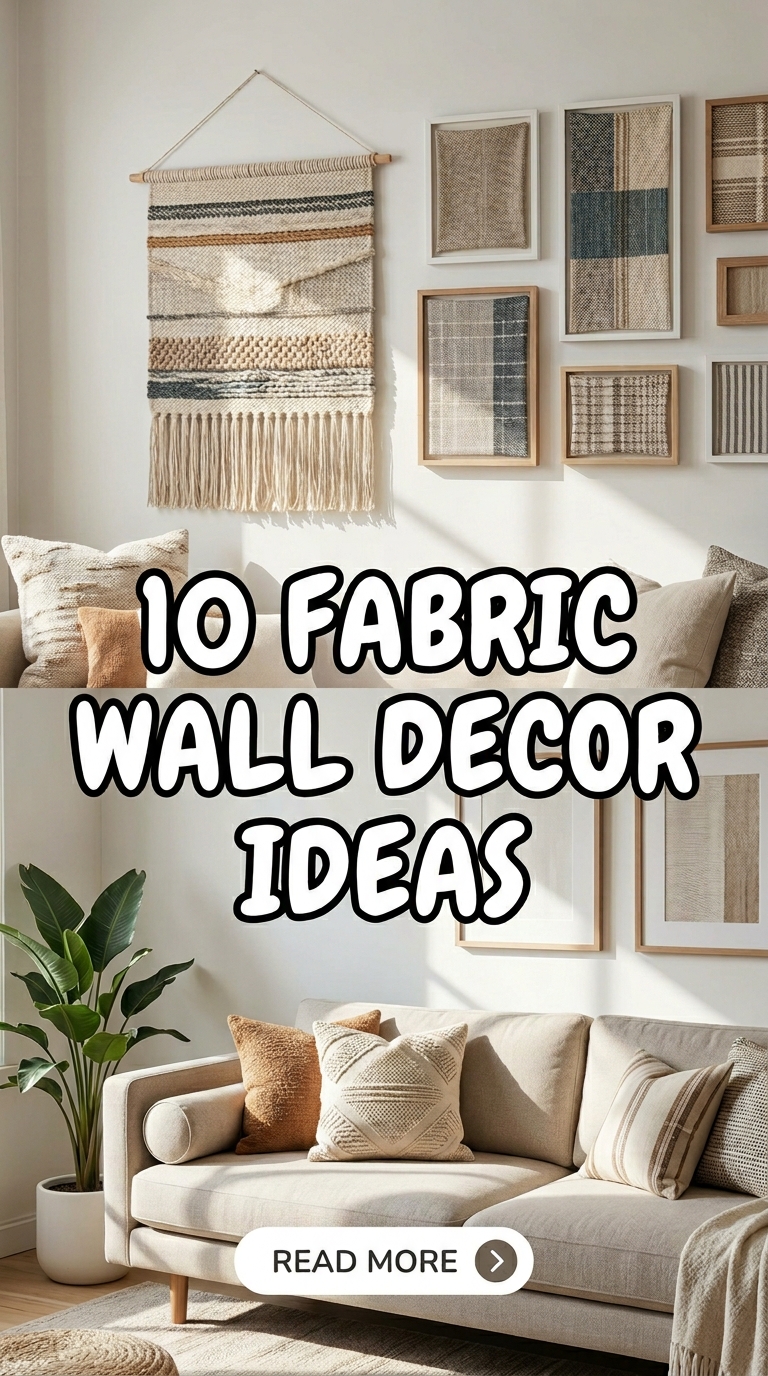
10 Fabric Wall Decor Ideas

Fabric wall decor offers a creative way to add texture, color, and personality to interior spaces without relying on traditional artwork. Unlike framed prints or painted wall treatments, fabric-based decoration introduces softness and visual depth that can transform a room while remaining flexible and budget friendly. Many Pinterest ideas focus on fabric wall decor because it combines DIY creativity with practical design solutions suitable for bedrooms, living rooms, home offices, nurseries, and entryways. Fabric can be used in numerous ways, from large statement pieces to small handmade accents that complement existing home decor. These projects often require simple materials and basic crafting skills, making them accessible to beginners while still offering opportunities for advanced customization. Fabric wall decoration also allows homeowners and renters to experiment with colors, patterns, and textures without making permanent changes to walls. In this article, readers will discover ten detailed fabric wall decor ideas, learn how to prepare materials, understand practical construction methods, and explore styling techniques that improve overall presentation. Whether creating a minimalist style feature wall or a layered aesthetic display, these creative ideas provide inspiration for designing attractive and personalized spaces.
Why This Idea Is Trending or Useful
Fabric wall decor continues to appear among trending ideas because it combines affordability, creativity, and versatility. Many people seek decorative solutions that offer visual impact without requiring major renovation projects or specialized equipment. Fabric-based wall decoration meets these needs by providing a wide range of design possibilities using readily available materials. Pinterest inspiration frequently highlights these projects because they can be adapted to many interior styles, including modern design, rustic themes, bohemian arrangements, minimalist style spaces, and contemporary home decor settings. Another reason for their popularity is accessibility. Most fabric projects require basic tools and simple step by step techniques that beginners can follow successfully. DIY enthusiasts appreciate the opportunity to create custom decoration pieces that reflect personal preferences while remaining budget conscious. Fabric also introduces warmth and texture, elements that are often difficult to achieve with flat wall art alone. These projects support organization and planning because creators can coordinate colors and patterns with existing furnishings. Additionally, fabric wall decor is often lightweight and easy to install, making it suitable for renters or individuals who frequently update room aesthetics. This combination of practicality, affordability, and creative flexibility explains its continued popularity across design-focused platforms.
Materials and Preparation
Successful fabric wall decor projects begin with thoughtful preparation and careful material selection. The exact materials depend on the chosen design, but common supplies include fabric pieces, measuring tape, scissors, fabric adhesive, sewing tools, wooden dowels, embroidery hoops, canvas frames, staples, mounting hardware, and decorative trims. Before starting any creative project, it is important to determine the intended location and available wall space. Measuring dimensions accurately helps prevent design imbalances and ensures that the finished decoration complements surrounding furniture and architectural features. Fabric selection should consider color schemes, pattern scale, texture, durability, and overall aesthetic goals. Preparation also involves cleaning and ironing fabric to remove wrinkles that may affect the final appearance. Planning layouts in advance allows adjustments before cutting materials, reducing waste and improving results. For larger DIY projects, creating a simple sketch can help visualize proportions and placement. Workspace organization is equally important because neatly arranged tools and materials improve efficiency and accuracy. Proper planning minimizes errors, controls costs, and supports smoother execution throughout the tutorial process. Investing time in preparation often leads to better craftsmanship, stronger visual consistency, and more professional-looking handmade wall decoration.
Idea 1: Oversized Fabric Hanging Panel
How to Create
An oversized fabric hanging panel creates a dramatic focal point while maintaining softness and elegance. This design works particularly well in living rooms, bedrooms, and reading corners where a large decorative feature can anchor the overall space. The concept involves displaying a single fabric panel with an attractive pattern, texture, or color palette that complements existing home decor. Choosing fabric with noticeable visual interest helps the piece function similarly to a large artwork while introducing textile warmth. Linen-like textures, geometric prints, botanical motifs, or abstract patterns can all contribute to a strong visual statement. The panel can be styled to fit modern design themes or more traditional interiors depending on material selection. Because the fabric occupies a significant area, it influences room atmosphere and color balance. Careful planning helps ensure that the design remains harmonious rather than overwhelming. This easy project offers flexibility because fabric can be changed seasonally or updated when design preferences evolve. The simplicity of the structure allows the material itself to become the primary decorative feature, creating a clean and sophisticated appearance suitable for many interior styles.
To create this fabric wall decor piece, begin by measuring the intended wall area and selecting fabric that extends proportionally within the space. Iron the material thoroughly to remove folds and ensure a smooth presentation. Fold the upper edge around a wooden dowel and secure it using sewing methods or fabric adhesive. The dowel serves as structural support and provides a clean hanging edge. A second dowel can be added to the bottom for stability and improved drape. Attach a hanging cord securely to both ends of the upper dowel. Before installation, test the display by hanging it temporarily and adjusting alignment. Consider the surrounding furniture and leave sufficient breathing room around the panel to emphasize its scale. If desired, decorative fringe or trim can be added along the lower edge to introduce additional texture. Once mounted, evaluate the balance of color and proportion within the room. This step by step approach produces a professional-looking handmade decoration that requires relatively few materials while delivering substantial visual impact.
Idea 2: Embroidery Hoop Fabric Gallery
How to Create
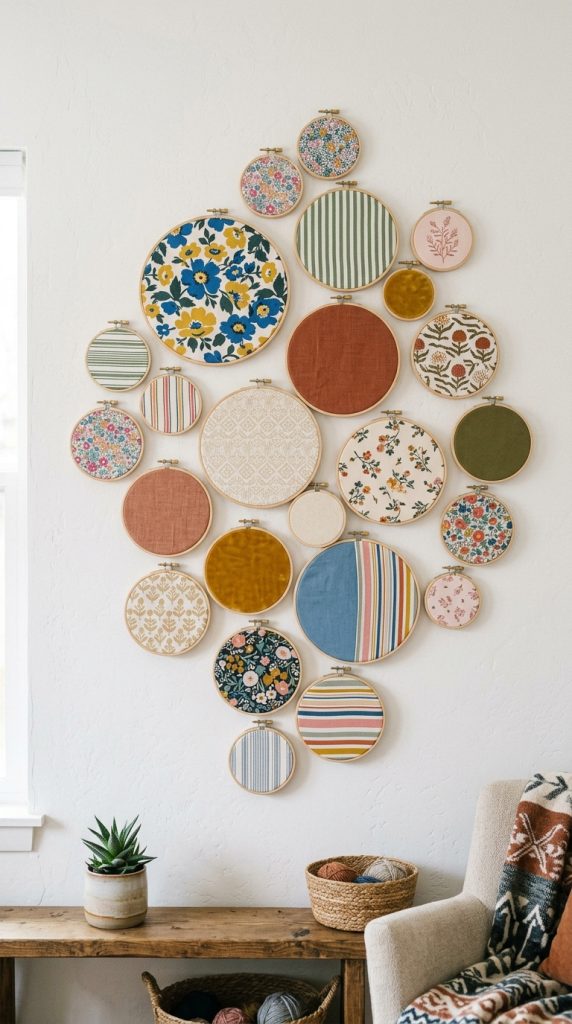
An embroidery hoop fabric gallery transforms small fabric sections into a coordinated wall display that resembles an art collection. Instead of using traditional framed artwork, decorative fabrics become the focal point within circular frames. This idea is particularly effective for showcasing multiple patterns, colors, or textures while maintaining visual cohesion. The circular shape softens wall arrangements and creates contrast against rectangular furniture and architectural elements. A collection of coordinated fabrics can reflect seasonal themes, color palettes, or specific design inspirations. Pinterest ideas frequently feature embroidery hoop displays because they are beginner friendly, highly customizable, and suitable for small spaces. The arrangement can be symmetrical for a structured aesthetic or more organic for a casual decorative effect. By varying hoop sizes, creators can introduce visual movement and depth across the display. This creative project allows even small fabric remnants to become meaningful decorative elements. The result is an affordable wall feature that combines craftsmanship with artistic presentation while adding texture and personality to the room.
Begin by gathering embroidery hoops in several sizes and selecting fabrics that share a consistent visual theme. Cut each fabric piece slightly larger than its corresponding hoop. Place the material between the hoop rings and tighten the hardware until the fabric surface becomes smooth and taut. Trim excess fabric from the back while leaving enough material for secure positioning. Arrange completed hoops on the floor before mounting them to the wall. This planning stage allows experimentation with spacing, scale, and composition. Once a pleasing layout is established, measure distances carefully to maintain balance during installation. Lightweight wall hooks or adhesive mounting solutions often provide sufficient support. Consider mixing patterned fabrics with solid colors to prevent visual overcrowding. Maintaining a consistent color palette helps unify the collection. After installation, assess the display from multiple viewing angles and adjust positioning if necessary. This tutorial method creates a sophisticated gallery effect using simple materials and straightforward construction techniques suitable for both beginners and experienced DIY enthusiasts.
Idea 3: Fabric Wrapped Canvas Collection
Step-by-Step Guide
Fabric wrapped canvas art offers a polished alternative to conventional paintings while preserving the softness associated with textile decoration. This concept involves stretching fabric over canvas frames to create clean-lined wall pieces that mimic professional artwork. The approach works especially well for minimalist style interiors because it highlights texture and pattern without excessive ornamentation. Different fabrics can be selected to emphasize color harmony, geometric structure, or subtle visual interest. A collection of coordinated canvases creates greater impact than a single piece and allows larger walls to be decorated effectively. Since the fabric becomes the central design element, careful selection contributes significantly to the final appearance. Neutral tones can support calm and balanced environments, while bold patterns provide striking focal points. This decorative solution suits many room types and can easily be customized according to changing trends or personal preferences. The result is a refined fabric-based artwork that combines the elegance of framed pieces with the warmth of textile materials.
To make fabric wrapped canvas decor, begin by selecting pre-stretched blank canvases in desired sizes. Iron the chosen fabric thoroughly and cut pieces several inches larger than each canvas. Place the fabric face down on a clean surface and position the canvas centrally. Pull the fabric tightly around the edges and secure it to the back using staples or strong adhesive. Work gradually around all sides to maintain consistent tension and avoid wrinkles. Trim excess material after securing the edges. If creating multiple canvases, ensure that patterns and colors complement one another while maintaining variation for visual interest. Arrange the completed pieces on the floor to determine the best wall composition before installation. Consistent spacing enhances professionalism and supports overall organization. Once mounted, evaluate lighting conditions because fabric texture often becomes more noticeable under natural or directional illumination. This handmade wall decoration combines simplicity with elegance and offers a practical way to introduce custom textile artwork into interior spaces.

Idea 4: Layered Textile Wall Tapestry
How to Create
A layered textile tapestry introduces dimension by combining multiple fabrics into a single decorative composition. Unlike flat wall hangings, this design relies on overlapping materials, textures, and lengths to create visual depth. Different fabric types can be combined to achieve contrast while maintaining color harmony. Lightweight cotton, textured linen, and woven materials often work well together because they contribute unique surface characteristics. This idea appeals to individuals seeking aesthetic wall decor with a handcrafted appearance. Layering allows creative expression through varied shapes, edges, and arrangement patterns. The design can be adapted for modern design interiors, bohemian themes, or eclectic spaces depending on material selection and composition. Pinterest inspiration frequently highlights layered textile projects because they encourage experimentation while remaining accessible to beginners. The combination of textures helps soften large wall surfaces and creates a welcoming atmosphere. By thoughtfully arranging fabric layers, creators can produce a decorative feature that feels detailed and visually engaging without requiring advanced technical skills.
Begin by selecting several complementary fabrics that vary in texture, thickness, and visual pattern. Cut each piece into desired shapes and lengths while considering how the layers will interact when displayed. Arrange the materials on a flat surface and experiment with overlapping positions until a balanced composition emerges. Attach the layers to a backing fabric or directly onto a support dowel using sewing techniques or fabric adhesive. Ensure that structural elements remain secure because multiple layers add weight to the project. Once assembled, attach hanging hardware and test the display before final installation. Minor adjustments can improve balance and proportion. Decorative details such as tassels, stitched accents, or fringe may be added to enhance texture. Evaluate the completed tapestry against the wall color to ensure adequate contrast. This step by step method creates a rich handmade decoration that combines visual complexity with approachable construction techniques, making it a rewarding DIY project for a wide range of skill levels.

Idea 5: Fabric Pocket Wall Organizer
Setup Method
A fabric pocket wall organizer combines decoration and functionality, making it an excellent choice for entryways, offices, craft rooms, and children’s spaces. Unlike purely decorative projects, this design contributes to organization while enhancing visual appeal. Fabric pockets mounted on a decorative backing provide storage for mail, stationery, accessories, small tools, or daily essentials. The organizer can be customized through color selection, pocket arrangements, and decorative stitching details. Pinterest ideas often feature organizational projects because they address practical household needs while maintaining aesthetic value. This concept supports efficient space usage and reduces surface clutter. Depending on design choices, the organizer can complement minimalist style interiors or introduce colorful decorative accents. Because the structure remains lightweight and adaptable, it is suitable for a variety of room sizes. The combination of utility and decoration makes this project particularly appealing for individuals seeking solutions that enhance both appearance and functionality within the home environment.
To construct the organizer, begin by selecting a durable backing fabric and several coordinating materials for the pockets. Measure the intended wall area and determine the number and size of storage sections required. Cut pocket pieces with additional allowance for folded edges and seams. Secure the pocket sides and bottom to the backing fabric while leaving the top open. Reinforce stress points through additional stitching to improve durability. Arrange pockets in a balanced layout that supports both function and visual appeal. Once construction is complete, attach the organizer to a wooden dowel or support frame for hanging. Test each pocket to ensure it can accommodate intended items without distortion. Decorative labels, contrasting trims, or stitched patterns can enhance organization and appearance. After installation, distribute stored items evenly to maintain shape and balance. This beginner friendly project transforms simple materials into a useful decorative feature that improves household organization while contributing attractive textile decoration.

Idea 6: Geometric Fabric Wall Mosaic
Execution Process
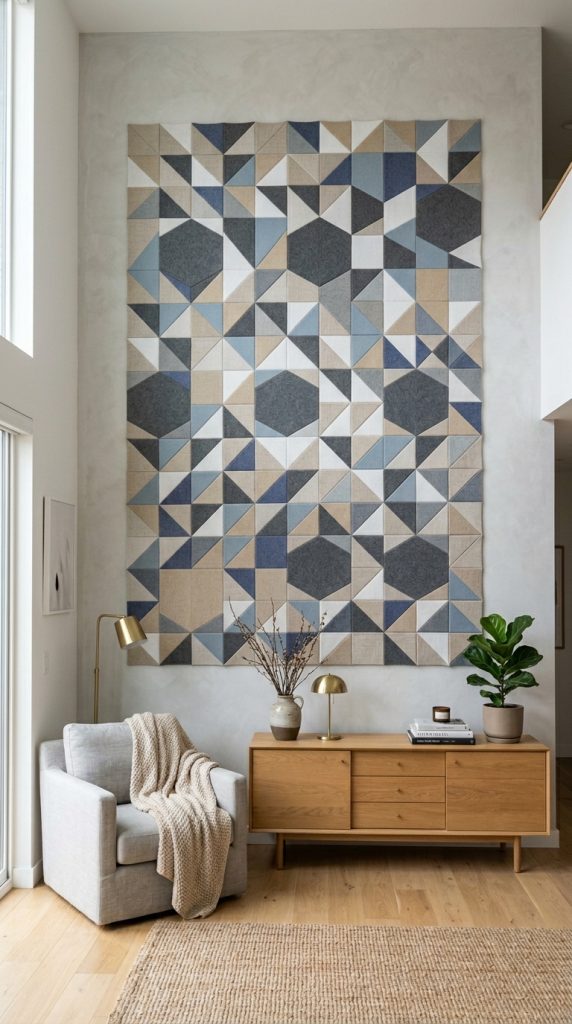
A geometric fabric wall mosaic transforms fabric remnants into a structured decorative composition based on repeating shapes and patterns. This design emphasizes order, symmetry, and visual rhythm, making it suitable for modern design and contemporary interiors. Triangles, hexagons, diamonds, or squares can be arranged into coordinated layouts that create movement across the wall surface. The mosaic approach allows creators to combine multiple fabrics while maintaining an organized overall appearance. Because smaller pieces are used, this project offers an efficient way to repurpose leftover materials. Careful planning is essential because shape placement directly influences visual balance and cohesion. Color selection plays a significant role in establishing contrast, harmony, or focal points within the arrangement. This creative project demonstrates how simple geometric principles can produce sophisticated decorative results. The finished display often resembles textile artwork while retaining the approachable nature of handmade DIY construction.
Begin by selecting several complementary fabrics and creating templates for consistent geometric shapes. Trace the templates onto fabric and cut the pieces accurately to ensure clean edges. Arrange the shapes on a large backing surface before securing them permanently. Experiment with color distribution and pattern placement to achieve a balanced composition. Once satisfied with the layout, attach each piece using fabric adhesive or stitching techniques. Work methodically from the center outward to maintain alignment and spacing. If desired, narrow gaps between shapes can create a tiled appearance that emphasizes geometry. After assembly, mount the mosaic onto a lightweight frame or fabric backing suitable for wall display. Evaluate the finished piece from a distance to confirm visual consistency and proportion. This step by step process produces a striking decorative feature that combines artistic structure with accessible materials and beginner friendly construction methods.
Idea 7: Fabric Strip Wall Installation
How to Make
A fabric strip wall installation introduces movement and texture through vertically suspended fabric segments arranged in a coordinated display. This decorative approach creates visual softness while adding height and dimension to interior spaces. Different lengths, textures, and colors can be combined to achieve varied stylistic effects. The installation may serve as a statement feature behind a bed, sofa, or reading area, helping define zones within larger rooms. Pinterest inspiration often highlights fabric strip projects because they offer substantial visual impact with relatively simple construction requirements. The flowing nature of the fabric creates gentle movement that enhances room atmosphere. Whether designed with neutral tones for minimalist style settings or colorful combinations for energetic environments, the installation can be adapted to numerous decorative preferences. This easy project encourages creativity while remaining achievable for beginners seeking distinctive wall decoration solutions.
To create the installation, select fabrics that coordinate in color and texture while offering some variation for visual interest. Cut the materials into strips of consistent or intentionally varied widths. Attach the strips to a wooden dowel, branch, or support rod using knots, loops, or sewn channels. Arrange colors strategically to maintain balance throughout the composition. Before hanging, spread the strips evenly and assess the overall appearance. Adjust spacing and length as needed to improve proportion. Decorative elements such as braided sections, tassels, or layered strips can introduce additional detail. Mount the support rod securely and allow the fabric to drape naturally. Evaluate how lighting interacts with the installation because shadows often enhance texture and depth. This handmade decoration requires basic materials and simple techniques while delivering an eye-catching result that transforms otherwise plain wall surfaces.

Idea 8: Framed Fabric Pattern Display
Step-by-Step Guide
A framed fabric pattern display presents attractive textiles as curated artwork within structured frames. This approach is particularly effective when showcasing fabrics with intricate prints, woven details, or meaningful designs. Framing elevates fabric from a craft material into a decorative feature that integrates seamlessly with existing wall art collections. The structured format suits both traditional and modern design environments because frame styles can be selected to complement different interiors. Multiple framed pieces can be arranged in grids, rows, or gallery compositions to create larger visual statements. This project emphasizes appreciation of textile design while maintaining a clean and organized presentation. Pinterest ideas frequently feature framed fabrics because they offer an accessible alternative to purchasing artwork while supporting personalized decoration. The combination of texture and pattern contributes visual interest without overwhelming surrounding furnishings.
To make a framed fabric display, begin by selecting frames that suit the room’s style and scale. Measure frame openings carefully and cut fabric pieces slightly larger than the backing boards. Stretch the fabric smoothly over the backing and secure it using adhesive or tape on the reverse side. Ensure that patterns remain centered and aligned before fastening permanently. Reassemble the frames and evaluate how the designs interact when displayed together. Coordinated color palettes help maintain visual harmony across multiple pieces. Arrange the frames on the floor before wall installation to refine spacing and composition. Once satisfied, mount them carefully while maintaining consistent alignment. Consider varying fabric patterns while preserving a common theme for cohesion. This beginner friendly tutorial transforms decorative textiles into polished wall art that combines elegance, simplicity, and customization.

Idea 9: Quilted Fabric Art Panel
How to Create
A quilted fabric art panel introduces texture, craftsmanship, and dimensional detail through layered textile construction. Unlike flat fabric displays, quilting creates raised surfaces that catch light and generate visual depth. This decorative concept can incorporate geometric patterns, abstract arrangements, or coordinated color blocks depending on design goals. The quilted structure contributes warmth and softness while demonstrating careful workmanship. Pinterest inspiration often showcases quilted projects because they merge traditional textile techniques with contemporary decorative applications. The resulting panel functions as both artwork and handcrafted decoration. Through thoughtful fabric selection, creators can produce designs that complement modern design interiors, farmhouse themes, or minimalist environments. The project encourages attention to detail while remaining achievable for dedicated beginners willing to follow a structured process.
Begin by selecting top fabrics, backing material, and a thin layer of batting for internal padding. Cut the pieces to matching dimensions and arrange them according to the intended pattern. Layer the backing, batting, and top fabric carefully before securing them temporarily with pins or clips. Stitch along planned lines to create the quilted effect and stabilize the layers. Consistent spacing contributes to a professional appearance and enhances overall texture. Once quilting is complete, trim edges neatly and finish them with binding or folded fabric borders. Mount the panel onto a frame or support structure suitable for wall display. Before installation, inspect the surface for loose threads and uneven sections. Proper finishing improves durability and presentation quality. This creative project requires additional planning but rewards the effort with a distinctive handmade wall decoration that highlights textile craftsmanship and visual texture.

Idea 10: Fabric Rosette Wall Arrangement
How to Create
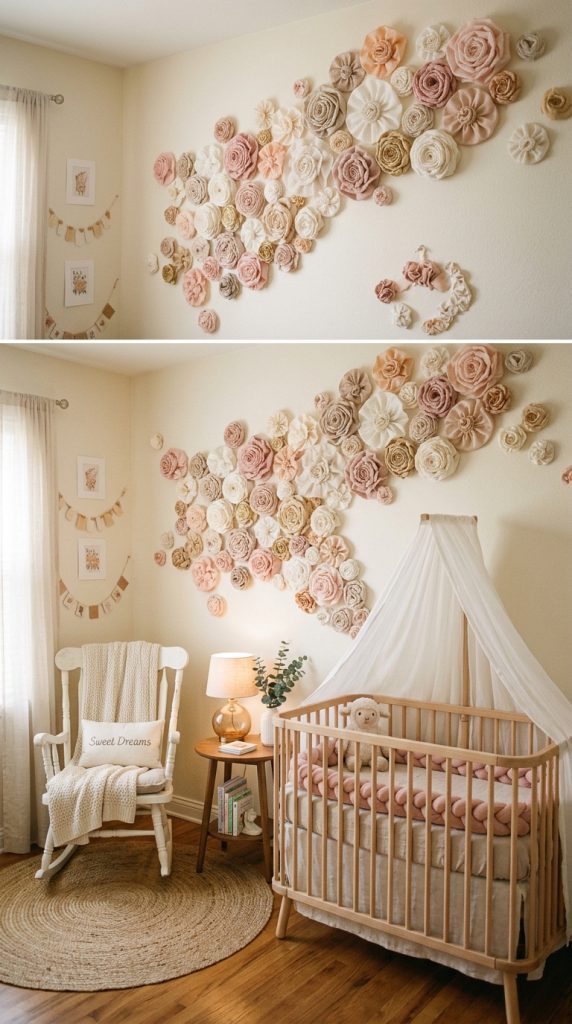
A fabric rosette wall arrangement uses folded and gathered fabric circles to create dimensional decorative elements that resemble floral forms. These rosettes can be displayed individually or combined into larger wall compositions that function as statement features. The design introduces softness, texture, and sculptural interest while remaining adaptable to different room styles. Fabric rosettes work especially well in bedrooms, nurseries, celebration spaces, and creative studios where decorative detail is appreciated. By varying size, color, and layering techniques, creators can achieve either subtle elegance or dramatic visual impact. Pinterest ideas frequently feature rosette arrangements because they are highly customizable and suitable for many aesthetic preferences. The project transforms simple materials into decorative forms that create depth and movement across wall surfaces. This handmade approach combines creativity with approachable construction methods, making it suitable for a wide range of skill levels.
To create fabric rosettes, cut circular fabric pieces in several sizes and gather the edges toward the center using stitching or adhesive techniques. Layer multiple circles together to increase fullness and dimension. Secure each completed rosette onto a backing disc or support surface to maintain its shape. Create a collection of rosettes before determining the final wall arrangement. Lay them out on the floor and experiment with placement patterns, spacing, and color distribution. Once a balanced composition is achieved, attach the pieces to the wall using appropriate mounting methods. Mixing large and small rosettes helps create visual movement and depth. Consider coordinating colors with surrounding home decor to improve integration. This step by step process results in an attractive fabric-based installation that delivers strong decorative value using accessible materials and straightforward construction techniques.
Common Beginner Mistakes and How to Avoid Them
One of the most common mistakes in fabric wall decor projects is insufficient planning. Many beginners begin cutting materials before measuring wall dimensions accurately, which often leads to poor proportions and wasted fabric. Another frequent issue involves selecting fabrics solely based on appearance without considering texture, weight, or durability. Heavy materials may sag, while extremely lightweight fabrics may not hang properly. Wrinkled fabric can also reduce the professional appearance of a finished project, making ironing an essential preparation step. Inconsistent spacing during installation is another challenge that affects overall visual balance. Creating temporary layouts on the floor before mounting helps identify design problems early. Some beginners also overcrowd decorative arrangements, reducing the impact of individual elements. Maintaining adequate negative space improves readability and visual organization. Weak mounting methods may compromise safety and stability, particularly for larger projects. Selecting hardware appropriate for project size and weight is important. Finally, rushing construction often leads to uneven cuts, misaligned patterns, and structural weaknesses. Taking time to measure carefully, test layouts, and review each step improves both craftsmanship and final presentation quality.
Practical Tips for Better Results
Achieving professional-looking fabric wall decor depends on attention to detail throughout the project. Begin by selecting a limited color palette that coordinates with existing furnishings and architectural features. Consistency helps create a cohesive appearance and prevents visual clutter. Testing fabric combinations under room lighting conditions allows more accurate evaluation of colors and textures. Accurate measuring remains one of the most valuable practices because proportion significantly influences decorative effectiveness. Creating paper templates before cutting expensive materials can reduce errors and improve efficiency. When working with patterned fabrics, pay attention to alignment so designs appear intentional rather than random. High-quality finishing details often distinguish polished projects from unfinished ones. Neatly trimmed edges, secure stitching, and carefully concealed mounting hardware contribute to a refined appearance. Maintaining clean work surfaces helps prevent stains and fabric damage during construction. Periodically stepping back from the project provides a broader perspective and makes it easier to identify imbalance or spacing issues. Thoughtful planning, precision, and patience consistently produce stronger results across a wide variety of DIY fabric decoration projects.
Styling, Presentation, or Organization Ideas
The presentation of fabric wall decor plays an important role in maximizing its visual impact. Placement should complement existing furniture rather than compete with it. Large decorative pieces often work best above beds, sofas, or consoles where they can function as focal points. Smaller projects benefit from grouping arrangements that create unified compositions. Maintaining consistent spacing between elements contributes to organization and professionalism. Layering textures throughout the room can strengthen connections between wall decor and other textile components such as cushions, rugs, or curtains. Color repetition is another effective strategy because it reinforces cohesion across the space. In minimalist style interiors, selecting neutral fabrics and simple arrangements supports a calm aesthetic. More expressive environments may incorporate varied patterns and richer textures. Lighting also influences presentation quality. Natural light and carefully positioned lamps can emphasize fabric texture and dimensional details. Seasonal updates provide additional flexibility, allowing decorative elements to evolve without replacing entire room designs. Thoughtful styling enhances the effectiveness of handmade decoration while ensuring that fabric wall projects integrate naturally within the overall interior design scheme.
Budget or Time Planning
Effective planning helps keep fabric wall decor projects affordable and manageable. Establishing a budget before purchasing materials prevents unnecessary spending and encourages thoughtful decision-making. Many creative ideas can be completed using fabric remnants, recycled textiles, or leftover materials from previous projects. Prioritizing essential supplies first helps maintain cost control while ensuring construction quality. Creating a detailed materials list reduces duplicate purchases and improves shopping efficiency. Time planning is equally important, particularly for larger or more detailed projects. Dividing work into stages such as measuring, cutting, assembly, finishing, and installation creates a structured workflow. This approach reduces stress and allows careful attention during each phase. Beginners may benefit from starting with smaller easy project options before progressing to more complex designs. Setting realistic timelines helps maintain motivation and reduces the likelihood of rushed workmanship. Workspace preparation can also improve efficiency by minimizing interruptions during construction. Through organized planning and resource management, fabric wall decor projects can remain budget friendly while still achieving attractive and durable results.
Creative Expansion and Advanced Inspiration
Once basic fabric wall decor techniques are mastered, numerous opportunities exist for creative expansion. Combining multiple methods within a single project can produce unique decorative features that stand out visually. For example, layered textiles may be integrated with embroidery hoop displays, quilted panels, or geometric mosaics to create multidimensional compositions. Advanced projects often explore texture through stitching techniques, appliqué details, fabric manipulation, or mixed-material additions. Experimenting with scale can also generate dramatic effects. Oversized installations and large-format wall hangings introduce strong visual statements while preserving the softness associated with textiles. Creative inspiration may come from architectural patterns, natural landscapes, geometric structures, or cultural textile traditions. Modular designs allow decorative arrangements to evolve over time through the addition of new components. Color gradients, abstract compositions, and layered pattern combinations provide further opportunities for artistic development. As skills improve, creators can adapt basic Pinterest ideas into personalized decorative solutions tailored to specific interiors. This progression transforms simple DIY projects into sophisticated handmade installations that showcase craftsmanship, creativity, and thoughtful design planning.