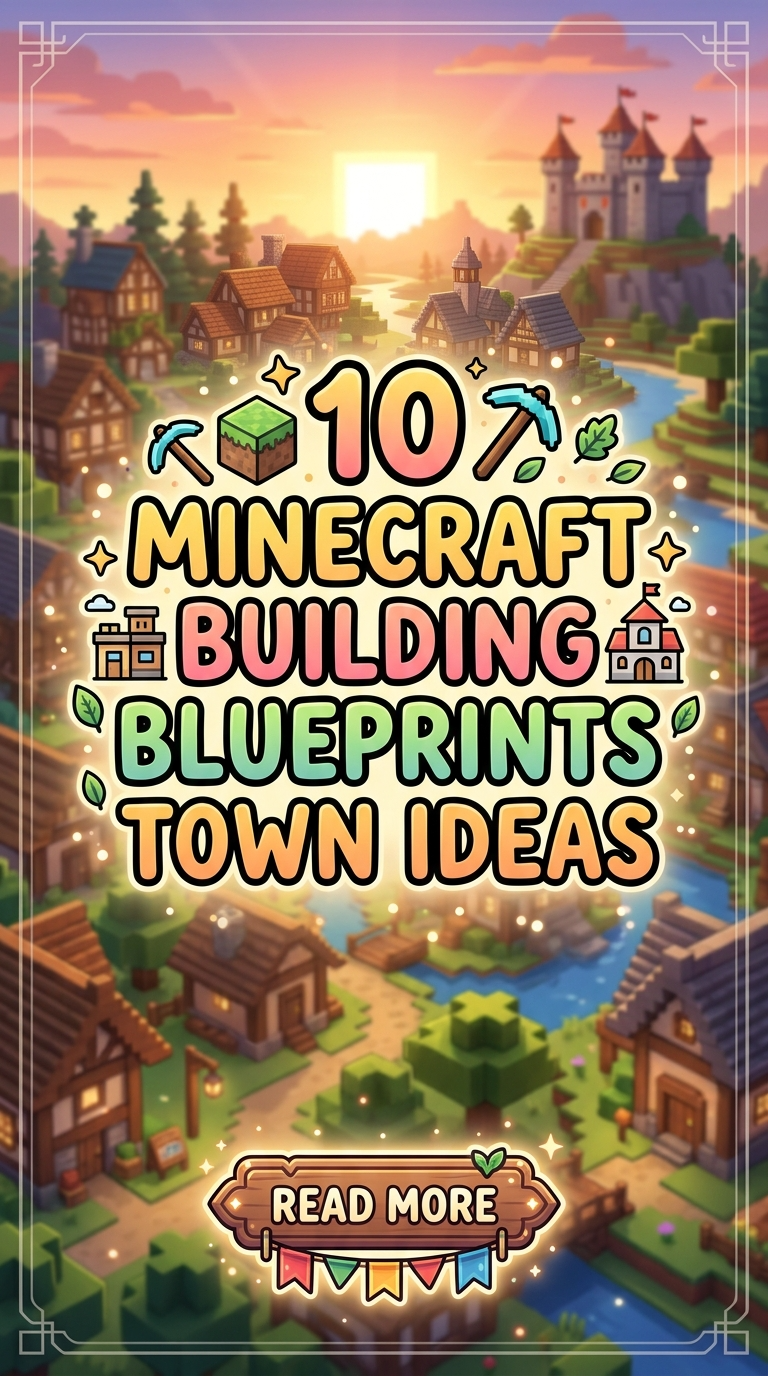
10 Minecraft Building Blueprints Town Ideas
Minecraft town building has become one of the most popular creative project categories shared across Pinterest ideas boards and gaming communities because it combines organization, architectural planning, and aesthetic world design into one large-scale experience. A well-designed Minecraft town creates a connected environment where buildings, roads, public spaces, and decorative details work together to form a believable and visually balanced setting. Unlike isolated structures, town blueprints require careful planning, material coordination, and layout consistency. This makes them highly useful for players who want to improve building skills while creating functional environments that feel realistic and immersive. This article explores 10 Minecraft building blueprints town ideas designed for different themes, styles, and gameplay goals. Readers will learn how to approach town construction through practical step by step methods, including layout planning, material preparation, road organization, building placement, and decorative detailing. Each idea focuses on beginner friendly concepts while still offering enough depth for advanced creativity. These town designs also provide inspiration for DIY projects within Minecraft, helping players transform empty landscapes into organized settlements that reflect modern design, medieval aesthetics, rustic environments, or fantasy-inspired architecture. The goal is to create towns that feel complete, balanced, and visually connected from every angle.
Why This Idea Is Trending or Useful
Minecraft town blueprints continue trending because they offer a structured way to combine creativity with long-term world organization. Many players move beyond simple survival houses and begin focusing on larger environments that include roads, marketplaces, residential districts, farms, and decorative public spaces. Pinterest ideas related to Minecraft towns are especially popular because they provide visual inspiration for creating connected worlds instead of isolated builds. Town layouts also support practical gameplay by improving navigation, storage organization, villager management, and resource distribution. These projects appeal to both casual builders and advanced players because towns can start small and expand gradually over time. Another reason these creative ideas remain popular is their flexibility. Players can design modern cities, fantasy villages, medieval settlements, coastal towns, or minimalist communities depending on the chosen environment and materials. Town blueprints also help beginners understand spacing, symmetry, and large-scale planning without requiring advanced technical skills. Many Minecraft players use these layouts as DIY tutorials for improving architectural consistency and aesthetic design. Since every structure contributes to a larger environment, town projects encourage creativity while teaching organization, visual balance, and step by step construction techniques that improve overall building quality.
Materials and Preparation
Successful Minecraft town construction begins with proper planning and material organization before placing the first block. The first step involves selecting a biome or terrain type that matches the desired town aesthetic. Plains areas work well for organized modern towns, while forests, mountains, and coastal regions support rustic or fantasy-inspired builds. Once the location is selected, players should define the overall town layout using pathways, district zones, and building placement guides. Materials should be gathered according to the chosen style. Stone bricks, wood planks, cobblestone, glass, concrete, lanterns, fences, slabs, and stairs are commonly used for town structures and decoration. Roads may require gravel, stone, or path blocks depending on the design concept. Players should also prepare landscaping materials such as leaves, flowers, water features, and lighting elements to improve environmental detail. Planning considerations include spacing between buildings, transportation routes, public gathering areas, and future expansion opportunities. Building one structure at a time without considering town flow often creates visual inconsistency. A blueprint approach ensures the town develops with logical organization and balanced proportions. This preparation stage simplifies construction while helping maintain a cohesive aesthetic across the entire Minecraft settlement.
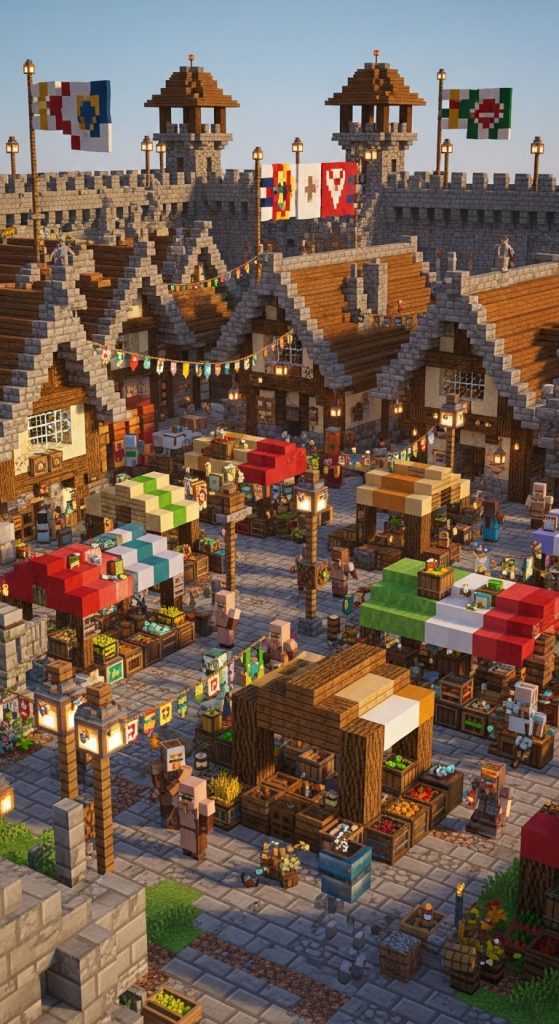
Idea 1: Medieval Marketplace Town
How to Create
A medieval marketplace town focuses on dense building placement, stone pathways, wooden structures, and centralized trading areas that create the appearance of an active historical settlement. This type of Minecraft building blueprint emphasizes realism through layered architecture, uneven street layouts, and practical town organization. The central marketplace acts as the heart of the settlement, surrounded by blacksmith shops, taverns, storage houses, farms, and residential buildings. Medieval town aesthetics rely heavily on texture variation using cobblestone, oak wood, spruce planks, and stone brick combinations. Roofs are usually steep and asymmetrical to create visual depth and realism. Decorative details such as lantern posts, banners, barrels, and fenced pathways contribute to the immersive atmosphere. This style remains one of the most popular Pinterest ideas because it blends fantasy inspiration with functional design. The compact structure arrangement also helps towns feel alive and interconnected instead of overly spacious or empty. A medieval blueprint works especially well in survival gameplay because buildings can serve practical purposes while maintaining strong visual consistency. The design encourages creative organization and helps players understand how roads, public areas, and structures interact within a complete town environment.
Begin by selecting a plains or forest biome with enough open space for expansion. Start construction with the marketplace square using stone pathways and wooden stalls placed around a central fountain or meeting area. Build roads extending outward toward residential and utility districts. Houses should vary slightly in height and width while maintaining consistent materials to preserve visual harmony. Use cobblestone foundations with wooden upper sections to create traditional medieval structure contrast. Add farms along the outskirts of town to improve realism and functional organization. Decorative elements such as lanterns, flower pots, fences, and carts should fill empty spaces naturally without overcrowding pathways. Build walls or watchtowers around the outer edge for protection and stronger town identity. Interior layouts should remain compact and practical with storage areas, fireplaces, and crafting spaces. This step by step approach allows beginners to create a realistic medieval town blueprint without needing advanced building techniques while still achieving a detailed and immersive final result.
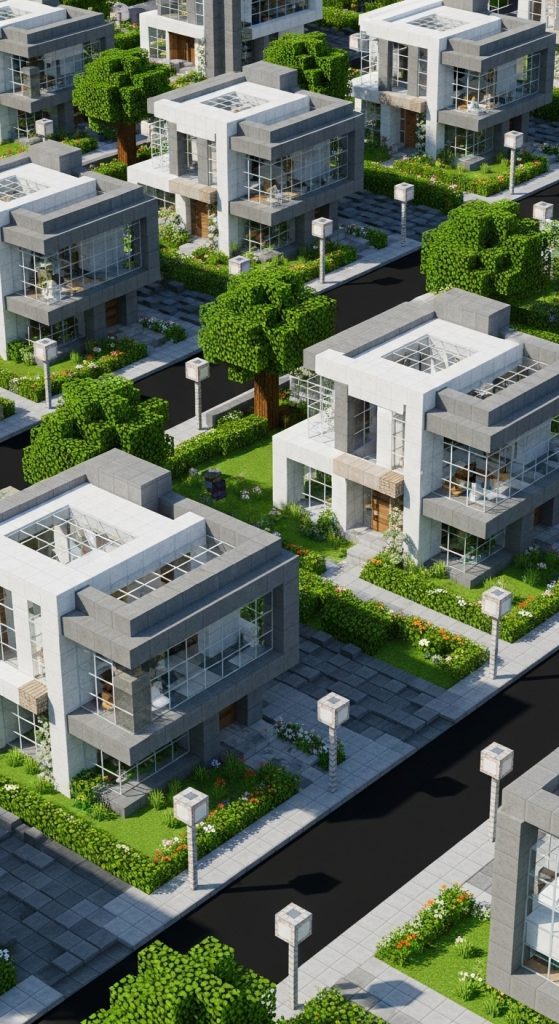
Idea 2: Modern Suburban Neighborhood
Step-by-Step Guide
A modern suburban neighborhood blueprint focuses on clean road layouts, organized housing placement, and minimalist style architecture that reflects contemporary residential design. This Minecraft town idea creates a calm and structured environment where homes, parks, and public areas connect through wide streets and symmetrical planning. Modern suburban builds emphasize simplicity, open spaces, and functional organization rather than heavy decoration. Materials commonly include concrete, glass, quartz, smooth stone, and light wood combinations that support modern design aesthetics. Each house typically features large windows, flat roofs, garages, and landscaped front yards. Sidewalks and street lighting improve navigation and create realistic urban structure. This type of town appeals to players seeking beginner friendly creative ideas because the geometric shapes are easier to construct than highly detailed fantasy structures. The organized layout also supports future expansion without disrupting visual consistency. Pinterest inspiration for suburban towns often focuses on neat spacing, greenery integration, and cohesive architectural themes. The result is a visually balanced Minecraft settlement that feels realistic, functional, and aesthetically modern.
Start by creating a grid-based road system using stone or concrete blocks for streets and slabs for sidewalks. Divide the area into residential plots with equal spacing between homes. Construct houses using rectangular foundations and flat roof designs to maintain architectural consistency throughout the neighborhood. Add garages, driveways, and fenced gardens to improve realism and decoration quality. Public spaces such as parks, basketball courts, or swimming pools can break up repetitive building placement while improving community atmosphere. Trees and bushes should line sidewalks to soften the modern structure lines and add natural contrast. Streetlights placed evenly along roads improve nighttime visibility and aesthetic balance. Interior layouts should remain open and uncluttered with organized furniture placement and large window designs. This easy project blueprint teaches players how to organize large-scale builds efficiently while maintaining modern visual appeal through careful planning and material coordination.
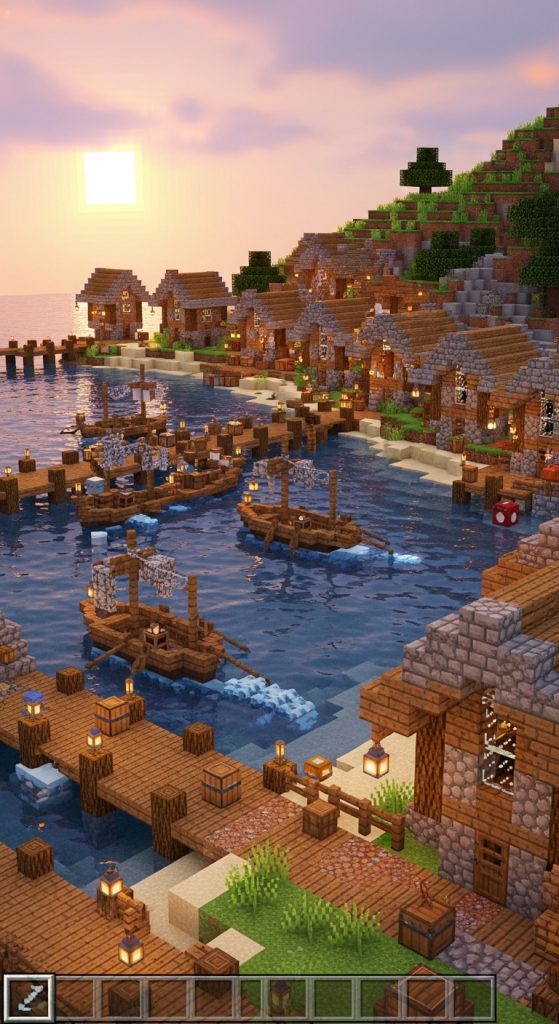
Idea 3: Coastal Fishing Village
How to Make
A coastal fishing village blueprint creates a peaceful Minecraft town centered around water access, wooden docks, and compact seaside homes. This aesthetic design emphasizes natural integration between architecture and the surrounding ocean environment. Fishing villages often feature weathered wood textures, sloped roofs, and layered pathways built into cliffs or coastlines. The visual appeal comes from combining practical survival structures with decorative maritime details such as boats, nets, lanterns, and storage crates. Pinterest ideas for coastal towns frequently highlight relaxed layouts where buildings follow terrain contours instead of rigid organization patterns. This creates a more natural and believable settlement appearance. Materials like spruce wood, oak logs, cobblestone, and stripped timber help reinforce the rustic waterfront atmosphere. The blueprint works well for both survival and creative gameplay because fishing areas, docks, farms, and homes can all function together within a compact layout. Water features also enhance the aesthetic by reflecting lighting and architecture during nighttime gameplay.
Begin by selecting an ocean or river biome with accessible shoreline terrain. Construct docks first using wooden slabs and fence posts to establish the village center. Place small fishing boats and storage crates nearby to create activity and realism. Build houses close together using wood and stone combinations while varying roof heights to avoid repetitive structure patterns. Pathways should follow the natural coastline using gravel or path blocks instead of straight roads. Add lanterns along docks and bridges to improve nighttime atmosphere and navigation. Fishing huts, smokehouses, and small farms can be positioned near the outskirts of town for practical gameplay use. Decorative details such as seaweed patches, barrels, and rope-style fence arrangements help strengthen the coastal theme. Interior spaces should remain compact with functional storage and sleeping areas. This step by step blueprint allows players to create a charming handmade village that feels connected to its natural environment while remaining visually organized and immersive.
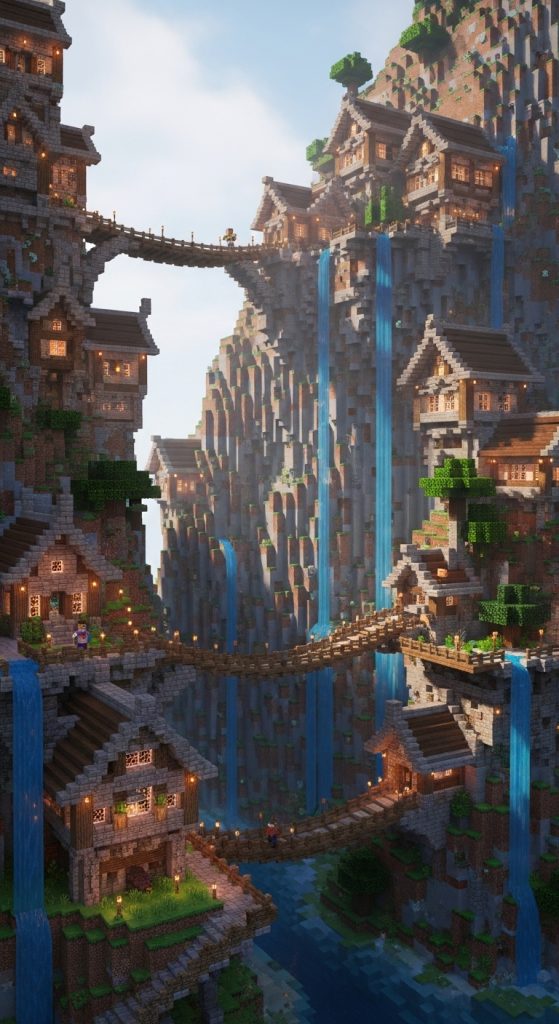
Idea 4: Mountain Cliff Town
Execution Process
A mountain cliff town blueprint uses vertical terrain to create dramatic layered architecture built directly into hillsides and rocky landscapes. This Minecraft building style focuses on elevation, stone integration, and connected pathways that wind through different height levels of the settlement. Unlike flat town layouts, cliff towns depend heavily on stair systems, bridges, retaining walls, and terraced construction. The design creates strong visual depth because buildings appear stacked naturally along the mountainside. Stone bricks, cobblestone, spruce wood, and deepslate materials work especially well in this environment because they blend with rocky terrain while maintaining architectural consistency. Pinterest inspiration for mountain towns often highlights dramatic views, suspended bridges, and layered lighting that transforms cliffs into visually striking settlements. This creative project also supports practical survival gameplay by using natural terrain for protection and organization. The blueprint encourages players to think vertically instead of horizontally, improving environmental integration and advanced planning skills while remaining achievable for beginners willing to work step by step.
Start construction by mapping safe pathways across the mountain using slabs, stairs, and retaining walls to stabilize movement routes. Build the lowest structures first, such as storage houses or farms, before gradually expanding upward toward residential and decorative sections. Houses should partially blend into cliff walls instead of sitting completely detached from the terrain. Wooden balconies, hanging lanterns, and bridge connections improve accessibility while enhancing the town’s visual identity. Add waterfalls and vegetation between buildings to soften harsh stone surfaces and create natural contrast. Elevated watchtowers or meeting platforms can act as focal points visible from below. Lighting placement is important because shadows naturally form around cliffs and narrow pathways. Interior layouts should remain compact and practical due to limited horizontal space. This setup method creates an immersive Minecraft town that feels organically connected to the mountain itself while teaching players how to manage elevation-based design effectively.
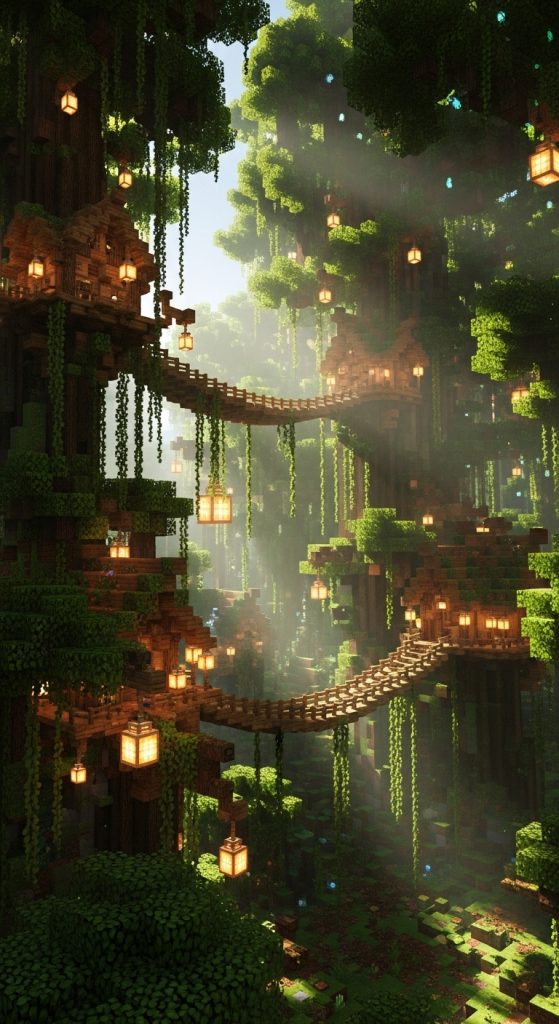
Idea 5: Fantasy Elf Forest Settlement
How to Create
A fantasy elf forest settlement combines natural landscapes with elegant architecture inspired by mythical woodland communities. This Minecraft town blueprint focuses on harmony between structures and surrounding forests, creating an environment where buildings appear integrated into trees and natural terrain. The aesthetic depends on curved pathways, elevated walkways, soft lighting, and lightweight wooden designs that avoid heavy industrial materials. Birch wood, spruce planks, moss blocks, leaves, and glow lighting elements support the magical atmosphere associated with fantasy settlements. Pinterest ideas related to elf-inspired towns often feature treehouses, suspended bridges, and hidden gardens that create a peaceful and immersive environment. The town layout should feel organic rather than perfectly symmetrical, allowing pathways and structures to follow the forest naturally. This design is highly beginner friendly because it encourages creativity without requiring strict architectural precision. The emphasis remains on atmosphere, decoration, and environmental integration instead of technical complexity. The result is a visually rich Minecraft settlement that feels calm, mysterious, and connected to nature.
Begin by selecting a dense forest biome with large trees and uneven terrain. Clear only small areas for construction to preserve the natural environment as much as possible. Build elevated wooden walkways connecting houses positioned among trees or on raised platforms. Structures should use light-colored wood and large windows to create openness and visual softness. Add decorative gardens with flowers, moss, lanterns, and water streams throughout the town to improve aesthetic consistency. Bridges should curve naturally between sections instead of following straight lines. Hidden pathways and small gathering spaces increase immersion while encouraging exploration. Lighting should remain warm and subtle using lanterns or glow blocks hidden within leaves and wooden supports. Interior decoration can include bookshelves, hanging plants, and compact seating arrangements. This DIY tutorial approach helps players build fantasy-inspired towns that maintain strong visual harmony while encouraging creative experimentation with terrain and natural design elements.
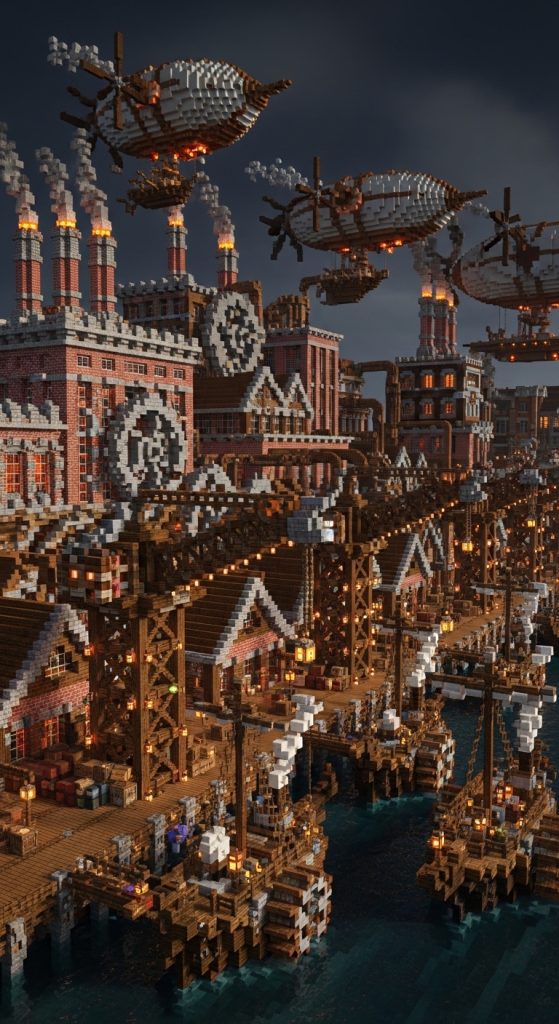
Idea 6: Industrial Steampunk Harbor
Setup Method
An industrial steampunk harbor town combines mechanical aesthetics with large dock systems, factories, warehouses, and elevated infrastructure. This Minecraft blueprint focuses on layered industrial design where pipes, gears, cranes, and smokestacks become part of the town’s visual identity. The environment typically features dark materials such as stone bricks, copper blocks, deep wood tones, and iron details that create a rugged mechanical atmosphere. Unlike minimalist style towns, steampunk settlements intentionally embrace structural complexity and dense decoration. Harbor districts, rail systems, bridges, and industrial towers work together to create a visually dynamic setting filled with movement and architectural contrast. Pinterest inspiration for industrial Minecraft towns often highlights machinery-like structures and detailed waterfront organization. This creative project encourages players to think about functional city planning while incorporating decorative engineering concepts into every building. The result is a unique aesthetic that combines fantasy engineering with organized urban structure.
Start construction near a river or ocean biome to support dock and shipping infrastructure. Build warehouses and factories first using stone, copper, and dark wood combinations. Add smokestacks and pipe systems extending between buildings to reinforce the industrial theme. Construct large wooden docks with cranes made from fences, chains, and trapdoors. Rail tracks or elevated walkways should connect major districts for visual continuity and navigation efficiency. Lighting should use lanterns and orange glow elements to create warm industrial atmosphere during nighttime gameplay. Decorative details such as barrels, storage crates, and mechanical-looking structures improve realism without requiring functional redstone systems. Buildings should vary in height and shape to create skyline depth. Interior spaces can include workshops, storage halls, and meeting rooms designed around utility rather than comfort. This blueprint helps players create detailed and immersive industrial towns that balance organization with strong aesthetic identity.
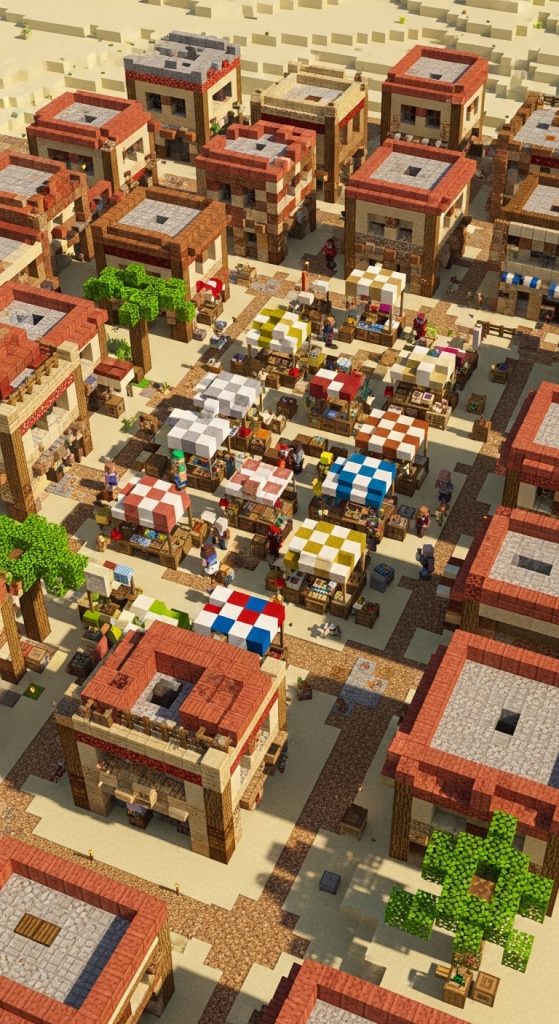
Idea 7: Desert Trading Town
How to Make
A desert trading town blueprint focuses on warm color palettes, compact architecture, and marketplace-centered organization designed to fit naturally within sandy environments. This Minecraft town style takes inspiration from traditional desert settlements where buildings are constructed close together to create shade and improve accessibility. Sandstone, terracotta, smooth stone, and wood accents form the foundation of the architectural style. Flat roofs, enclosed courtyards, and narrow pathways help define the visual identity of the settlement. Pinterest ideas for desert towns often emphasize layered rooftops, decorative market stalls, and colorful banners that create lively public spaces. The town’s layout should encourage movement through interconnected alleys and plazas instead of wide open roads. This style works well as a beginner friendly creative project because simple geometric shapes and repeated materials make construction manageable while still producing visually impressive results. The desert environment itself enhances the aesthetic by providing natural lighting and strong color contrast against the architecture.
Begin by selecting a desert biome with enough open terrain for expansion. Create a central marketplace first using sandstone stalls, shaded canopies, and decorative pathways. Surround the trading area with homes, inns, storage buildings, and farming sections positioned closely together to create density. Use flat roofs connected by small bridges or staircases to improve movement and add visual layering. Decorative details such as lanterns, clay pots, wells, and palm trees strengthen the town’s atmosphere. Pathways should use sandstone slabs and compact layouts to maintain consistency. Add defensive walls or towers around the outskirts to reinforce the feeling of a protected trading settlement. Interior spaces should remain simple and functional with organized storage and sleeping areas. This step by step blueprint allows players to build a realistic desert town that feels active, organized, and visually cohesive while remaining practical for survival gameplay.
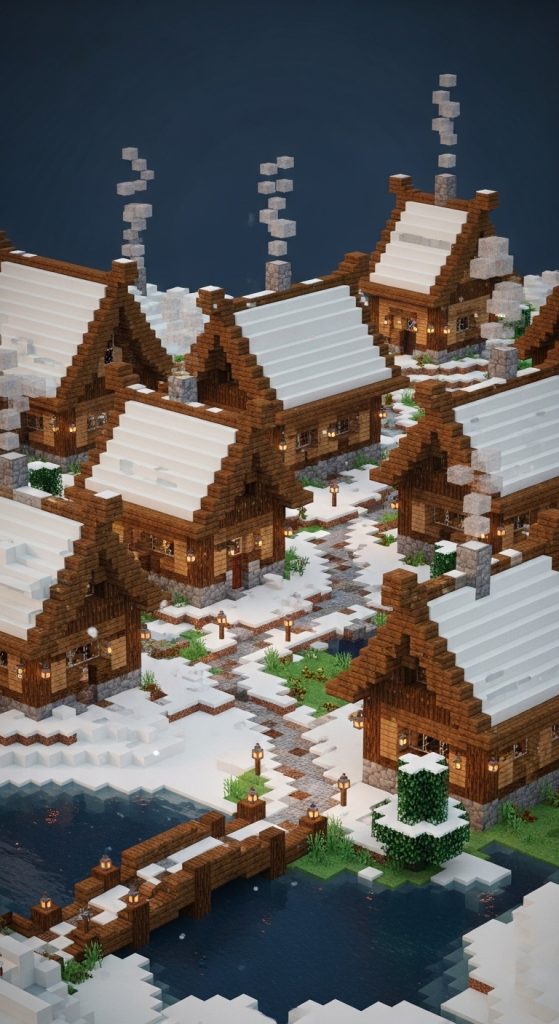
Idea 8: Snowy Nordic Village
How to Create
A snowy Nordic village blueprint combines cold-environment survival design with rustic wooden architecture inspired by northern mountain settlements. This Minecraft town aesthetic focuses on steep roofs, heavy timber framing, and warm lighting that contrasts against snowy landscapes. The visual appeal comes from combining practical winter architecture with cozy decorative details such as fireplaces, lanterns, and wooden balconies. Spruce wood, stone bricks, snow blocks, and dark roofing materials create the foundation for this design style. Pinterest inspiration for Nordic villages often highlights peaceful mountain scenery, frozen lakes, and organized pathways illuminated during nighttime snowfall. The town layout should feel compact and protected from harsh weather conditions, with structures positioned closely together around central gathering spaces. This creative project is ideal for players interested in atmospheric environments and realistic biome integration. The snowy setting naturally enhances lighting effects and architectural contrast, making even simple structures appear detailed and visually striking.
Start by choosing a snowy biome with mountainous terrain or frozen lakes nearby. Build a central hall or gathering lodge first using spruce logs, stone foundations, and layered roofs designed to handle heavy snowfall. Construct surrounding homes with elevated entrances and steep roof angles to maintain architectural consistency. Pathways should use packed snow, stone slabs, or wooden planks for realistic winter movement routes. Add lantern posts, fireplaces, and smoke effects to create warmth and atmosphere throughout the village. Farms can be enclosed within greenhouses or protected structures to improve realism and survival functionality. Decorative elements such as sled-style carts, fences, and frozen water features help reinforce the Nordic aesthetic. Interior layouts should remain warm and compact with wood-heavy decoration and practical organization. This easy project blueprint teaches players how to adapt architecture to environmental conditions while creating visually immersive winter towns.
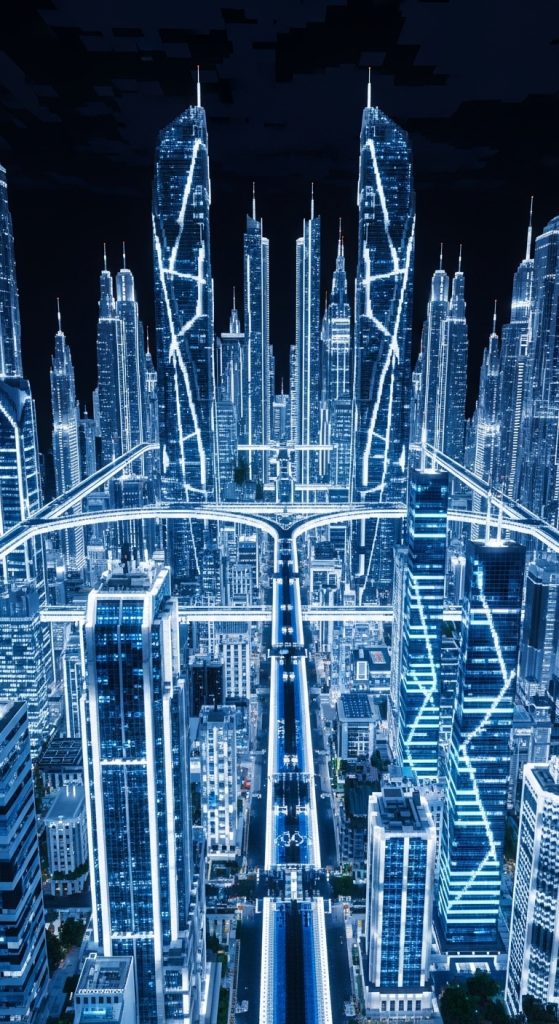
Idea 9: Futuristic Sci-Fi City Hub
Step-by-Step Guide
A futuristic sci-fi city hub focuses on advanced architectural concepts, glowing infrastructure, and sleek geometric layouts designed to create the appearance of a technologically advanced civilization. This Minecraft building blueprint uses modern design principles combined with imaginative structural forms to create large-scale urban environments filled with elevated walkways, glass towers, and illuminated transportation systems. Quartz, concrete, glass, sea lanterns, and metallic blocks are commonly used to achieve the clean futuristic aesthetic. Unlike traditional towns, sci-fi settlements emphasize verticality, symmetry, and organized lighting patterns. Pinterest ideas for futuristic Minecraft cities often showcase interconnected skyscrapers, floating platforms, and energy-inspired decoration that create strong visual identity. This type of creative project encourages large-scale planning and structural consistency while allowing flexibility for imaginative architecture. The result is a visually bold environment that transforms ordinary terrain into a high-tech urban landscape.
Start by creating a central transportation or energy hub that acts as the focal point for the city. Build wide roads or elevated pathways extending outward toward residential, industrial, and commercial districts. Towers should use smooth geometric shapes with large glass sections and embedded lighting systems to create futuristic contrast. Bridges, rail systems, and suspended walkways help connect structures while improving movement across the city. Decorative elements such as hologram-inspired signs, glowing gardens, and symmetrical plazas strengthen the advanced technological atmosphere. Interior layouts should remain spacious and organized with modern furniture arrangements and bright lighting. The city should maintain consistent material choices throughout all districts to preserve visual cohesion. This setup method allows players to build detailed futuristic towns step by step while exploring advanced architectural inspiration within Minecraft.
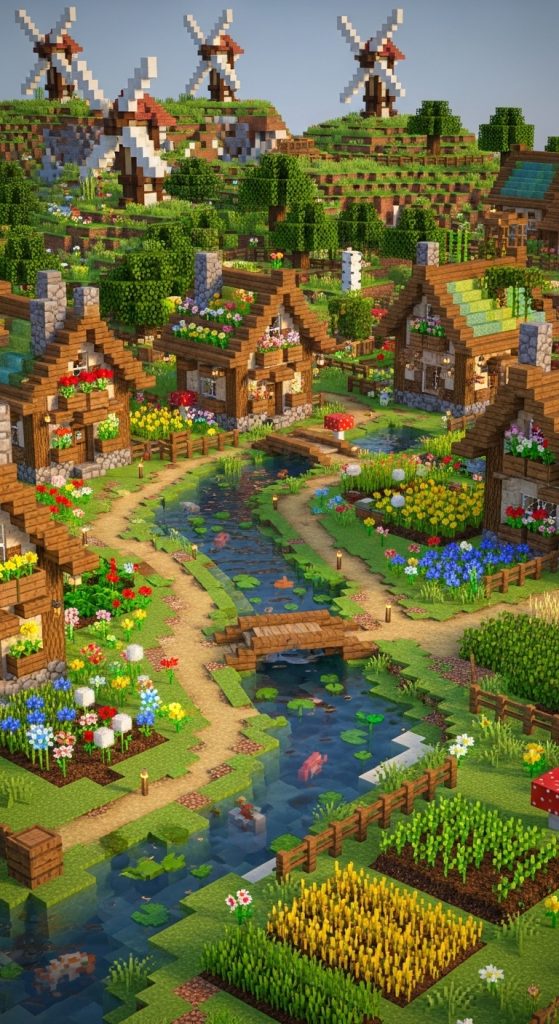
Idea 10: Cottagecore Countryside Town
Execution Process
A cottagecore countryside town blueprint focuses on peaceful rural living, handmade decoration, and natural landscaping designed to create a calm and welcoming Minecraft environment. This town aesthetic emphasizes small homes, farming areas, flower gardens, and soft natural color palettes that blend gently with surrounding terrain. Oak wood, birch planks, stone, leaves, flowers, and moss blocks are commonly used to support the cottagecore visual style. Unlike highly structured urban builds, countryside towns embrace irregular pathways, natural spacing, and decorative farming details. Pinterest ideas related to cottagecore Minecraft towns often feature windmills, barns, riverside cottages, and community gardens arranged around open green spaces. The aesthetic appeal comes from simplicity, warmth, and environmental harmony rather than architectural complexity. This beginner friendly project encourages creativity through landscaping and decoration while remaining practical and accessible for players at any skill level.
Begin construction by selecting a plains biome with rivers, hills, or open farmland nearby. Build small cottages first using stone foundations and wooden walls topped with sloped roofs. Add flower gardens, fences, and farming plots around each structure to create personalized outdoor spaces. Dirt pathways should curve naturally between homes and public areas instead of following straight lines. Windmills, barns, and market stands can serve as larger focal structures within the town layout. Decorative details such as lanterns, benches, bee farms, and water wells improve atmosphere while reinforcing the countryside theme. Trees and vegetation should remain abundant throughout the settlement to preserve the natural aesthetic. Interior layouts should feel cozy and practical with fireplaces, bookshelves, and storage integrated into compact living spaces. This blueprint helps players create relaxing Minecraft towns that combine organization, decoration, and nature-focused design into one immersive environment.
Common Beginner Mistakes and How to Avoid Them
One of the most common mistakes in Minecraft town construction is building structures individually without considering the overall layout. This often creates disconnected towns where roads, building styles, and public spaces lack visual consistency. Another frequent issue involves overusing one material throughout the settlement, causing the environment to appear flat and repetitive. Beginners also tend to make pathways too wide or leave excessive empty space between structures, reducing immersion and making towns feel unfinished. Poor lighting placement creates dark areas that weaken the aesthetic quality and disrupt navigation during nighttime gameplay. Ignoring terrain is another major mistake, especially when players flatten natural landscapes completely instead of integrating architecture into the environment. To avoid these problems, players should create a basic blueprint before building, defining road placement, district organization, and architectural style. Material variation should be introduced through stairs, slabs, and texture combinations rather than relying on single block types. Smaller decorative details such as lanterns, fences, plants, and elevation changes improve realism significantly. Gradual expansion also helps maintain organization because each new structure can be planned in relation to the existing town layout instead of being added randomly.
Practical Tips for Better Results
Improving Minecraft town blueprints requires careful attention to detail, organization, and environmental integration throughout every stage of construction. One effective method involves building roads and infrastructure before placing houses because pathways naturally guide town flow and spacing decisions. Using elevation changes such as hills, stairs, bridges, and retaining walls creates visual depth and prevents towns from appearing overly flat. Material layering also improves structure quality by combining slabs, stairs, walls, and fences instead of relying only on full blocks. Consistent lighting design enhances atmosphere while helping important structures stand out during nighttime gameplay. Another useful strategy involves studying real-world architecture or Pinterest ideas for inspiration related to layout organization, roof design, and decoration placement. Players should also avoid overcrowding structures because balanced spacing allows landscaping and pathways to contribute to the town’s overall aesthetic. Building one district at a time helps maintain consistency and prevents visual confusion. Trees, water features, flower beds, and public gathering areas create stronger environmental immersion and make settlements feel more realistic. Careful planning combined with gradual construction produces cleaner and more organized towns while improving both functionality and visual presentation within the Minecraft world.
Styling, Presentation, or Organization Ideas
Town styling plays a major role in determining how immersive and visually cohesive a Minecraft settlement appears once construction is complete. One effective approach involves dividing the town into themed districts such as residential zones, marketplaces, farming sections, industrial areas, or public gathering spaces. This organizational method creates natural structure while helping players manage expansion more efficiently. Consistent color palettes also improve aesthetic balance because buildings appear connected even when architectural shapes vary slightly. Pathways should visually connect important areas using matching materials and decorative lighting to guide movement naturally through the environment. Landscaping adds another layer of presentation quality by softening harsh building edges and integrating structures into surrounding terrain. Trees, bushes, rivers, flower beds, and small gardens create visual transitions between buildings while improving environmental realism. Public spaces such as fountains, plazas, parks, and marketplaces help towns feel active and functional instead of empty. Decorative details should remain proportional to the chosen town style. Medieval towns benefit from lanterns and barrels, while modern settlements require clean sidewalks and organized greenery. Presentation improves significantly when every structure contributes to the larger environment instead of functioning as an isolated build without connection to nearby areas.
Budget or Time Planning
Large Minecraft town projects become easier to manage when players divide construction into smaller phases based on time, materials, and expansion priorities. One practical approach involves starting with essential infrastructure such as roads, pathways, farms, storage areas, and a few core buildings before adding decorative structures. This method prevents players from becoming overwhelmed by attempting to complete an entire town at once. Material planning is equally important because gathering blocks without preparation often slows progress and creates inconsistent architectural styles. Players should define a limited material palette early in the project to simplify resource collection and maintain visual consistency. Building reusable structure templates also reduces construction time because houses, shops, and utility buildings can follow similar layouts while still allowing small variations. Creative mode planning before survival construction helps identify spacing problems and design improvements in advance. Another effective strategy involves completing one district fully before expanding outward, ensuring each section feels finished and organized. Landscaping and decoration should be added gradually after major structures are complete. Breaking the project into manageable stages keeps motivation high while allowing steady progress toward a complete Minecraft town blueprint without unnecessary delays or resource shortages.
Creative Expansion and Advanced Inspiration
Minecraft town blueprints can expand far beyond simple villages once players become comfortable with layout planning and aesthetic organization. Advanced creative ideas include connecting multiple towns through highways, rail systems, bridges, or waterways to form larger regional environments. Players can also combine architectural themes within different districts, creating medieval marketplaces beside modern industrial zones or fantasy forests connected to mountain settlements. Vertical building techniques introduce another level of creativity through underground districts, cliffside expansions, floating platforms, or elevated transportation systems. Seasonal transformations provide additional inspiration by redesigning towns for winter, autumn, or festival themes using temporary decoration and lighting changes. Redstone integration can improve realism through automated gates, transportation systems, lighting controls, and functional marketplaces. Larger creative projects may also include castles, ports, universities, arenas, or government districts that expand the town’s identity and storytelling potential. Terrain transformation is another advanced technique where rivers, cliffs, forests, and coastlines are reshaped to support architectural goals while maintaining natural appearance. Players interested in cinematic presentation can design scenic viewpoints, harbor skylines, or dramatic entrances that improve visual impact when exploring the town. These advanced expansion methods encourage long-term creativity while transforming Minecraft worlds into fully developed and immersive environments.