
10 Mud Kitchen Accessories Ideas
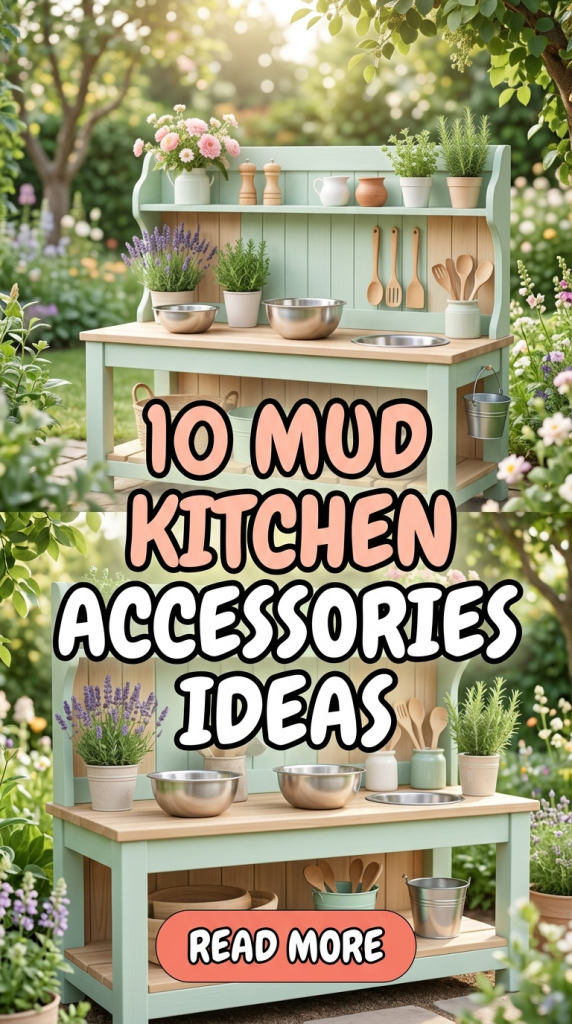
Mud kitchens have become one of the most popular outdoor play and learning setups in modern Pinterest ideas because they combine creativity, sensory exploration, and practical DIY design in a simple environment. A mud kitchen is an outdoor play station where children can mix soil, water, leaves, stones, and natural materials while using realistic kitchen-inspired accessories. These setups encourage imaginative learning and hands-on activity while supporting outdoor engagement. Many parents and educators now include mud kitchens in backyard spaces because they are beginner friendly, adaptable, and easy to personalize with handmade decoration and organization features.
This article explores practical mud kitchen accessories ideas that improve both functionality and visual appeal. Readers will learn how to create useful additions such as storage systems, water stations, preparation counters, and natural ingredient displays using accessible materials and step by step planning methods. Each idea focuses on realistic outdoor use while maintaining a clean and aesthetic design suitable for modern outdoor home decor inspiration. The goal is to create a creative project that encourages play, supports organization, and improves the overall mud kitchen experience with practical accessories that are simple to build and maintain.
Why This Idea Is Trending or Useful
Mud kitchen accessories have become trending ideas across Pinterest because they combine outdoor learning with creative DIY construction in a visually appealing format. Parents and educators are increasingly searching for easy project solutions that encourage children to spend more time outdoors while interacting with natural materials. Unlike plastic indoor toys, mud kitchen setups create open-ended environments where children can experiment freely with texture, water, soil, and imaginative cooking activities. Accessories improve these spaces by adding structure, organization, and realistic functionality.
Another reason for their popularity is their strong connection to modern design and handmade outdoor decoration trends. Many mud kitchen accessories use reclaimed wood, metal containers, natural baskets, and simple shelving systems that fit minimalist style outdoor spaces. The DIY appeal also makes them accessible to beginners because most projects require only basic tools and affordable materials. Pinterest inspiration often highlights rustic storage jars, hanging utensil walls, herb stations, and water dispensers that transform simple mud kitchens into organized creative spaces. These additions increase usability while maintaining a playful and natural aesthetic that works well in gardens, patios, and backyard learning areas.
Materials and Preparation
Preparing for a mud kitchen accessories project requires careful planning to ensure safety, durability, and organization. Most accessories can be built using basic DIY materials such as reclaimed wood, metal buckets, hooks, baskets, jars, wooden crates, and weather-resistant containers. Outdoor-safe screws, nails, and wood sealants are commonly used to strengthen handmade structures and protect them from moisture exposure. Tools such as drills, hammers, measuring tape, sandpaper, and paintbrushes are useful for creating stable and safe accessories suitable for outdoor use.
Before construction begins, it is important to evaluate the available outdoor space and determine how the mud kitchen will be used. Some families prioritize storage and organization, while others focus on sensory play stations or decorative elements. Planning should include drainage considerations, accessibility for children, and safe placement of accessories away from unstable surfaces. Surfaces should be sanded carefully to remove rough edges, and materials exposed to weather should be sealed properly. Organizing accessories according to activity zones such as cooking, washing, or ingredient storage creates a more functional setup. Good preparation improves long-term durability and helps create a clean and attractive outdoor play environment.
Idea 1: Hanging Utensil Wall
How to Create
A hanging utensil wall is one of the most practical mud kitchen accessories because it improves organization while making tools easy to access during outdoor play. This setup usually includes mounted hooks, rails, or pegboards where children can hang spoons, strainers, measuring cups, and small pots. The accessory also adds visual structure to the mud kitchen and creates a realistic cooking environment inspired by full-sized outdoor kitchens. Pinterest ideas frequently feature rustic wooden backboards combined with metal hooks to create a balanced mix of handmade decoration and functional storage.
To create this accessory, begin by selecting a wooden board wide enough to hold several hanging tools. Sand the surface carefully and apply outdoor-safe sealant to protect it from weather exposure. Install evenly spaced hooks across the board and secure the structure to the mud kitchen wall or fence using strong screws. Lightweight kitchen utensils can then be arranged according to size and function. Keeping similar tools grouped together improves accessibility and teaches basic organization habits during play activities.
Execution Process
The practical setup process begins with measuring the available wall space behind the mud kitchen. A balanced layout should allow children to reach accessories comfortably without overcrowding the area. Wooden boards can be painted in natural earthy tones or left unfinished for a minimalist style appearance. Hooks should be installed securely to support repeated use and outdoor exposure.
After mounting the board, arrange utensils by category. Mixing tools, pouring containers, and scooping accessories should each have designated sections. Metal buckets or small hanging baskets can also be added for storing leaves, pebbles, or mud ingredients. This organization system improves the overall flow of outdoor play while maintaining a neat appearance. The hanging utensil wall is a beginner friendly DIY tutorial project that requires minimal materials and delivers strong practical value for everyday mud kitchen use.
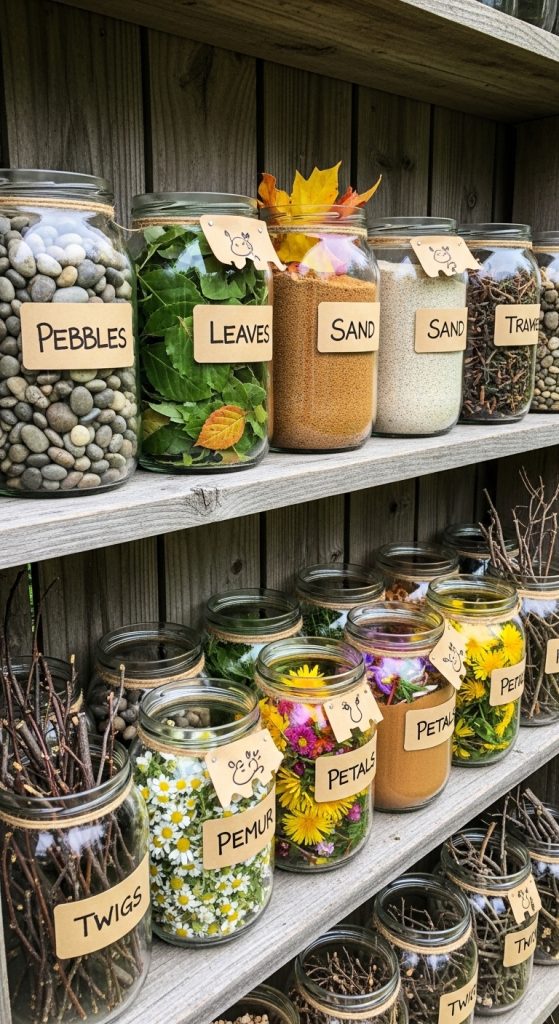
Idea 2: Mud Ingredient Storage Jars
Step-by-Step Guide
Mud ingredient storage jars provide a simple way to organize natural play materials while adding aesthetic detail to the mud kitchen setup. These jars are commonly used to store pebbles, dried flowers, leaves, sticks, shells, and sand collected during outdoor exploration. Pinterest inspiration often showcases glass jars, recycled containers, or metal tins arranged neatly on wooden shelves to create visually appealing ingredient stations. This accessory supports organization while encouraging children to sort and categorize materials independently.
To create this setup, select weather-resistant jars or containers with secure lids. Transparent containers work especially well because they allow children to identify materials quickly. A wooden shelf or crate system can be mounted above or beside the mud kitchen workspace to hold the jars safely. Labels made from chalkboard paint or wooden tags can also be added to identify ingredients clearly and improve educational value during play activities.
How to Make
The setup process starts by cleaning and preparing all storage containers. Sharp edges should be removed or covered to ensure child safety. Arrange jars according to size and type of material, placing frequently used ingredients at lower levels for easier access. Shelves should be mounted securely and positioned away from standing water or unstable surfaces.
Natural materials can then be collected and sorted into individual jars. Leaves, pinecones, stones, petals, and bark pieces create visually rich displays that improve the sensory appeal of the mud kitchen. Rotating ingredients seasonally keeps the setup interesting and encourages outdoor exploration. This accessory combines practical organization with decorative value and works well within both rustic and modern design outdoor play spaces.
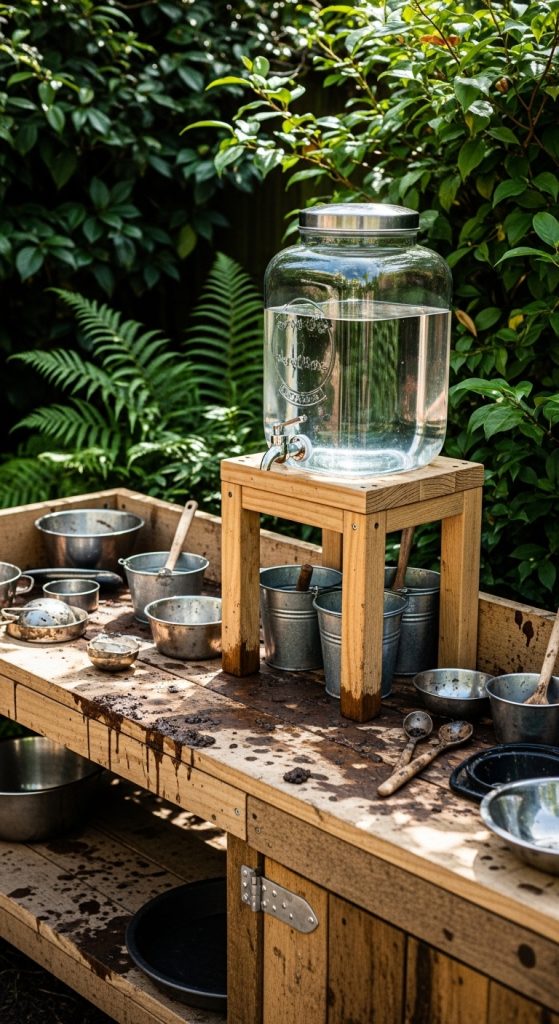
Idea 3: Outdoor Water Dispenser Station
Setup Method
An outdoor water dispenser station is one of the most functional mud kitchen accessories because it supports realistic mixing, pouring, and washing activities. Water play is central to mud kitchen experiences, and a controlled dispensing system improves convenience while reducing unnecessary mess. Pinterest ideas often include rustic containers with small taps mounted onto wooden stands beside preparation counters. This accessory creates a structured water source that children can operate independently during sensory play sessions.
To create this feature, begin with a large weather-resistant container fitted with a child-friendly spout or tap. The container should be mounted securely on a raised wooden platform to allow easy access for filling cups and bowls underneath. Positioning the dispenser near drainage areas helps maintain cleanliness and prevents mud buildup around the workspace.
Execution Process
The construction process begins with building or selecting a stable wooden stand that can support the weight of a filled water container. Sand all surfaces thoroughly and apply weather-resistant treatment to increase durability. The water dispenser should be positioned at a comfortable height that allows children to operate the tap safely without assistance.
Buckets or trays can be placed underneath to collect excess water and improve organization. Small washing bowls and mixing containers should remain nearby to encourage structured activity flow. Refilling the station regularly and cleaning the tap prevents clogging and maintains hygiene. This beginner friendly DIY accessory improves the realism and functionality of mud kitchens while supporting sensory learning and outdoor creative play.
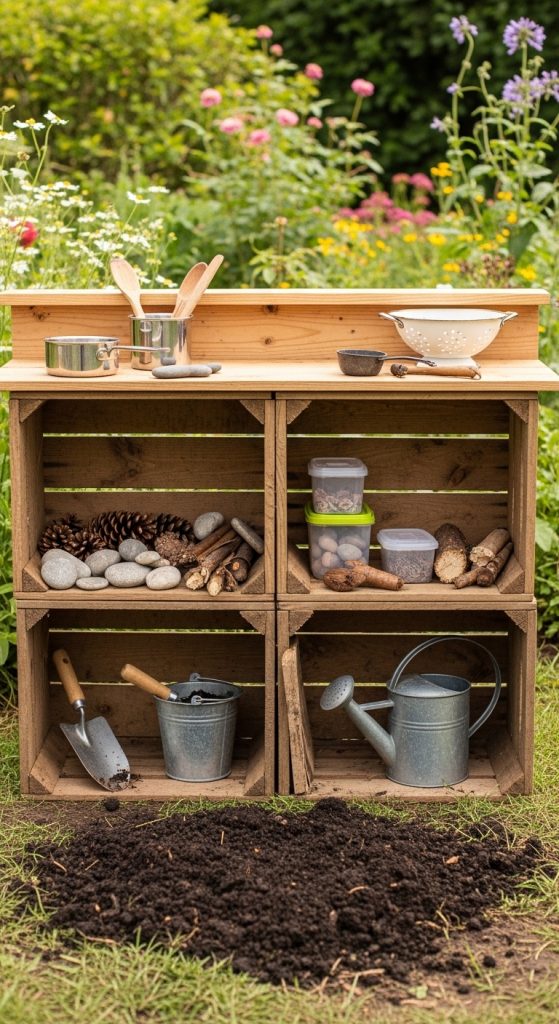
Idea 4: Wooden Crate Storage Shelves
How to Create
Wooden crate storage shelves provide practical organization while contributing to the rustic aesthetic commonly seen in Pinterest mud kitchen inspiration. These shelves are useful for storing pots, bowls, utensils, jars, and natural ingredients without cluttering the main workspace. Crates can be stacked vertically or mounted horizontally depending on available space and storage needs. Their simple structure also makes them accessible for beginner friendly DIY projects.
Start by selecting strong wooden crates with smooth surfaces and stable construction. Sand rough edges carefully and apply outdoor-safe wood protection. The crates can be arranged in layered formations beside the mud kitchen or attached directly to fencing for wall-mounted organization. Open-front storage makes it easier for children to identify and access materials independently.
Step-by-Step Guide
After preparing the crates, determine whether the setup will remain movable or permanently fixed. Movable crates provide flexibility for changing layouts, while mounted shelves create stronger long-term organization systems. Arrange heavier accessories at lower levels to improve stability and safety during use.
Decorative touches such as handwritten labels, natural baskets, or chalkboard panels can improve visual presentation while maintaining functionality. Grouping accessories by activity type creates cleaner organization and improves the flow of outdoor play. Wooden crate shelving combines storage, decoration, and accessibility in a simple and cost-effective outdoor accessory project.
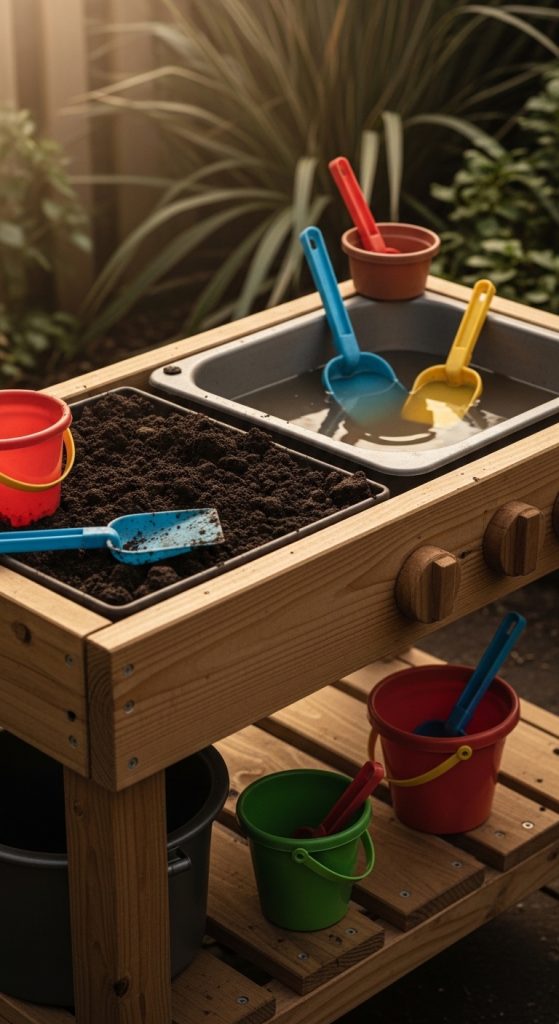
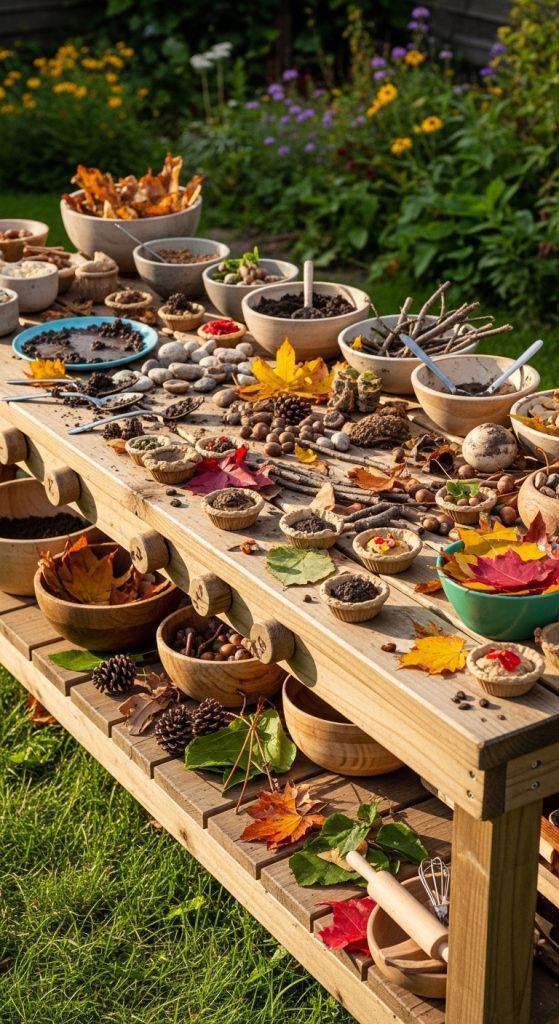
Idea 5: Mud Pie Preparation Counter
How to Make
A mud pie preparation counter creates a dedicated workspace where children can mix natural ingredients and create imaginative outdoor recipes. This accessory functions like a real kitchen countertop while remaining adapted for outdoor sensory play. Pinterest ideas often highlight wide wooden counters paired with bowls, trays, and ingredient displays to encourage creative interaction.
To create this setup, build a sturdy flat counter using weather-resistant wood. The surface should be smooth enough for mixing activities but durable enough to withstand water and mud exposure. A lower shelf underneath the counter can hold bowls, containers, and preparation tools. Positioning the station near the main mud kitchen improves workflow and organization.
Execution Process
The practical setup begins with measuring enough workspace for multiple activity zones. Children should have room for mixing, pouring, and arranging materials comfortably. Protective sealant should be applied evenly across the counter surface to increase durability against moisture and outdoor conditions.
Bowls, trays, measuring cups, and scooping tools can then be organized across the preparation station. Natural decorations such as herbs or flower petals add visual inspiration while encouraging imaginative play. The preparation counter improves the structure of the mud kitchen and supports longer creative sessions by providing a dedicated workspace for sensory cooking activities.
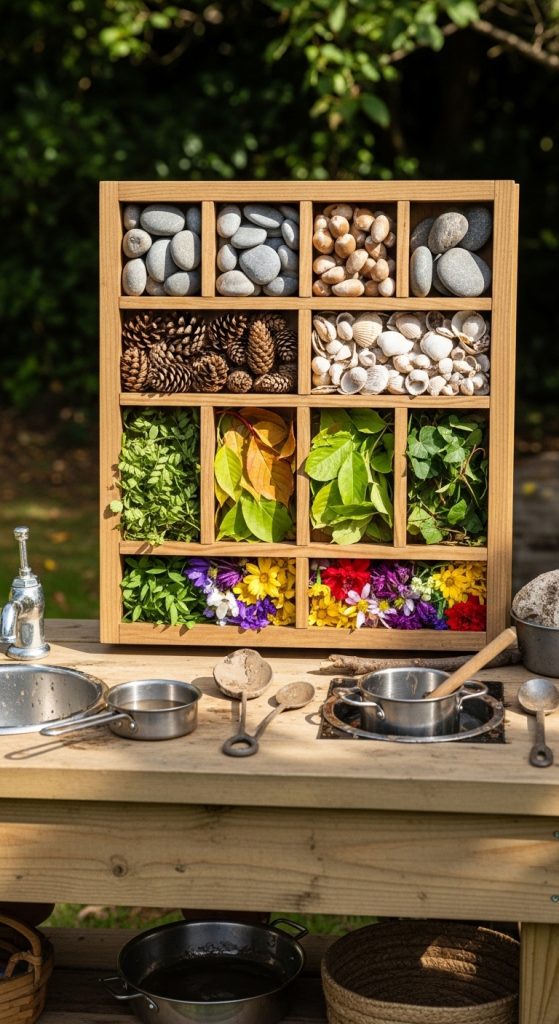
Idea 6: Nature Collection Display Rack
How to Create
A nature collection display rack helps organize and showcase outdoor materials gathered during play and exploration. This accessory encourages observation, sorting, and creative use of natural objects while adding decorative detail to the mud kitchen setup. Pinterest inspiration frequently includes wooden racks filled with stones, branches, flowers, pinecones, and shells arranged in organized compartments.
To create this display, construct a shallow wooden rack with divided sections or use repurposed crates and trays. Sand all surfaces carefully and apply weather-resistant protection. The rack can be mounted onto a fence or positioned beside the mud kitchen for easy access during play.
Setup Method
Once the structure is complete, begin organizing natural materials into separate sections according to texture, size, or type. Larger stones and branches should be placed at lower levels for stability, while lightweight decorative items can remain on upper shelves. Labels can also be added to encourage identification and learning.
Regularly rotating the collection keeps the display visually interesting and encourages seasonal exploration. This accessory combines organization, sensory learning, and natural decoration while improving the educational value of outdoor play spaces.
Idea 7: Hanging Pot and Pan Rail
How to Create
A hanging pot and pan rail introduces realistic kitchen organization into the mud kitchen environment. This accessory allows children to access cooking tools easily while maintaining a clean and structured workspace. Pinterest-style mud kitchens often include metal rails mounted beneath shelves or across wooden frames to hold lightweight pots and pans.
Begin by installing a strong horizontal rail made from wood or metal across the mud kitchen wall. Secure hooks evenly along the rail and ensure the structure is mounted safely. Lightweight outdoor-safe cookware can then be hung within reach for practical use during play activities.
Execution Process
The setup process involves balancing accessibility with organization. Frequently used tools should be placed at lower levels, while decorative or less-used accessories can remain higher. Spacing between hanging items prevents overcrowding and improves visual presentation.
Additional storage baskets can also be attached beneath the rail for scoops, spoons, and small containers. This accessory supports independent play while contributing to the realistic atmosphere of the mud kitchen. It is an easy project requiring minimal materials and basic planning.

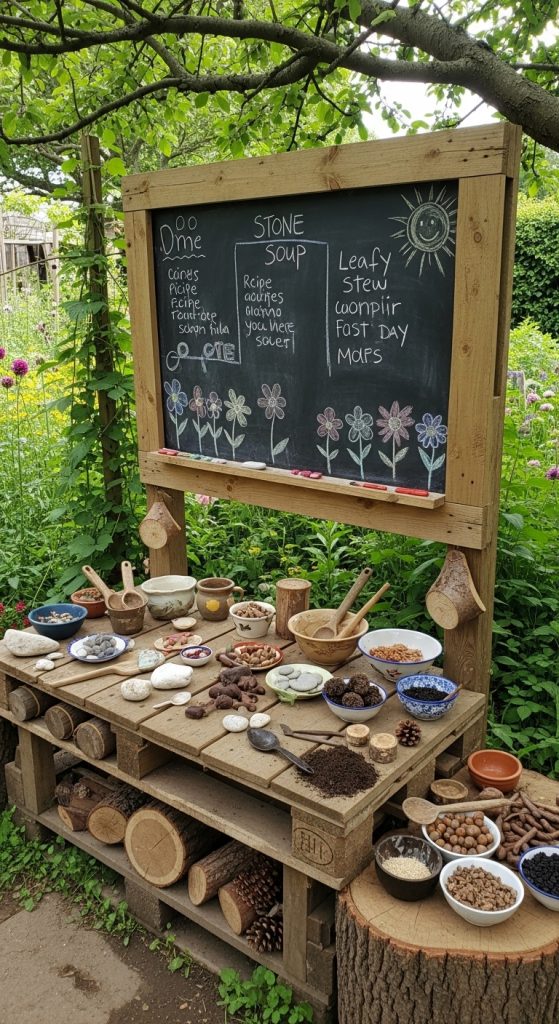
Idea 8: Chalkboard Recipe Wall
Step-by-Step Guide
A chalkboard recipe wall transforms the mud kitchen into an interactive creative space where children can draw recipes, ingredient lists, and imaginative menus. This accessory supports learning and encourages communication during outdoor play activities. Pinterest ideas often feature rustic framed chalkboards integrated directly into wooden mud kitchen structures.
To create this feature, attach a smooth board coated with outdoor chalkboard paint onto the kitchen wall or fence. The board should be mounted securely at child-friendly height and positioned away from heavy water exposure. Chalk storage containers can also be attached nearby for convenience.
How to Make
After installation, divide the board into simple sections such as recipes, ingredient lists, or menu displays. Decorative borders can be painted around the edges to improve visual appeal while maintaining functionality. Children can then use chalk to write imaginative cooking instructions or sketch mud kitchen creations.
Regular cleaning keeps the board easy to use and visually clear. This accessory adds educational value and creativity while contributing to the handmade aesthetic commonly associated with Pinterest mud kitchen inspiration.
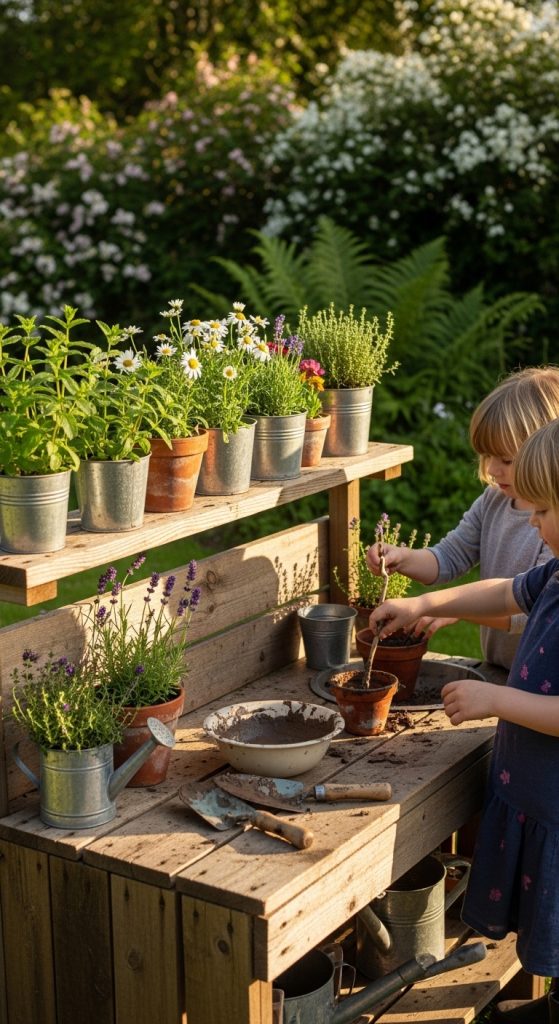
Idea 9: Herb and Flower Sensory Shelf
How to Create
A herb and flower sensory shelf introduces natural scents, textures, and colors into the mud kitchen environment. This accessory encourages sensory exploration while supporting decorative outdoor styling. Pinterest-inspired setups often combine small planters with wooden shelves to create organized sensory stations filled with herbs and seasonal flowers.
To build this feature, install a narrow shelf system beside the mud kitchen using treated wood or weather-resistant materials. Small containers or planters can then be arranged across the shelf to hold herbs, flowers, and textured natural elements.
Setup Method
Position fragrant herbs such as mint or lavender at accessible heights so children can interact with them safely. Flowers and textured plants should be grouped according to size and color to create a balanced presentation. Watering containers can also remain nearby for plant care activities.
This accessory improves both aesthetics and educational value while creating a calming and organized outdoor play environment. It works especially well in minimalist style backyard setups focused on natural materials and sensory learning.
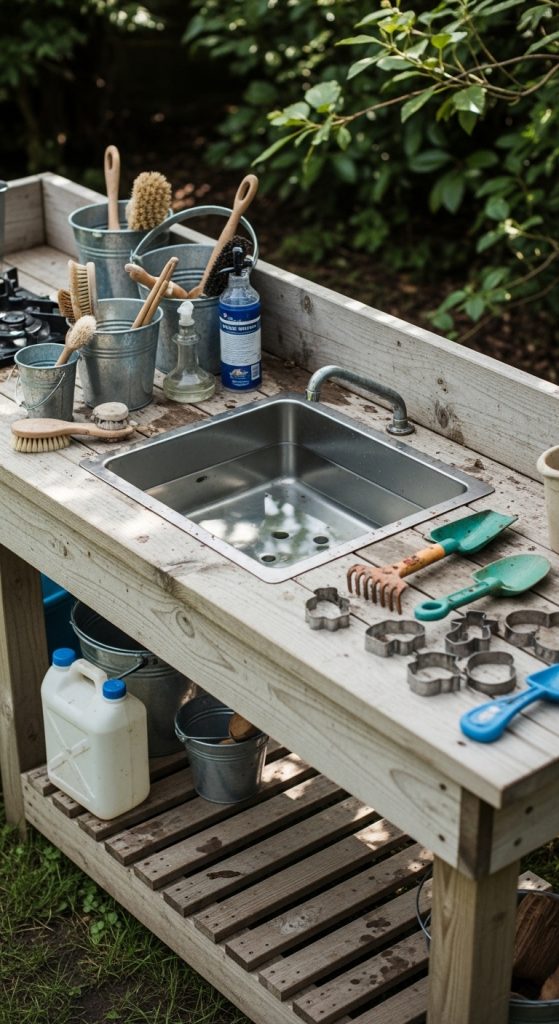
Idea 10: Outdoor Washing Basin Station
How to Make
An outdoor washing basin station provides a dedicated cleaning area for mud kitchen activities. This accessory improves organization by separating messy mixing tasks from washing and rinsing functions. Pinterest ideas often showcase metal tubs or deep basins mounted into wooden counters to create realistic cleaning stations.
To create this setup, install a durable basin into a wooden frame or countertop section. The structure should remain stable and positioned near a drainage area to prevent standing water buildup. Buckets and soap containers can also be included for additional functionality.
Execution Process
After securing the basin, organize nearby shelves or hooks for cloths, brushes, and washing tools. Water containers should remain easily accessible for rinsing activities. Drainage trays underneath the station help maintain cleanliness and reduce mud accumulation around the workspace.
This accessory supports realistic outdoor play while teaching organization and cleanup habits. It also improves the overall functionality of the mud kitchen by creating a dedicated washing area separate from preparation and ingredient stations.
Common Beginner Mistakes and How to Avoid Them
One common mistake in mud kitchen accessory projects is using untreated materials that quickly deteriorate when exposed to outdoor moisture. Wood that is not sealed properly may crack, warp, or develop rough edges that reduce safety. Another issue is overcrowding the mud kitchen with too many accessories, making movement difficult and reducing play efficiency. Poor organization also creates unnecessary clutter and limits accessibility for children.
To avoid these problems, choose weather-resistant materials whenever possible and apply outdoor sealants to wooden surfaces. Accessories should be spaced carefully to allow comfortable movement between activity zones. Planning storage systems before construction improves organization and prevents clutter from building over time. Sharp edges should always be sanded thoroughly, and mounted accessories should be tested for stability before use. Regular maintenance and cleaning also improve durability and help preserve the overall appearance of the mud kitchen setup.
Practical Tips for Better Results
Better mud kitchen results often come from focusing on simple organization and practical layout planning rather than excessive decoration. Grouping accessories according to activity zones such as washing, cooking, and ingredient storage creates smoother play experiences and improves usability. Durable containers and removable storage systems also make cleaning easier after outdoor use.
Using natural materials consistently across the design improves visual balance and supports the rustic aesthetic commonly seen in Pinterest inspiration. Rotating ingredients and sensory materials regularly keeps the setup interesting while encouraging outdoor exploration. Adding flexible storage options such as baskets or movable crates allows the mud kitchen to adapt over time. Maintaining a balance between functionality and decoration creates a more realistic and enjoyable outdoor learning environment.
Styling, Presentation, or Organization Ideas
Styling a mud kitchen involves combining practical organization with natural decorative elements that enhance the outdoor atmosphere. Wooden textures, metal containers, woven baskets, and neutral colors create a cohesive rustic appearance suitable for modern backyard home decor. Organizing accessories according to size and function improves both aesthetics and usability.
Open shelving systems help display natural materials attractively while maintaining accessibility during play. Hanging tools vertically creates visual structure and reduces countertop clutter. Seasonal flowers, herbs, and nature displays can also be integrated into the setup for additional sensory inspiration. Maintaining consistent colors and materials across all accessories creates a balanced and organized outdoor creative project that feels visually connected.
Budget or Time Planning
Most mud kitchen accessory projects can be completed efficiently using reclaimed materials and basic DIY construction methods. Wooden crates, recycled jars, metal buckets, and leftover boards are commonly reused in outdoor setups to reduce overall costs. Planning projects in stages also helps manage both budget and construction time effectively.
Simple accessories such as hanging utensil walls or chalkboard recipe stations can usually be completed in a single afternoon, while larger storage systems may require additional preparation. Prioritizing the most frequently used accessories first helps improve functionality without overwhelming the project budget. Measuring carefully before cutting materials also reduces waste and improves efficiency throughout the construction process.
Creative Expansion and Advanced Inspiration
Mud kitchens can be expanded gradually into larger outdoor learning environments with additional sensory and organizational features. Advanced inspiration often includes miniature greenhouse stations, outdoor baking counters, nature laboratories, or integrated gardening areas connected directly to the mud kitchen setup. These additions encourage longer creative sessions and broader educational activities.
Layered shelving systems, multi-level storage stations, and decorative lighting can also improve both functionality and visual appeal. Combining natural textures such as stone, reclaimed wood, and woven materials creates a more detailed outdoor aesthetic while maintaining practical usability. As the setup evolves, accessories can be rearranged or replaced seasonally to keep the environment dynamic and engaging.