10 Bird Bath Ideas DIY Mosaic Birdbath
A DIY mosaic bird bath is a decorative garden feature that combines functional wildlife support with artistic surface design. On Pinterest, mosaic bird bath ideas are widely shared because they transform simple outdoor structures into visually rich focal points using patterned tile, stone, or glass arrangements. This topic focuses on practical ways to design, build, and style mosaic bird baths that suit different garden sizes and outdoor aesthetics. Readers will learn how to plan materials, select mosaic patterns, and apply step by step techniques to create durable and visually balanced bird baths. The concept is useful because it enhances garden decoration while also providing water access for birds, contributing to a more natural and active outdoor environment. These projects fit well into DIY culture because they use accessible materials and allow creative freedom without requiring advanced construction skills. Whether the goal is a modern design, a minimalist style, or a colorful handmade decoration, mosaic bird baths offer flexibility in both appearance and structure. This guide explores ten practical ideas that combine creative inspiration with functional planning for long lasting garden improvement.
Why This Idea Is Trending or Useful
DIY mosaic bird baths are trending because they align with the growing interest in personalized outdoor spaces and handmade garden decor. Pinterest ideas increasingly focus on combining creativity with practicality, and mosaic surfaces provide an easy way to upgrade plain garden objects into artistic features. This type of project offers strong design relevance because it introduces color, texture, and pattern into outdoor environments without requiring major construction work. It is also highly accessible for beginners since the process mainly involves arranging small materials onto a prepared surface. The DIY appeal comes from the freedom to create unique patterns using simple materials such as tiles, stones, or glass pieces. These projects also support budget ideas because they can be completed gradually using leftover or recycled materials. Another important factor is versatility, as mosaic bird baths can match modern design, rustic landscapes, or minimalist garden styles depending on pattern selection. The combination of creative expression and functional purpose makes these projects popular in home decor inspiration boards and gardening communities. This balance between beauty and usability ensures continued interest across seasonal trends.
Materials and Preparation
Before starting a DIY mosaic bird bath project, proper preparation ensures durability and visual consistency. Essential materials include a base bird bath structure, mosaic tiles or broken ceramic pieces, waterproof adhesive, grout, sealant, and a protective coating for outdoor use. Additional tools include gloves, tile cutters or hammers for shaping pieces, sponges for cleaning grout, and brushes for applying sealant. Surface preparation is a critical step because the base must be clean, dry, and stable before applying any materials. Planning the mosaic layout in advance helps maintain pattern balance and reduces placement errors during installation. It is also important to decide on a color scheme or design theme before starting, especially for projects inspired by Pinterest ideas where visual harmony is essential. Working in small sections prevents adhesive from drying too quickly and allows better control over placement. Safety considerations should include wearing gloves and handling sharp materials carefully. Allowing sufficient drying time between steps ensures structural strength and long term durability. Proper preparation supports both aesthetic results and functional stability, making the entire creative project more efficient and beginner friendly.
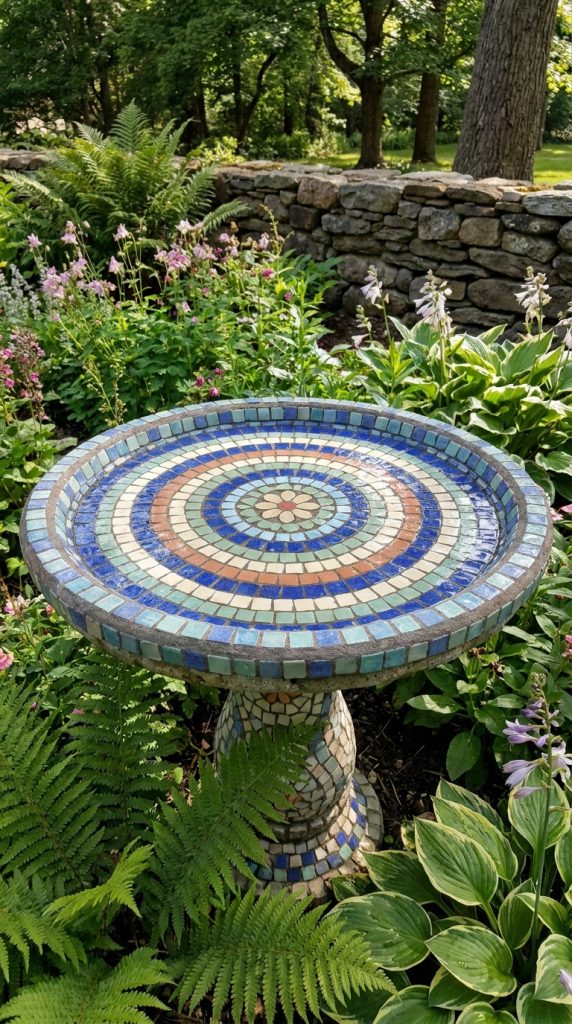
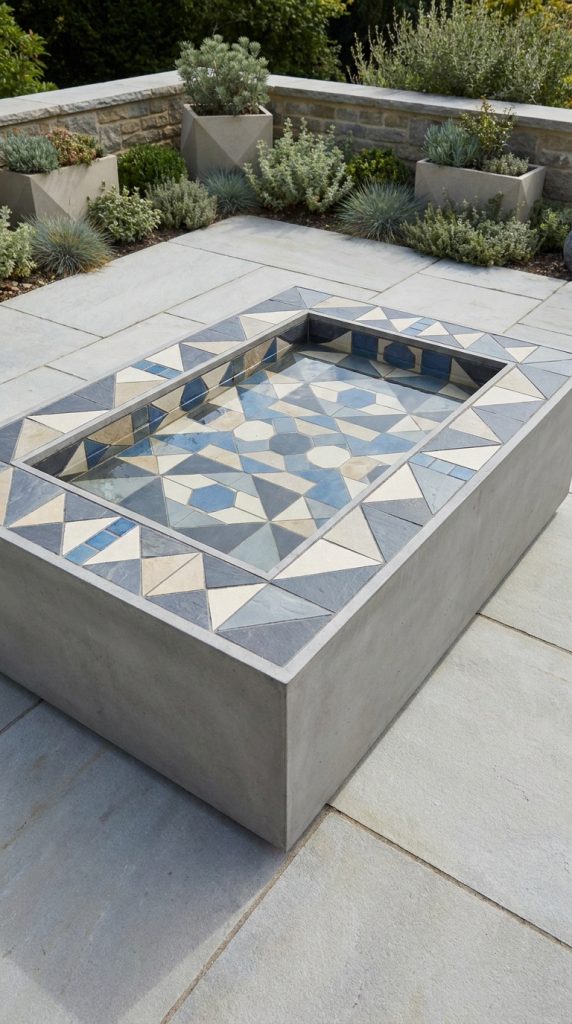
Idea 1: Classic Circular Mosaic Pattern Bird Bath
How to Create
A classic circular mosaic pattern focuses on symmetry and balance, making it one of the most widely used designs for DIY bird baths. The concept involves arranging mosaic pieces in concentric circles that radiate outward from the center of the bowl. This structure creates a visually stable design that draws attention naturally to the middle of the bird bath where water collects. The circular layout works well with both colorful and neutral palettes, depending on whether the goal is a vibrant garden feature or a more minimalist style decoration. This design is popular in Pinterest ideas because it offers timeless appeal and suits a wide range of garden environments. The repetition of circular shapes also creates a calming visual effect, making it suitable for home decor focused on natural harmony. The structure supports both beginner friendly execution and long term durability when properly sealed.
To create this design, begin by marking the center point of the bird bath and dividing the surface into circular guide rings. Apply adhesive in small sections and place mosaic pieces gradually along each ring, maintaining even spacing. Start from the center and work outward to preserve symmetry. Use a mix of tile sizes to improve texture while keeping the circular flow intact. Once the adhesive dries, apply grout evenly across the surface and clean excess material carefully. Finish with a waterproof sealant to protect the design from outdoor conditions. This step by step method ensures a balanced and durable result suitable for DIY garden projects.
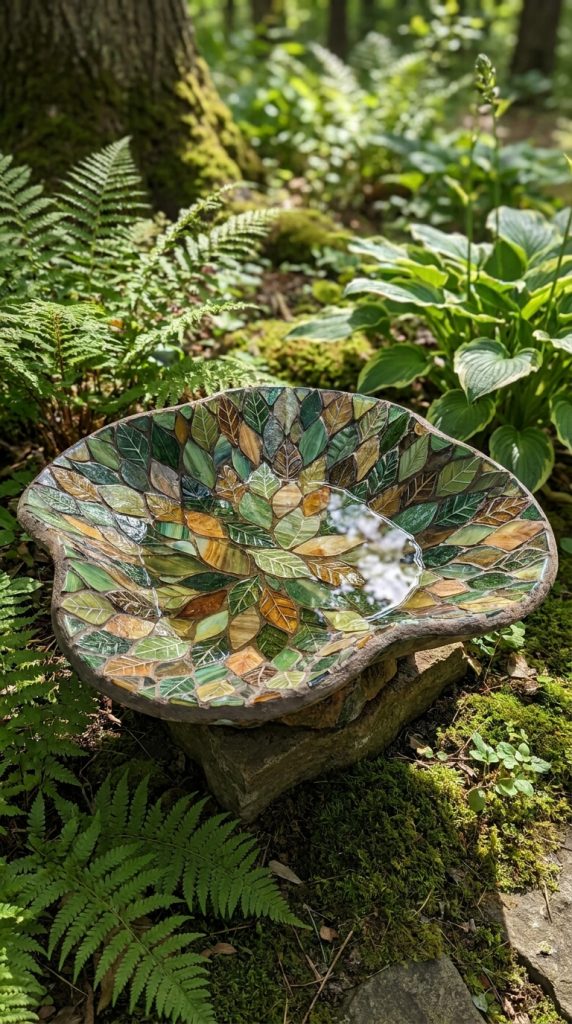
Idea 2: Nature-Inspired Leaf Mosaic Design
How to Make
A leaf-inspired mosaic design brings organic shapes into the bird bath surface, creating a natural flow that blends with garden environments. This concept focuses on replicating leaf patterns using green, brown, and earthy-toned mosaic pieces. The design emphasizes movement and natural structure rather than strict geometry. It fits well within modern design and minimalist style gardens because it reflects natural forms in a controlled artistic layout. This approach is often included in creative ideas collections due to its connection with outdoor landscapes and seasonal garden aesthetics. The visual result creates a sense of continuity between the bird bath and surrounding plants, making the entire space feel more unified and intentional.
To construct this design, sketch leaf outlines lightly on the bird bath surface before applying materials. Choose mosaic pieces in varying shades of green and arrange them along the leaf shapes, starting with the central vein and extending outward. Use smaller pieces for curved edges to maintain smooth transitions. Apply adhesive gradually to ensure precision. After placement, allow the surface to dry completely before grouting. Wipe carefully to preserve shape definition. Seal the finished design to protect it from moisture and weather changes. This step by step tutorial produces a natural and elegant bird bath surface suitable for beginner friendly DIY garden projects.
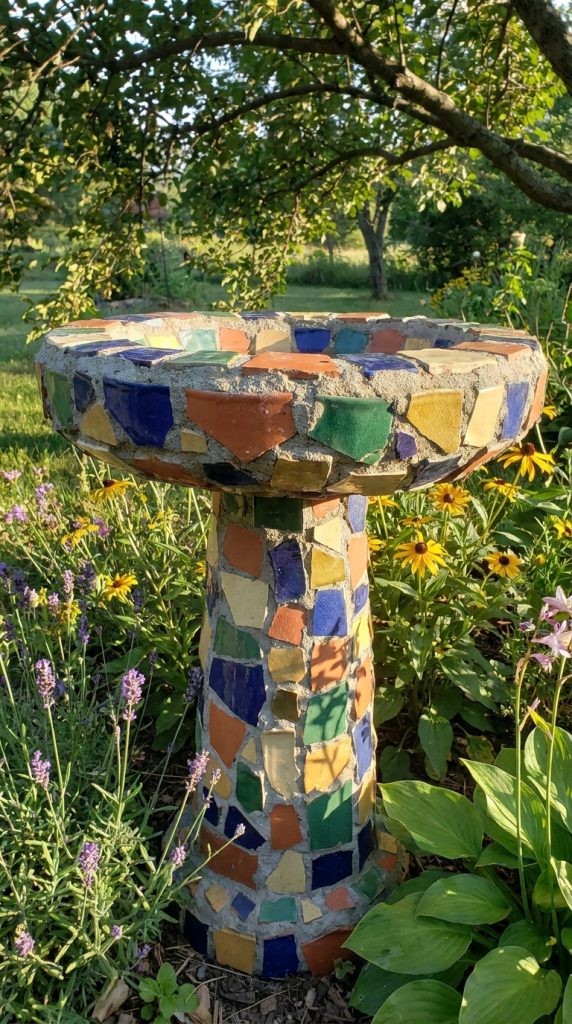
Idea 3: Broken Ceramic Patchwork Bird Bath
How to Create
A broken ceramic patchwork design transforms irregular ceramic pieces into a structured mosaic surface, creating a handcrafted and artistic appearance. This design emphasizes color variation and texture rather than uniform patterning. It is commonly used in DIY home decor projects because it allows reuse of old materials, making it a budget friendly option. The irregular shapes create visual movement across the bird bath surface, resulting in a lively and expressive finish. This idea is often featured in Pinterest inspiration boards due to its handmade aesthetic and creative flexibility. The design works well in cottage style gardens and eclectic outdoor spaces where individuality and artistic variation are encouraged.
Begin by sorting ceramic pieces by color and size to ensure balanced distribution. Apply adhesive to small sections of the bird bath and place pieces randomly while maintaining overall color harmony. Leave small gaps between pieces for grout lines, which help unify the design. Once all pieces are placed, allow full drying time before applying grout. Spread grout evenly and remove excess material carefully to reveal the pattern. Finish with sealant to protect the surface. This structured process ensures durability while preserving the artistic randomness of the design.
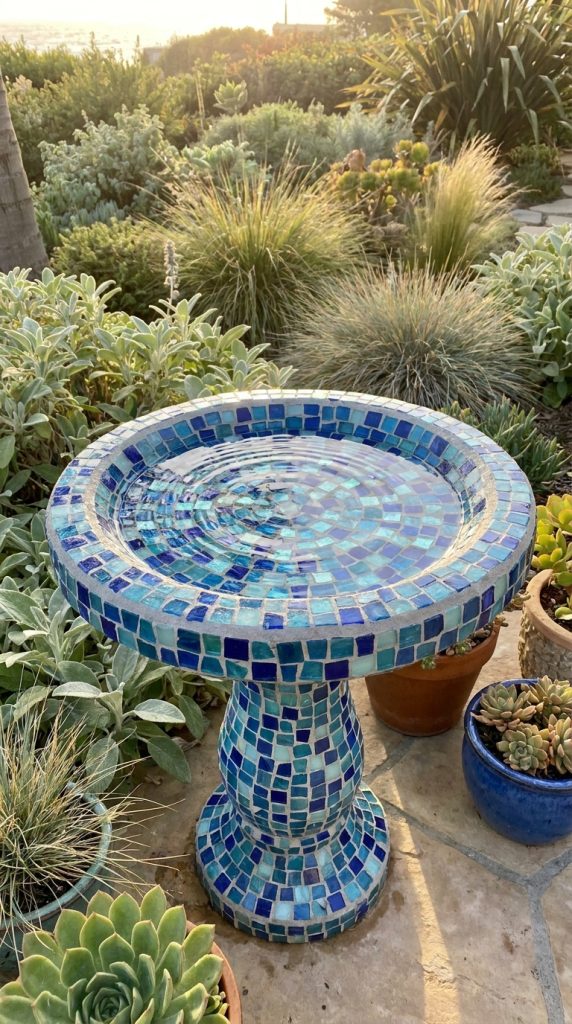
Idea 4: Coastal Blue Glass Mosaic Theme
How to Make
A coastal blue mosaic theme uses shades of blue, turquoise, and clear glass pieces to create a water-inspired visual effect. This design reflects natural elements such as ocean waves and flowing water, making it ideal for bird baths where water is a central feature. The reflective surface of glass pieces enhances light interaction, producing a shimmering effect during sunlight exposure. This style aligns with modern design principles by focusing on color harmony and reflective texture. It is widely used in creative project inspiration because it creates a refreshing and calming atmosphere in outdoor spaces.
Start by selecting glass pieces in coordinated blue tones and arranging them loosely to plan the gradient effect. Apply adhesive in sections and begin placing pieces from darker tones at the edges toward lighter shades near the center. Maintain controlled spacing for grout application. After drying, apply grout and clean carefully to preserve glass shine. Seal thoroughly to protect against weathering. This method produces a visually dynamic bird bath that enhances garden aesthetics.

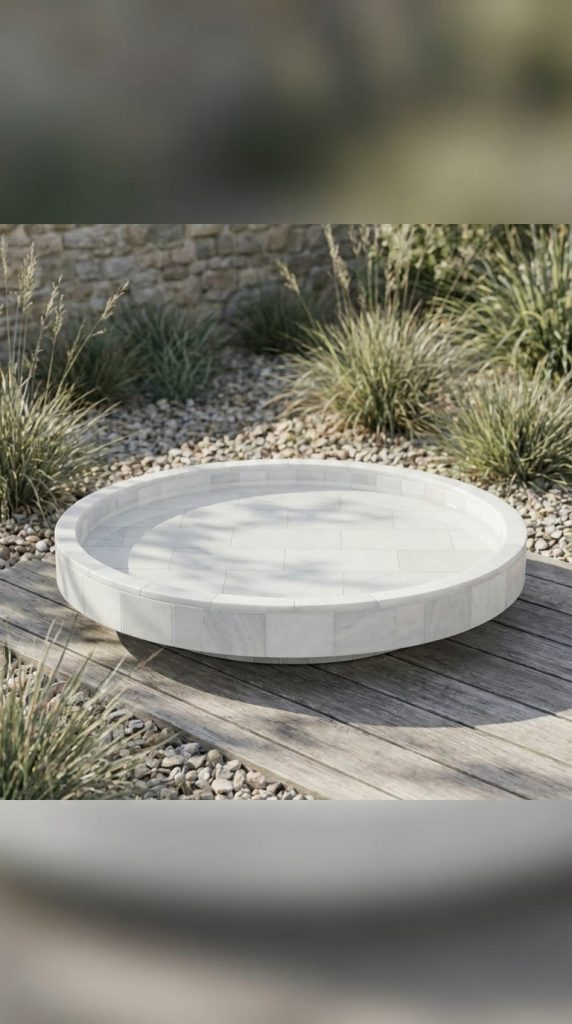
Idea 5: Minimalist White Stone Mosaic Bird Bath
How to Create
A minimalist white stone mosaic design focuses on simplicity, using uniform light-colored stones to create a clean and modern surface. This concept emphasizes texture over color, making it suitable for minimalist style gardens. The consistent tone creates a calm and structured appearance that blends easily with modern outdoor decoration.
Begin by selecting smooth white stones of similar size. Apply adhesive evenly and arrange stones in a tight, consistent pattern. Maintain alignment to preserve simplicity. After drying, apply grout carefully and seal the surface for protection. The result is a refined and low-maintenance bird bath design.
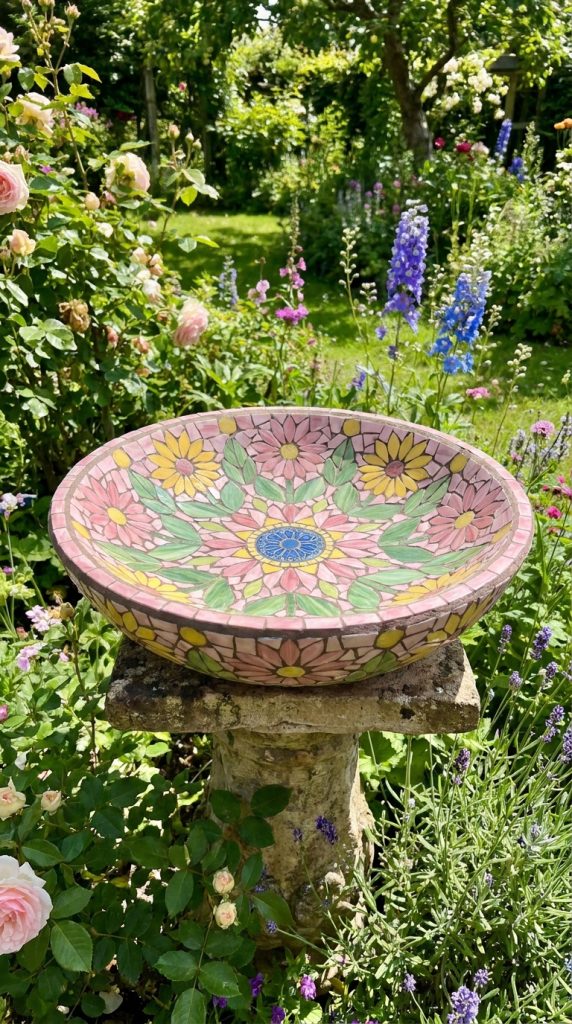
Idea 6: Floral Mosaic Pattern Bird Bath
How to Make
A floral mosaic design incorporates flower shapes into the bird bath surface, creating decorative patterns inspired by nature. This style adds softness and detail to the structure.
Sketch flower outlines and fill them using colored mosaic pieces. Apply adhesive gradually, then grout and seal once dry. The result is a decorative garden centerpiece.
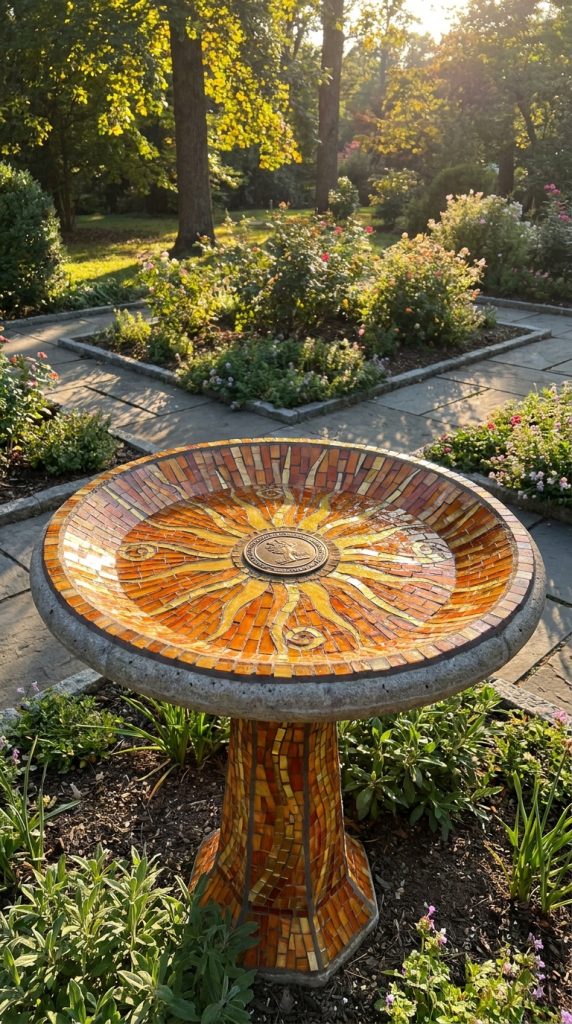
Idea 7: Sunburst Mosaic Radiating Design
Execution Process
A sunburst design radiates from the center outward, creating energetic visual movement.
Start from the center and place mosaic pieces in straight lines outward. Maintain symmetry and finish with grout and sealant for durability.
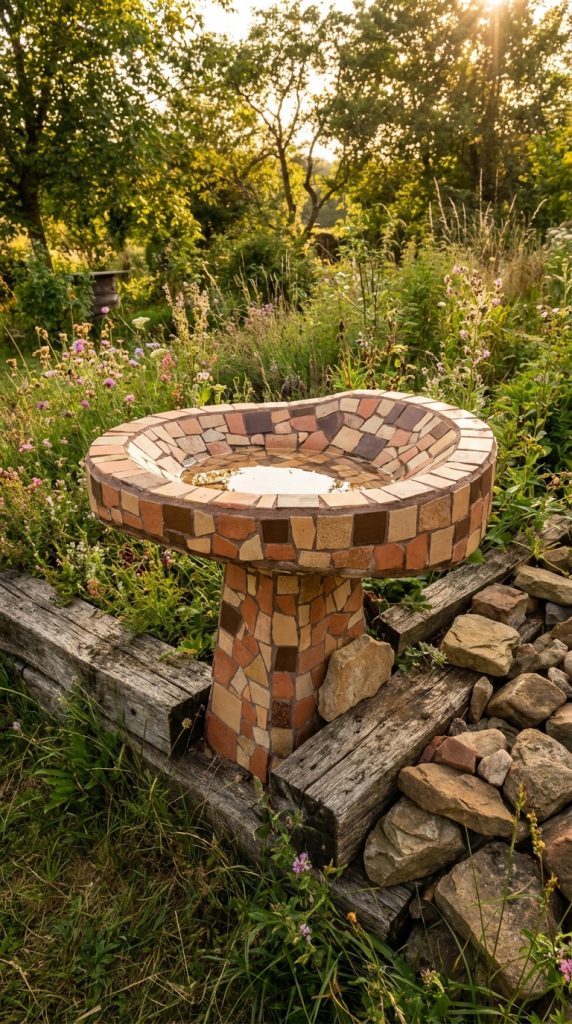
Idea 8: Rustic Earth Tone Mosaic Bird Bath
How to Create
Earth tones create a natural rustic appearance using browns, beige, and terracotta shades.
Arrange pieces in organic patterns, apply grout, and seal for protection. This creates a warm outdoor aesthetic.
Idea 9: Geometric Tile Mosaic Layout
Step-by-Step Guide
Geometric layouts use structured shapes like triangles and squares.
Plan a grid, place tiles evenly, and finish with grout. This creates a modern design effect.
Idea 10: Mixed Texture Artistic Mosaic Bird Bath
How to Make
This design combines glass, stone, and ceramic pieces for texture variation.
Arrange materials randomly but balanced, apply adhesive, grout, and seal. This produces a highly creative surface.

Common Beginner Mistakes and How to Avoid Them
A common mistake is uneven spacing between mosaic pieces, which disrupts visual balance. Another issue is skipping surface preparation, leading to weak adhesion. Beginners also often rush grout application, affecting final appearance. Proper planning, slow application, and careful cleaning help avoid these problems and ensure a durable result.
Practical Tips for Better Results
Work in small sections to maintain control over placement. Use consistent adhesive amounts to avoid uneven surfaces. Plan color distribution before starting to maintain harmony. Allow full drying time between stages to improve durability and finish quality.
Styling, Presentation, or Organization Ideas
Place the finished bird bath in a visible garden focal point surrounded by plants. Use contrasting foliage to highlight mosaic colors. Maintain clean surroundings to enhance visual impact. Integrating natural elements improves overall aesthetic balance.
Budget or Time Planning
Mosaic bird baths can be completed gradually using recycled materials, making them cost efficient. Working in stages allows better control of time and reduces pressure. Simple designs require less time, while detailed patterns may take multiple sessions.
Creative Expansion and Advanced Inspiration
Advanced designs can include layered patterns, mixed materials, or themed color gradients. Adding surrounding mosaic garden elements such as stepping stones creates a unified outdoor space. Experimenting with textures and seasonal themes enhances long term creative inspiration.