10 Pumpkin Archway DIY Ideas
Transforming a residential entryway into a captivating focal point represents a major trend in seasonal home decor. Utilizing structural archways adorned with gourds provides a striking canvas for celebrating autumn, blending natural organic shapes with structured property borders. This comprehensive guide explores ten distinct methods to design and build an outdoor pumpkin archway, offering practical inspiration for anyone looking to refresh their autumn landscape. Readers will learn how to select proper support structures, navigate anchoring methods, arrange various sizes of gourds, and integrate supplemental foliage for a cohesive look. This information serves as an essential tutorial for managing large-scale seasonal installations, making it highly useful for homeowners looking to elevate their curb appeal or create a festive backdrop for gatherings. By understanding the intersection of structural load limits, weatherproofing, and visual balance, executing a stable and beautiful entryway display becomes an accessible goal. This detailed analysis breaks down the planning, assembly, and decorative steps, ensuring you gain the confidence to complete this creative project successfully. Navigating these step-by-step methods will help you establish a secure, professional-grade autumn threshold that withstands the seasonal elements beautifully.
Why This Idea Is Trending or Useful
The massive popularity of pumpkin archways across prominent design sharing platforms stems from their incredible visual impact, high design relevance, and excellent practical value. In contemporary seasonal decorating, enthusiasts increasingly seek out high-visibility projects that make a bold statement while celebrating natural materials, making the structural archway an ideal choice. This versatile aesthetic bridges the gap between classic rustic charm and refined modern design, allowing it to complement diverse home exteriors from historic farmhouses to urban townhomes. From a practical standpoint, an archway frames an entry portal beautifully, establishing an immediate sense of hospitality and architectural interest before guests even reach the front door. The DIY appeal remains exceptionally strong, as basic materials like PVC pipes, metal t-posts, or wooden arbors can be easily configured without advanced technical skills. For beginners, building a festive entryway portal offers an accessible, rewarding project that provides high-impact results with manageable initial skill requirements. As minimalist style mixed with maximalist seasonal displays continues to influence exterior decoration trends, these handmade arches offer a highly photogenic and satisfying weekend project.
Materials and Preparation
Before embarking on any construction steps, proper preparation and gathering your specific building materials are absolutely vital for achieving safe, long-lasting results. A successful structural assembly tutorial requires a dedicated toolkit, including heavy-duty zip ties, chicken wire or wire fencing rolls, a rubber mallet, a power drill, and exterior wood screws. Product and material selection plays an equally critical role, demanding lightweight foam gourds or carefully balanced real pie pumpkins, sturdy internal supports like metal rebar or thick PVC pipes, and durable landscape staples. The initial planning stage involves measuring the exact height, width, and depth of your walkway or door frame to ensure the archway allows for safe pedestrian traffic. Preparing the physical site begins with clearing a flat ground baseline, clearing away loose debris, and identifying secure anchor points along structural walls, porch columns, or sturdy lawn borders. Laying out your frame pieces on a flat driveway surface beforehand ensures that all angles match perfectly before vertical assembly starts. Establishing this organized workspace and mapping your structural stress points lays a solid foundation for executing a secure installation.
The Industrial Conduit Frame Arch
How to Create
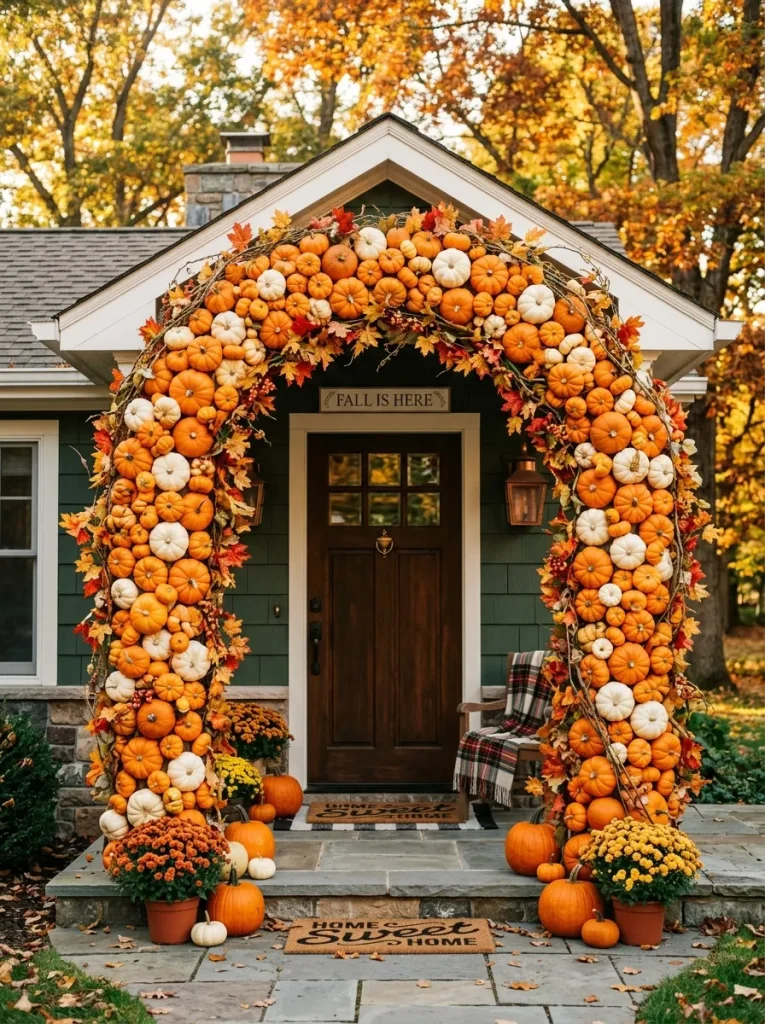
The industrial conduit frame arch focuses on maximum structural stability by utilizing heavy-duty metal electrical conduits as the underlying skeleton for the pumpkin arrangement. This specific design features a rigid, unyielding perimeter that can easily support the substantial weight of numerous real or faux gourds without bending or swaying in autumn winds. By building a solid metal frame, this setup ensures that your seasonal display remains completely safe and securely anchored over concrete or paved walkways. The aesthetic relies on a clean, hidden skeletal structure, allowing the pumpkins to appear as if they are floating in a seamless, self-supporting curve over your entry portal. It avoids the flimsy appearance often associated with lightweight plastic frames, providing a highly reliable and professional-grade solution for prominent home exteriors. This style serves as excellent inspiration for high-traffic zones, ensuring your handmade structural project remains completely intact throughout the entire autumn season.
Executing this easy project requires precise measurements and careful anchoring to ensure the metal frame remains balanced and vertical. Start by driving two four-foot metal rebar stakes halfway into the soil on either side of your walkway using a heavy rubber mallet. Slide a ten-foot section of flexible three-quarter-inch metal conduit pipe over each rebar stake, bending the tops inward toward the center to meet in a uniform semi-circular arch. Secure the center joint using a heavy-duty conduit coupling, tightening the integrated screws firmly with a screwdriver to lock the peak into position. Wrap the entire length of the metal frame with a layer of sturdy wire mesh fencing, anchoring the wire tightly to the conduit using thick industrial zip ties every six inches. This wire mesh creates a multi-point attachment grid, allowing you to easily fasten your pumpkins to the frame at various angles using additional zip ties threaded through the back of each gourd.
The Rustic Wooden Timber Arbor
Step-by-Step Guide
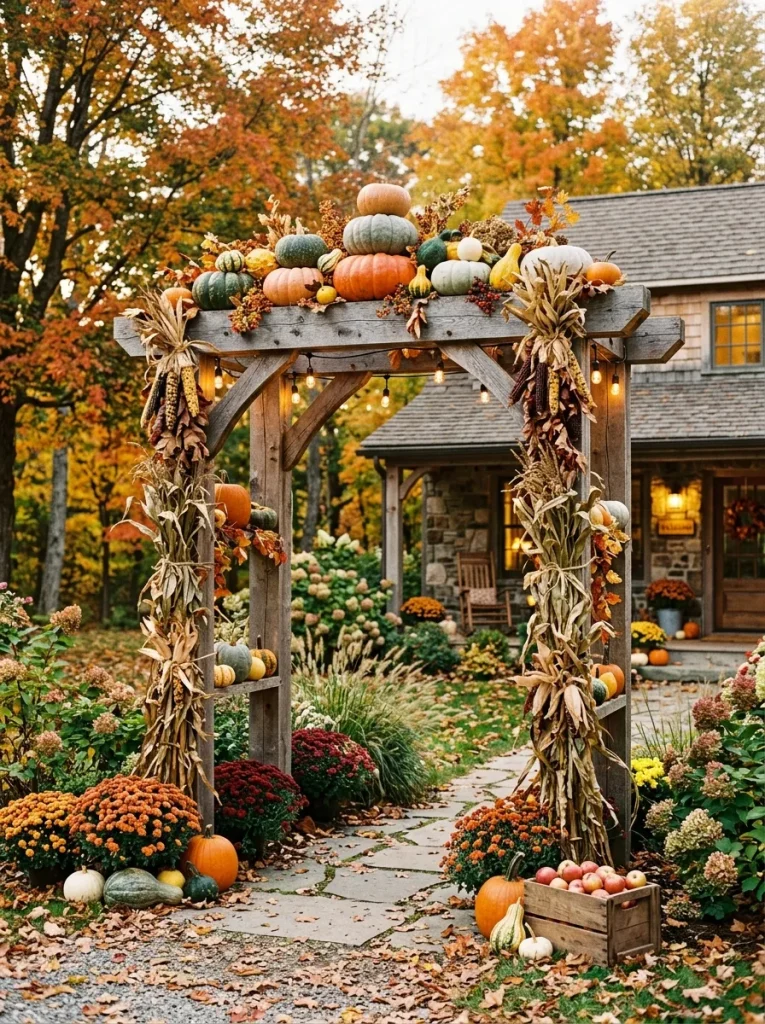
The rustic wooden timber arbor utilizes a permanent or semi-permanent wooden frame structure to build a classic, nature-inspired gateway filled with autumn charm. This design focuses on a sturdy square or rectangular silhouette made from thick wood beams, providing an elegant architectural element that complements traditional garden beds and porch layouts. The flat top and straight vertical posts of the wooden arbor offer clear surfaces for stacking large gourds and securing cascading autumn foliage collections. This option possesses high design relevance for rustic or craftsman-style homes, as the natural wood grain peeks through the pumpkin layers to enhance the organic look. It represents an actionable approach to blending permanent outdoor structures with temporary seasonal decoration elements seamlessly.
To implement this creative project, begin by constructing a basic three-sided arbor frame using rot-resistant four-by-four cedar or treated pine timbers cut to your desired height and width specifications. Secure the horizontal header beam across the top of the two vertical posts using heavy-duty exterior lag screws and metal corner brackets to ensure complete structural rigidity. Anchor the vertical posts firmly into the ground using metal fence post spikes, or attach them to heavy weighted wooden planter boxes filled with gravel to maintain complete stability on hard concrete surfaces. Staple a wide grid of heavy-duty chicken wire across the top header and down the exterior sides of the wooden posts to create a dependable attachment surface. Drill small pilot holes through the backs of your lightweight foam pumpkins, thread a durable floral wire through each hole, and tie the gourds tightly to the chicken wire grid. Arrange the pumpkins closely together to hide the wood frame completely, or leave spaces to show off the rustic timber look.
The Flexible PVC Pipe Gateway
Execution Process
The flexible PVC pipe gateway represents a highly accessible, lightweight, and budget-friendly method for creating a beautiful seasonal archway within a short timeframe. This specific design relies on the natural elasticity of thick schedule 40 PVC piping, which easily bends into a perfect, fluid arc when pinned at both base ends. It offers an exceptional alternative for beginners or renters, as the lightweight materials can be easily disassembled, moved, and stored without causing permanent alterations to the property exterior. The aesthetic is smooth, uniform, and highly modern, providing a clean curve that looks wonderful when wrapped entirely in dense autumn garlands and bright orange gourds. This setup provides an easy project framework that yields high-impact visual results with very little manual labor or specialized tool investment.
Begin the setup method by driving two thick wooden ground stakes or short pieces of metal rebar into the grass exactly where you want the base pillars to rest. Cut two ten-foot lengths of one-inch PVC piping, and connect them at the top using a standard straight PVC union piece secured with exterior clear adhesive. Lift the connected pipe and slide the open bottom ends directly over the driven ground stakes, allowing the pipe to bend naturally into a clean, smooth archway over your path. Wrap the plastic piping completely in a thick layer of brown or green artificial leaf garland to create a full, natural-looking camouflage background before attaching your gourds. Drill two small holes through opposite sides of each pumpkin shell, feed a long zip tie completely through the gourd body, and fasten it tightly around the PVC pipe. Work from the ground up on both sides simultaneously to ensure the weight distribution remains balanced across the flexible plastic frame.
The Heavy-Duty Cattle Panel Tunnel
Setup Method
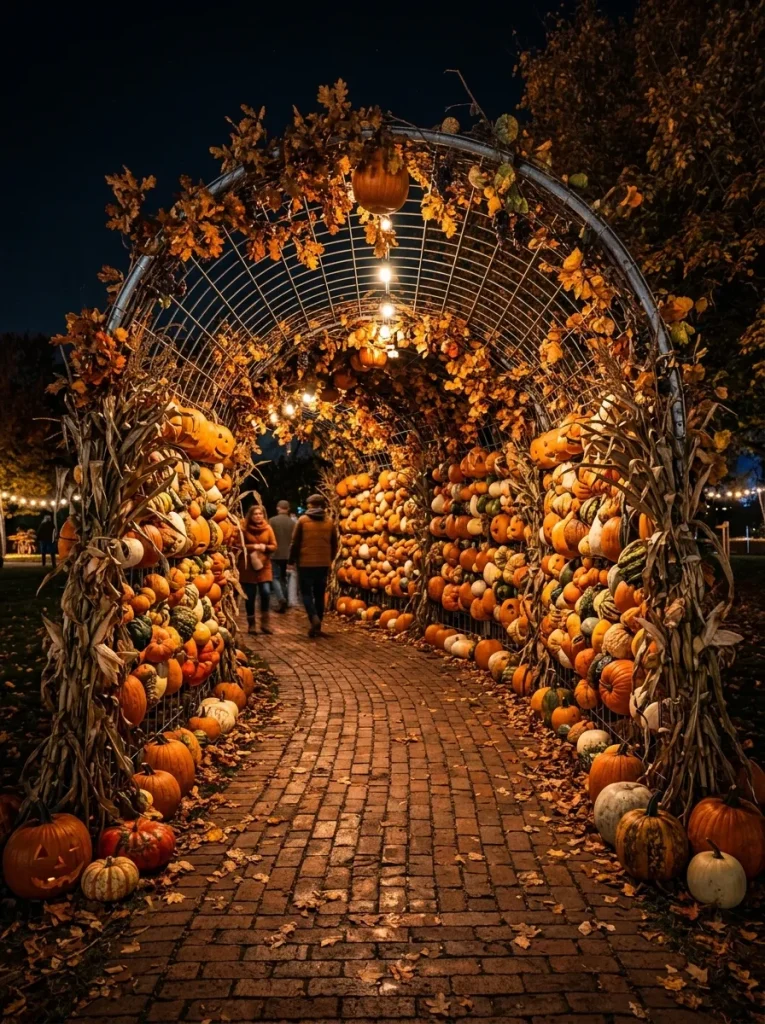
The heavy-duty cattle panel tunnel utilizes thick, galvanized steel fencing panels to build a deep, immersive walkway experience that feels like walking through an autumn cavern. This design prioritizes extended depth over a single flat arch, stretching three to four feet along your entry path to provide an experiential journey for visitors. The rigid welded wire grids of cattle panels offer hundreds of secure built-in attachment points, completely eliminating the need to add separate chicken wire layers. This setup is highly realistic for expansive front lawns, long walkways, or large properties where a small single arch would get lost against the scale of the main house. The structural strength of the thick steel rods allows for the inclusion of larger, heavier pumpkins alongside massive quantities of autumn corn stalks.
Set up the construction zone by purchasing two standard sixteen-foot galvanized steel cattle panels from a local agricultural or home supply retailer. Lay the panels flat on your grass parallel to your walkway, and drive four heavy-duty metal t-posts into the soil to mark the outer corners of your deep tunnel footprint. With the help of a partner, lift the top edges of the cattle panels upward, bending them toward each other to form a spacious, high-ceilinged tunnel dome over your path. Secure the bottom edges of the bent wire panels firmly to the driven metal t-posts using heavy-gauge wire ties or specialized fence clips to prevent any shifting. Once the metal tunnel dome is completely locked into place, weave thick corn stalks and dried oak branches through the square wire grid to build a thick rustic base texture. Secure an array of various-sized pumpkins along the interior and exterior curves of the wire dome using durable wire twist ties.
The Pre-Existing Metal Arbor Wrap
How to Make
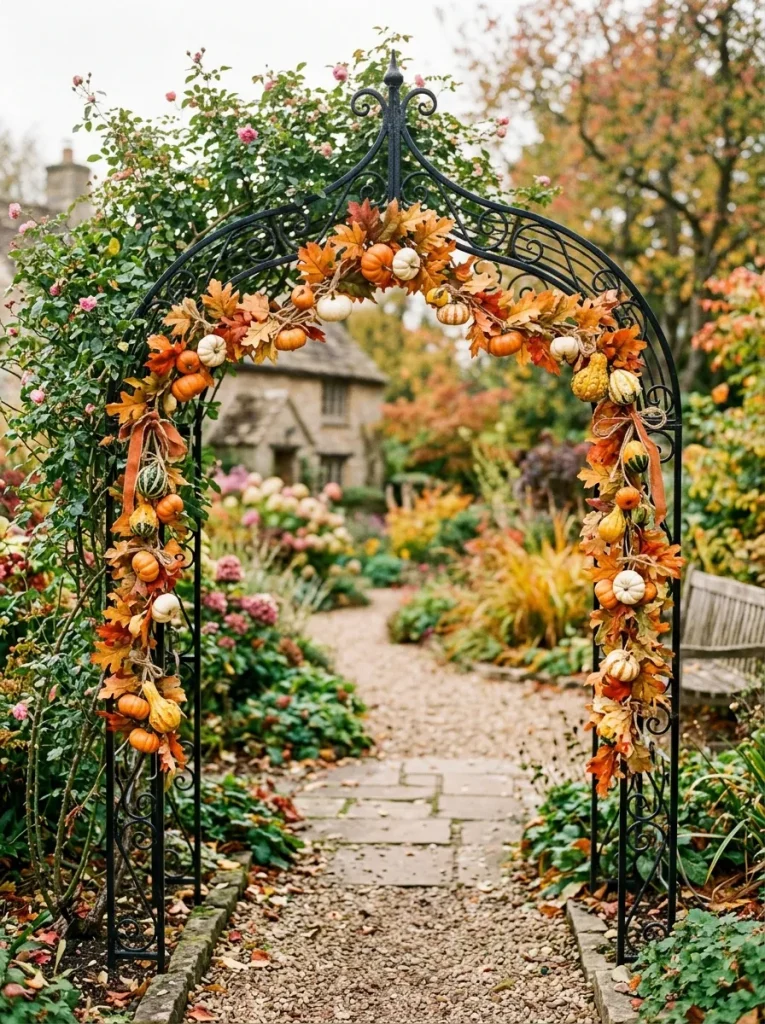
The pre-existing metal arbor wrap focuses on utilizing garden features that are already present in your landscape, such as a traditional wrought-iron rose arbor or walkway gate. This design method is highly efficient and beginner friendly because it completely bypasses the frame construction phase, allowing you to focus your energy entirely on the decorative layout. It works beautifully for enhancing established garden entries, integrating your existing summer landscaping elements into a festive autumn aesthetic without requiring extra storage space for bulky framing materials later. The underlying metalwork provides an elegant, dark background that contrasts beautifully with vibrant orange and white gourds, creating a classic look that feels integrated into the home environment.
To make this decorative wrap, clean your existing metal garden arbor thoroughly, removing any loose dirt, old cobwebs, or decaying summer vine remnants that could trap unwanted moisture. Wrap the primary vertical iron bars tightly with a thick layer of artificial grapevines, faux maple leaf garlands, or real dried grapevine rolls to establish a dense background texture. Select a curated collection of lightweight faux pumpkins in coordinating shades of cream, pale green, and vibrant orange to build a sophisticated color palette across the arch. Drill a small quarter-inch hole into the rear shell of each decorative gourd, and insert a heavy-duty green zip tie through the opening until it catches internally. Fasten each pumpkin directly to the wrought-iron scrollwork of the arbor, placing the largest gourds near the bottom base pillars and gradually transitioning to smaller mini pumpkins as you reach the upper curve. Fill any remaining open gaps with bunches of faux fall berries and silk oak leaves to finish the look.
The Porch Column Frame Extension
How to Create
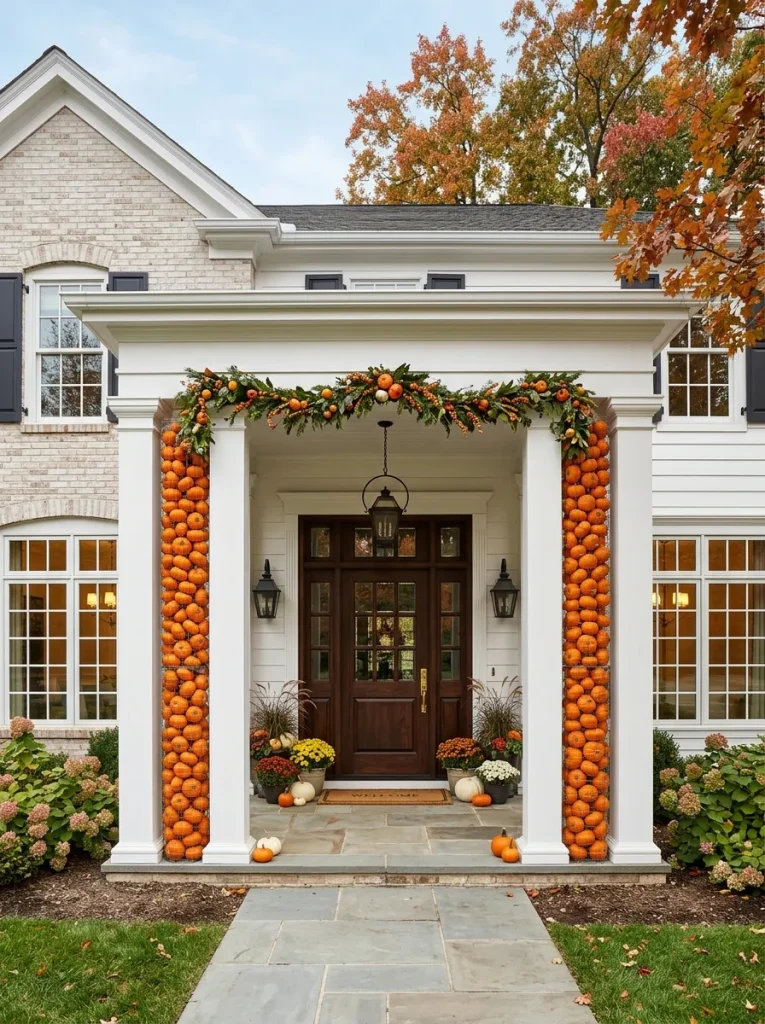
The porch column frame extension integrates your pumpkin display directly into the existing architectural pillars of a front porch, creating a grand, unified entryway feature. This style uses two structural porch columns as the vertical legs of your archway, connecting them across the top ceiling beam with a temporary horizontal header plate. By anchoring your seasonal elements directly to the solid home structure, you achieve exceptional wind resistance and a clean look that frames your front door perfectly. This aesthetic is highly relevant for stately modern designs, traditional colonial exteriors, or any home featuring prominent front porch supports that frame the entryway. It provides an impressive, high-end display that looks completely custom-built for the specific home exterior.
Create this structural extension by measuring the distance between your porch columns and checking the surface material to select the correct non-destructive mounting hardware. Cut a straight piece of two-by-four exterior lumber to match the span between the two pillars, wrapping it entirely in dark green landscape fabric to mask the bright wood tones. Mount this wooden header beam horizontally across the top section of your porch columns, securing it with removable heavy-duty clamping brackets to avoid drilling permanent holes into your structural columns. Hang long drops of heavy-duty plastic-coated wire fencing from the top header beam down to the porch floor along the outer face of each pillar. Secure the vertical wire drops to the columns using non-damaging tension straps or removable adhesive anchors designed for exterior siding surfaces. Fasten your collection of pumpkins to this newly created wire mesh curtain using strong cable ties, stacking them tightly to frame the columns.
The Wire Mesh Wall-Mounted Arch
Step-by-Step Guide
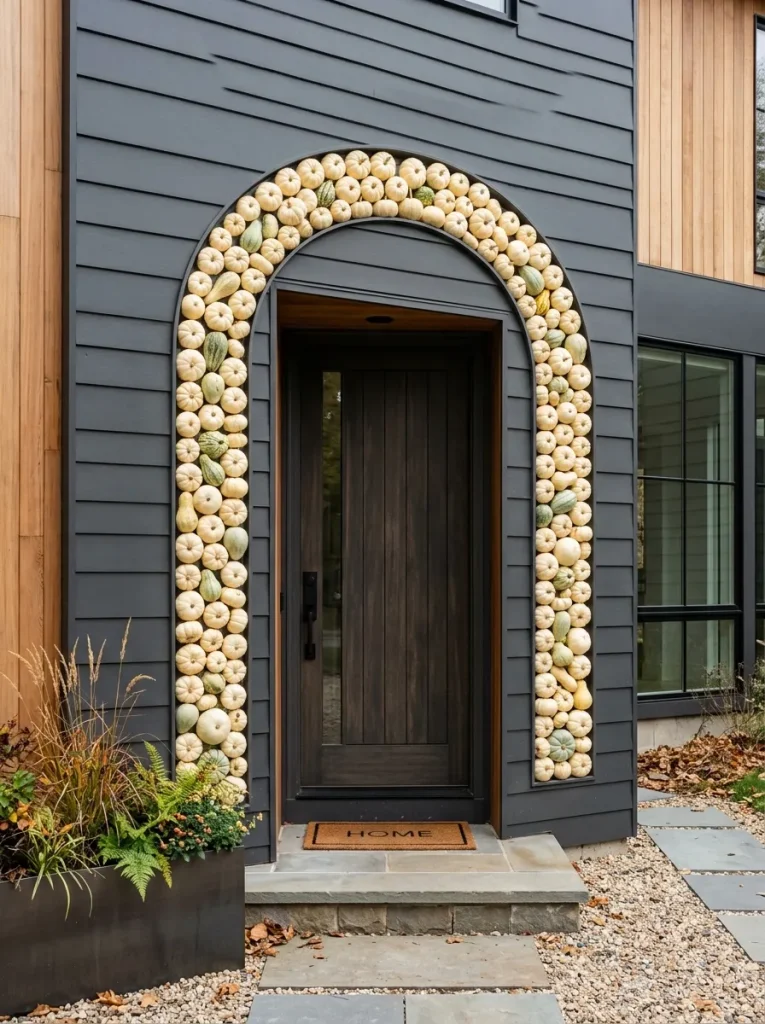
The wire mesh wall-mounted arch is designed specifically for entryways that open directly onto flat exterior walls without the benefit of a covered porch or structural pillars. This design features a flat, low-profile archway that mounts directly flush against your home’s siding, framing the front door casing like a decorative structural molding piece. Because it projects outward only a few inches, it leaves the walkway completely unobstructed, making it an excellent choice for tight city townhomes or narrow front stoops. The aesthetic is incredibly neat, structured, and intentional, transforming a plain exterior wall into a festive gallery display that celebrates autumn color with clean lines. It represents a highly practical solution for maximizing limited front entry square footage while maintaining high visual impact.
To implement this step by step, begin by drawing a light pencil outline of your desired arch shape directly onto your exterior wall surface around the door frame trim. Secure a series of small, weather-resistant metal eyelet screws or heavy-duty removable adhesive cable mounts along your drawn boundary line, spacing them twelve inches apart. Cut a long strip of sturdy two-foot-wide galvanized chicken wire or hardware cloth to match the length of your door perimeter line. Attach the wire mesh strip directly to the wall mounts, using wire ties to pull the mesh taut against the siding until it forms a rigid vertical track. Prepare your pumpkins by drilling small holes through their back surfaces and inserting thick floral wire pieces into each shell opening. Tie the gourds firmly onto the mounted wire track, working in small sections to ensure they fit tightly together without leaving gaps that expose the underlying mesh.
The Woven Grapevine Base Arch
Execution Process
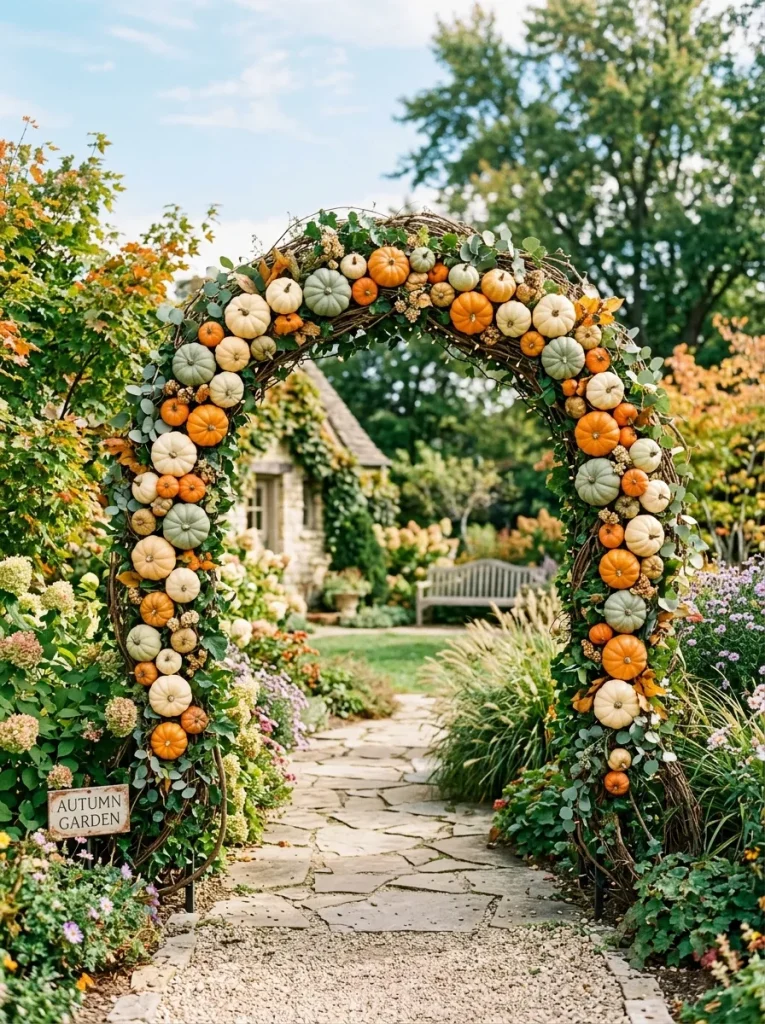
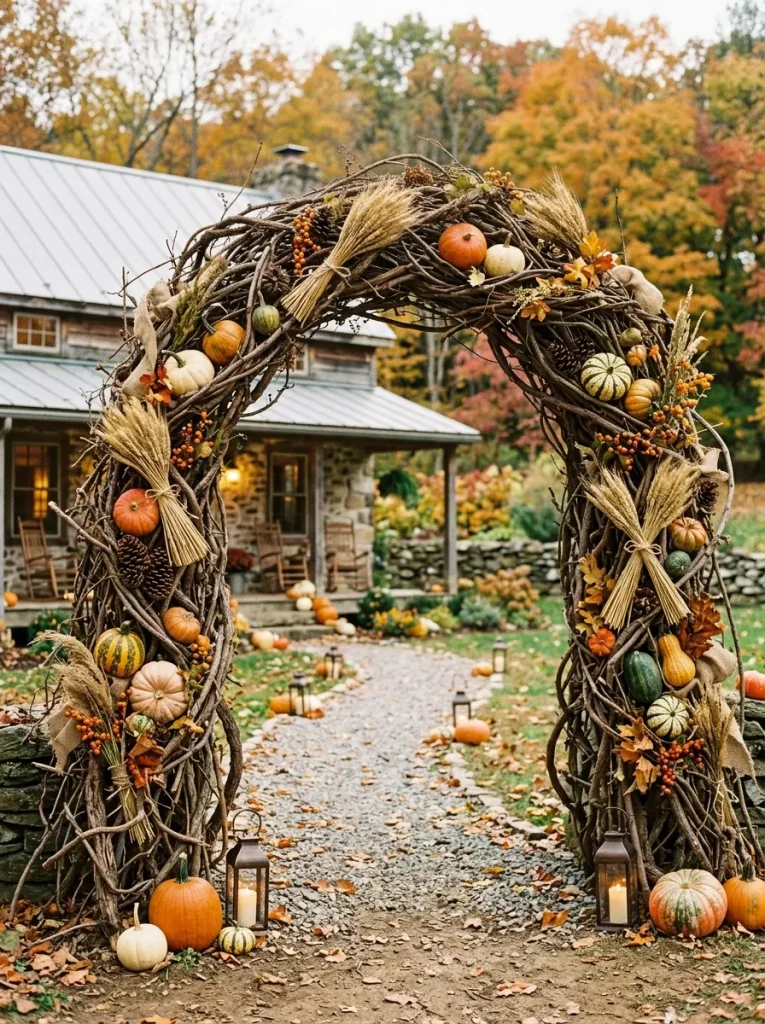
The woven grapevine base arch relies on a thick, natural framework of intertwined woody vines to build an organic, highly texturized autumn display. This style replaces rigid metal pipes and plastic tubes with a rustic, handmade base made from wild grapevines or decorative willow branch bundles. The irregular, twisting nature of the vines provides excellent texture and depth, allowing you to nestle mini pumpkins directly into the natural wooden crevices without requiring complex hardware. This design possesses exceptional appeal for lovers of classic farmhouse aesthetics or cottage style home decor, as it embraces an organic, unstructured look that blends with surrounding autumn trees. It offers a beautiful, highly sustainable project framework that can be easily repurposed for winter holiday displays later in the year.
Start the execution process by sourcing two large rolls of dried, flexible grapevine garland or harvesting wild grapevines from a local woodland border during early autumn cleanup. Construct a basic foundational arch using lightweight PVC or metal pipe as described previously, securing the base firmly into heavy weighted ground anchors. Wrap the thick grapevine bundles loosely around the foundational pipe frame, weaving the branches in opposite directions to build a thick, three-dimensional nested wooden texture. Secure the vine bundles to the inner frame using discrete brown zip ties or natural jute twine every twelve inches to keep the branches from unfurling. Once your thick rustic base is built, use a hot glue gun or floral wire to nestle various sizes of orange and white pumpkins into the grapevine loops. Interweave clusters of dried wheat stalks, real pinecones, and orange bitter-sweet berries throughout the vines to complete the organic farmhouse look.
The Modern Asymmetric Geometric Arch
Setup Method
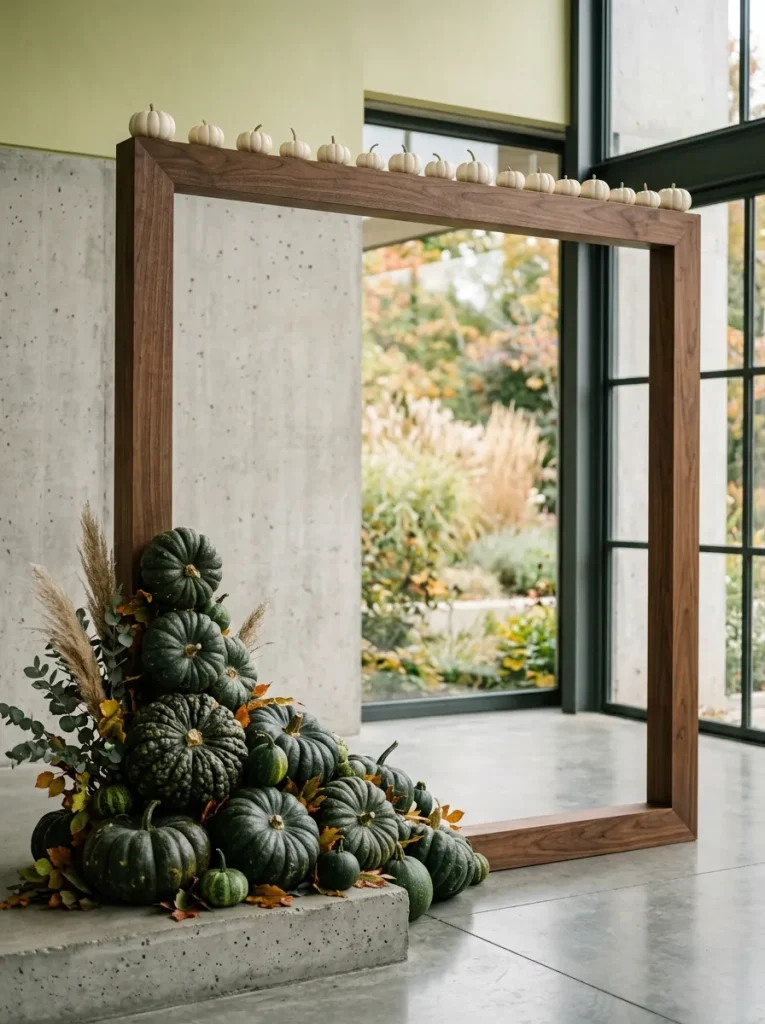
The modern asymmetric geometric arch breaks away from traditional curved shapes, utilizing sharp angles and unbalanced weight distribution to achieve a contemporary minimalist style look. This design features a sharp, three-sided frame made from straight lines that sits higher on one side of the walkway before angling down sharply to meet the ground. The pumpkin decoration follows this asymmetry, clustering heavily at one low corner before thinning out into a sparse, delicate line of mini gourds across the top header beam. This design relevance is exceptionally high for contemporary architecture, urban settings, or modern homes where traditional rustic styling might clash with clean exterior lines. It represents an innovative, artistic project that redefines classic holiday symbols through a sophisticated design perspective.
Set up this contemporary project by constructing a clean, three-sided square archway frame using straight two-by-two square lumber beams or dark painted metal square tubes. Join the corners at perfect ninety-degree angles using heavy-duty internal corner plates and exterior wood screws to ensure the frame remains crisp and angular. Mount the completed geometric frame securely to your concrete porch floor using weighted metal base plates or heavy concrete patio blocks painted to match the frame color. Cover only the lower third of one vertical leg and the opposite top corner with a clean layer of black wire mesh to serve as targeted attachment zones. Attach a dense, tightly packed cluster of dark heirloom pumpkins and white gourds to the lower mesh zone using industrial black cable ties to build a heavy base. Run a single, sparse line of small white mini pumpkins across the top header beam to finish the modern asymmetric look.
The Enchanted Whimsical Twig Arch
How to Make
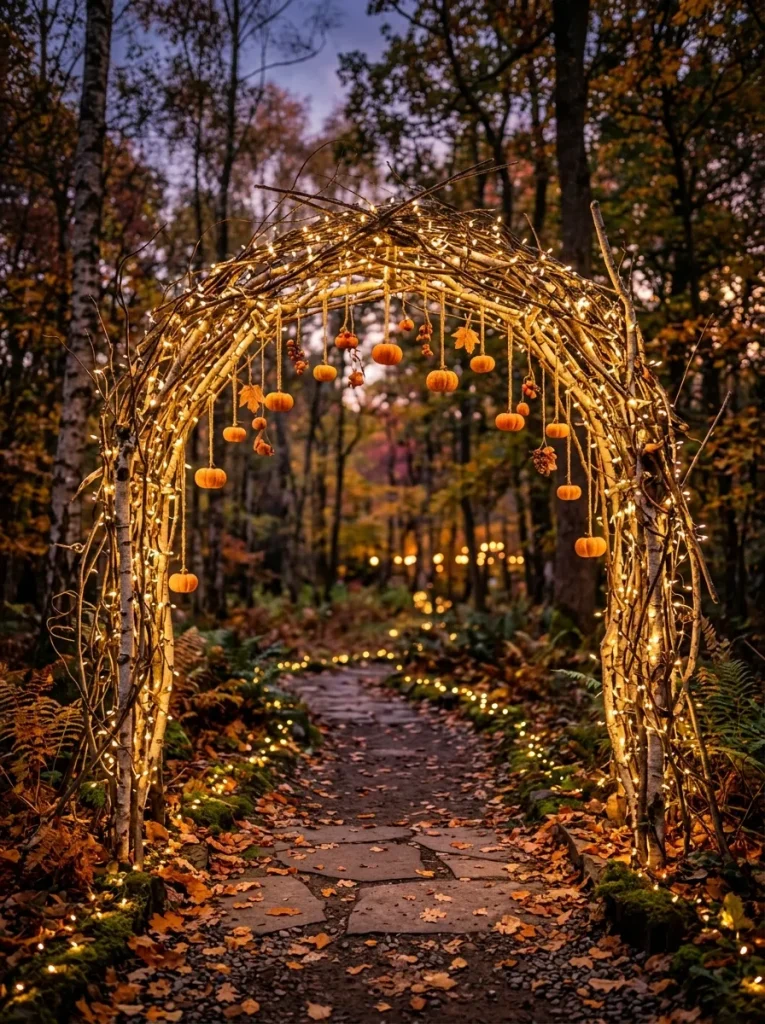
The enchanted whimsical twig arch focuses on building a magical, fairytale-inspired autumn entryway filled with airy branches, fairy lights, and delicately suspended mini pumpkins. This specific design avoids thick, heavy clusters of large gourds, opting instead to use long birch twigs, curly willow branches, and delicate faux bittersweet vines to build a light structure. The mini pumpkins appear to grow naturally from the wild branches, creating a whimsical aesthetic that looks beautiful during twilight hours when the integrated lighting illuminates the path. It provides fantastic inspiration for creating a memorable family environment or a captivating display for neighborhood trick-or-treaters during late October evenings.
To make this whimsical gateway, construct a basic semi-circular arch using flexible wire fencing panels anchored securely into the lawn with short metal ground stakes. Attach long bundles of fresh curly willow branches, tall birch twigs, and wild dogwood branches to the wire frame using thin brown floral wire to build an airy structure. Allow the tips of the branches to extend outward past the main frame line, creating a natural, slightly unkempt silhouette that mimics an enchanted forest path. Interweave two long strands of warm-white, battery-operated exterior LED fairy lights throughout the entire branch network, securing the battery packs safely inside waterproof plastic bags at the base. Hang numerous small miniature pumpkins and colorful ornamental gourds from the sturdy branch nodes using natural jute twine loops, letting them dangle freely at varying heights. Finish the look by tucking small bunches of preserved orange leaves into the branch junctions.
Common Beginner Mistakes and How to Avoid Them
When attempting a DIY pumpkin archway for the first time, a frequent and dangerous mistake is failing to accurately calculate the total weight of the pumpkin collection. Real pumpkins are filled with dense moisture and can easily weigh down a lightweight plastic or thin metal wire frame, causing the structure to buckle, collapse, or blow over during severe autumn windstorms. To avoid this significant safety hazard, always utilize heavy-duty structural frames like thick schedule 40 PVC or metal conduits, or switch entirely to high-quality lightweight foam gourds for the upper arch sections. Another common pitfall is securing pumpkins to the wire mesh using weak household twine or low-grade plastic tape that quickly degrades when exposed to cold rain and morning frost. Always utilize industrial-grade, UV-resistant zip ties or heavy-gauge galvanized copper floral wire to fasten your gourds securely to the frame structure. Additionally, beginners often pack the pumpkins so tightly against their front entry door that the door cannot swing open fully, creating an immediate fire hazard and blocking daily foot traffic. Always build your archway frame at least one foot wider than the exterior door frame to allow for a clear, completely unobstructed pedestrian clearance zone.
Practical Tips for Better Results
Achieving a durable, professional finish on your custom autumn archway relies heavily on executing tight wire connections and maintaining proper structural balance throughout the assembly phase. Always apply your largest, heaviest pumpkins near the ground baseline on both vertical legs of the arch, using them as natural stabilizing weights that anchor the bottom structure securely against wind lift. As your display moves upward toward the high header beam, gradually transition to smaller, lighter gourds to keep the top section from becoming dangerously top-heavy. If you choose to use real pumpkins for your display, spray the exterior skins with a clear acrylic sealer or a mixture of water and peppermint oil to deter squirrels, birds, and insects from chewing on your festive creation. When threading zip ties through foam pumpkins, always place a small plastic or metal washer over the tie before pulling it tight against the gourd wall; this simple step prevents the thin plastic tie from slicing completely through the soft foam shell during heavy winds. Finally, step back from your installation every few minutes during the assembly process to view the arch from the street, ensuring your color distribution and shape symmetry remain completely balanced.
Styling, Presentation, or Organization Ideas
| Archway Design Type | Recommended Base Frame | Primary Gourd Choice | Supplemental Foliage |
|---|---|---|---|
| Industrial Conduit | Metal Conduit & Rebar | Real Medium Pie Pumpkins | Dense Maple Leaf Garland |
| Rustic Timber Arbor | Four-by-Four Cedar Beams | Mixed Faux Heirloom Gourds | Dried Corn Stalk Bundles |
| Flexible PVC Gateway | Schedule 40 Plastic Pipe | Lightweight Foam Pumpkins | Green Grapevine Garlands |
| Heavy Cattle Panel | Galvanized Steel Panels | Large Mixed Autumn Squash | Whole Oak Branch Sprigs |
| Modern Asymmetric | Two-by-Two Square Lumber | White and Dark Green Gourds | Minimalist Eucalyptus Stems |
Presenting a beautiful outdoor archway involves coordinating your surrounding front porch decorations to match the primary theme of your handmade entryway structure. Arranging matching groupings of mums, ornamental cabbages, and vintage lanterns around the base pillars hides your structural ground anchors while anchoring the archway into the wider landscape design cleanly. For an organized building process, sort your pumpkin collection by size and color on your lawn before starting assembly, creating clear groups that make selecting the next piece easy. Storing your leftover wire coils, extra zip ties, and wire cutters inside a weather-resistant tool bucket keeps your workspace clear and safe during the weekend build.
Budget or Time Planning
Managing a large-scale seasonal home decor project requires a realistic approach to time allocation and material budgeting to ensure a satisfying and low-stress building experience. A basic flexible PVC archway or a pre-existing arbor wrap can easily be completed within three to four hours over a single Saturday afternoon using basic household hand tools. More complex structures, such as the heavy-duty cattle panel tunnel or a permanent timber arbor installation, will require a full weekend commitment to allow for proper ground leveling, anchor driving, and dense foliage weaving. From a financial perspective, you can minimize your overall budget by purchasing your hardware cloth, wire mesh, and industrial zip ties from agricultural supply stores or wholesale hardware outlets rather than high-end retail craft shops. If using high-quality faux pumpkins, consider the initial cost as a long-term investment; these durable materials can be packed away into plastic storage bins after Thanksgiving and reused for many years to come, reducing your future autumn decorating expenses to zero. Plan your construction steps during dry, temperate early October weekends to ensure comfortable working conditions before the freezing late-autumn weather arrives.
Creative Expansion and Advanced Inspiration
Once you feel completely comfortable managing your primary autumn archway installation, you can explore advanced variations to expand your personal exterior design statement throughout the year. Consider integrating custom low-voltage LED landscape spotlights at the base of each vertical pillar, angling the beams upward to cast dramatic shadows and showcase your pumpkin geometry after dark. When late November arrives, you can transition your existing framework into a winter holiday threshold by removing the pumpkins and weaving fresh pine boughs, holly berries, and twinkling white lights through the wire mesh. Another creative option involves building a matching pair of mini arches over your driveway entrance or garden path gates, creating a cohesive, estate-like holiday theme across your entire residential property. Experiment with advanced color stories, such as painting your pumpkins with custom metallic gold, matte copper, or chalky charcoal shades to match a specific modern exterior paint scheme. By treating your underlying frame structure as a permanent, multi-season canvas, you can easily reinvent your home’s entrance decoration for every major holiday transition.