
10 DIY Garage Organization Ideas

Optimizing a residential garage requires systematic planning, spatial awareness, and the implementation of reliable storage structures to reclaim valuable floor area. Garages frequently become overcrowded zones where tools, seasonal gear, and household overflow accumulate without an organizational framework. This comprehensive guide details ten distinct, practical structural designs for wall, ceiling, and floor optimization that can be constructed directly within a standard garage space. Readers will learn the precise installation methodologies, weight-bearing structural requirements, and dimensional planning necessary to build highly durable shelving units, custom tool racks, and overhead frameworks. Exploring these diverse design strategies helps homeowners understand how vertical heights, specialized mounting brackets, and modular configurations interact to maximize utility within a utility environment. Selecting the appropriate manufacturing technique ensures the physical stability of the completed project, resulting in a clean, functional, and easily navigable space for daily vehicle parking, workshop activities, and household management. This overview serves as a functional blueprint for individuals looking to merge resourceful material construction with an long-term organization plan for their household storage assets.
Why This Idea Is Trending or Useful
Repurposing unfinished wall studs and open overhead rafters into specialized storage systems has become a dominant category within modern home organization and workshop planning communities on Pinterest. Utilizing vertical and ceiling real estate provides significant practical value, allowing individuals to clear floor blockages while producing heavy-duty storage tools that cost far less than commercial cabinetry. For beginners, creating garage storage fixtures serves as a highly accessible point of entry into handmade home improvement because the structural components rely on basic linear cuts and standard fastening hardware. The DIY appeal stems from the ability to completely customize shelf depths and bin heights to match personal gear storage without requiring complex cabinet-making machinery. Furthermore, an organized garage directly improves residential safety by removing tripping hazards and securing sharp tools or chemical substances out of reach of children. This systematic production strategy transforms mundane everyday building materials like plywood, framing lumber, and PVC pipes into high-performance utility structures, maximizing space efficiency while creating a clean, modern design aesthetic.
Materials and Preparation
Successfully manufacturing structurally sound and completely safe storage fixtures requires systematic material screening and workspace preparation before joining any heavy framing components together. Essential base materials include two-by-four structural framing lumber, three-quarter-inch exterior grade plywood sheets, heavy-duty steel lag screws, zinc-plated wood fasteners, and rigid PVC plumbing pipes. To facilitate precise construction, you will need a digital stud finder, a pocket hole jig, a circular saw with a framing blade, a power drill driver, a metal measuring tape, and a long spirit level. Before initiating any assembly step by step, it is imperative to clear the target wall or ceiling area completely, inspecting the drywall or exposed framing for moisture issues or electrical conduit lines. Carefully measuring and marking stud locations with a laser line or level ensures that every structural bracket fastens directly into a load-bearing solid wood framework. Planning for weight distribution also entails verifying that your ceiling joists can support suspended overhead storage loads before purchasing materials for high-elevation installations.
Idea 1: The Heavy-Duty Lumber Stud Shelf
Setup Method
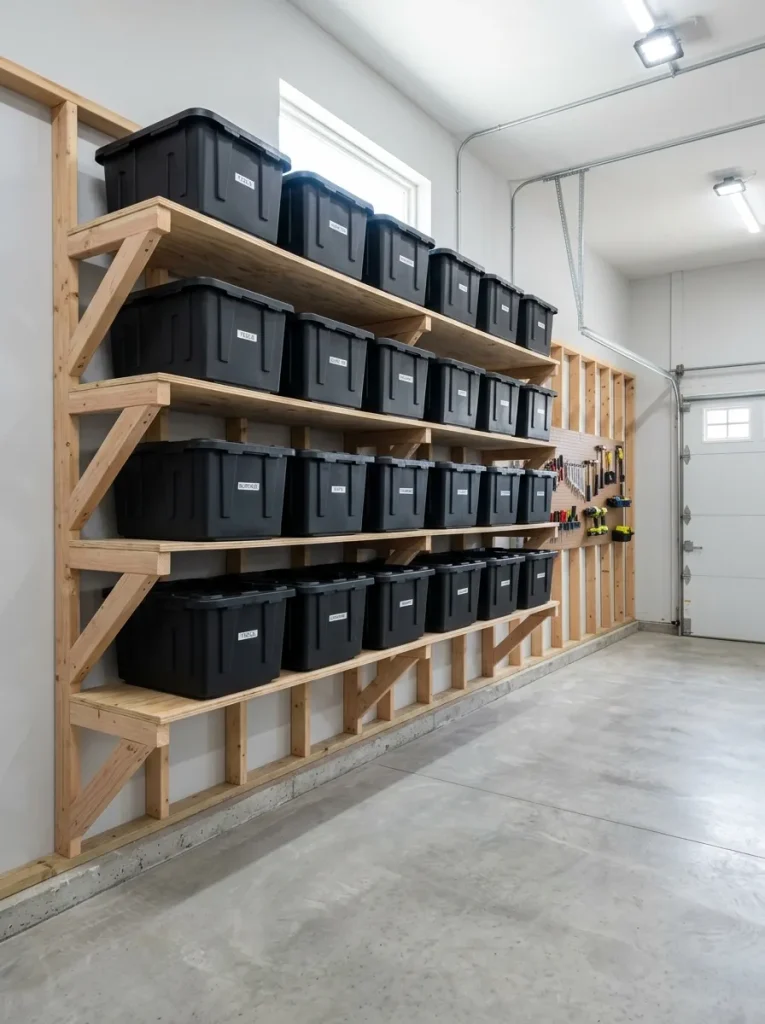
The heavy-duty lumber stud shelf configuration focuses on utilizing the raw vertical wall studs of a garage to mount ultra-deep, high-weight-capacity storage platforms without using floor legs. This concept uses standard framing lumber cut into triangular load-bearing brackets that transfer downward weight pressures directly into the wall framing structure of the building. The shelving surfaces are made from thick plywood sheets, providing a continuous, flat platform for heavy storage totes, automotive parts, or seasonal machinery. This layout functions beautifully as a minimalist style addition to a narrow garage side path, keeping the lower floor boundary completely clear for vehicle doors to open without obstruction.
To construct this heavy-duty wall shelving unit, begin by utilizing a digital stud finder to locate the exact center lines of the vertical wall studs across the chosen installation zone. Cut three matching pieces of two-by-four lumber for each triangular support bracket: a horizontal arm measuring twenty inches, a vertical wall plate measuring sixteen inches, and a diagonal support brace mitered at forty-five-degree angles on both ends. Fasten the vertical wall plates directly into the center of the studs using three-inch steel lag screws, validating vertical alignment with a spirit level during tightening. Secure the horizontal arms to the wall plates with pocket hole screws, then install the diagonal braces underneath to lock the structural triangle. Lay a pre-cut sheet of three-quarter-inch plywood over the extending horizontal arms, fastening it down with standard wood screws along the perimeter to finish the sturdy storage platform.
Idea 2: Overhead Slideway Tote Tracks
Step-by-Step Guide
The overhead slideway tote track system is a ceiling-mounted structural matrix designed to suspend heavy plastic storage bins completely off the ground by utilizing their thick plastic rims as structural rails. This design leverages the unused dead space located directly above open garage doors or high rafters, creating an invisible storage layer for seasonal items like holiday decorations or camping gear. By sliding the bins horizontally along parallel wooden tracks, homeowners can access their contents easily without unstacking multiple heavy containers. The clean, hidden nature of this ceiling layout keeps items safe from ground-level moisture and pests while maintaining a highly streamlined room profile.
To execute this ceiling-mounted construction project, select uniform heavy-duty plastic storage totes that feature pronounced, rigid protruding lips along their upper perimeter rims. Measure the exact width of the tote lid directly beneath the outer lips to determine the spacing interval required for your parallel ceiling tracks. Cut several lengths of two-by-four framing lumber to serve as the track bases, and cut matching lengths of two-by-two lumber to serve as the supporting ledges. Fasten the two-by-two ledges to the bottom edges of the two-by-four bases using wood glue and three-inch construction screws, creating an upside-down T-shaped structural track profile. Mount these compiled tracks onto the ceiling joists using heavy lag screws, spacing them precisely so the tote lips slide securely along the ledges without slipping through the central gap.
Idea 3: The Modular French Cleat Wall
Execution Process
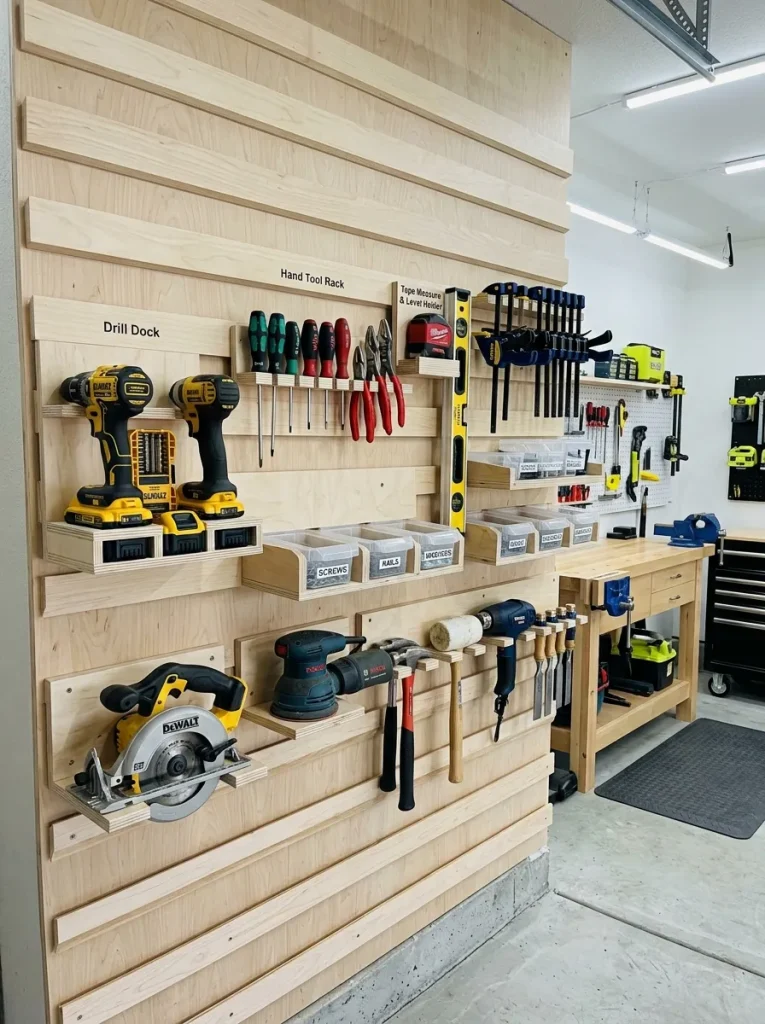
The modular French cleat wall system introduces an infinitely adjustable vertical tool organization canvas that allows homeowners to rearrange tool holders instantly without re-drilling into the wall structure. This arrangement relies on a series of horizontal wooden boards cut at matching forty-five-degree angles that lock together using simple gravity and mechanical friction. Individual specialized tool holsters, custom drill docks, and parts bins can be mounted onto matching wedge plates that hook over the wall tracks seamlessly. This project stands as an exceptional easy project for organizing vast collections of hand tools, lawn equipment, and hardware accessories within a highly visible and neat layout.
To manufacture this modular wall display, rip several eight-foot lengths of three-quarter-inch plywood into four-inch-wide strips using a circular saw or table saw. Tilt the saw blade to a precise forty-five-degree angle, and cut each strip down the center line to create two matching cleat boards with opposite interlocking wedge profiles. Mount the base cleat boards horizontally onto the garage wall studs using three-inch wood screws, ensuring the sharp point of the wedge faces upward and outward from the wall surface. Space each horizontal wall cleat exactly six inches apart vertically, maintaining absolute level alignment across the entire display matrix. To build individual tool holders, simply attach a small downward-facing forty-five-degree plywood wedge to the back of custom wooden boxes, tool hooks, or shelf dividers, allowing them to drop securely into the wall cleats.

Idea 4: Vertical PVC Lawn Tool Racks
How to Make
The vertical PVC lawn tool rack is a stationary wall-mounted containment organizer designed to secure long-handled garden implements like shovels, rakes, and brooms in a perfectly upright position. This design utilizes short sections of rigid plastic plumbing pipe cut at matching angles to serve as individual retention sleeves that prevent long handles from falling over or tangling together. By storing tools vertically against an otherwise unused wall section, this organizer minimizes floor clutter and keeps hazardous metal tool blades oriented safely upward or flat against the wall boundary. It serves as a classic beginner friendly project that utilizes affordable, water-resistant utility materials.
To make this vertical garden tool organizer, secure two matching lengths of two-by-four framing lumber measuring forty inches in total length to act as the primary horizontal wall mounting rails. Smooth the wood surfaces with sandpaper, and mount the first rail horizontally to the wall studs at a height of twelve inches from the floor, and the second rail parallel at a height of forty-eight inches. Cut a three-inch diameter schedule forty PVC pipe into several six-inch-long individual sleeves using a fine-tooth hacksaw or pipe cutter. Smooth the rough plastic cut lines with fine sandpaper, then drill a pilot hole through the front wall of each plastic sleeve to allow access for your screwdriver blade. Fasten the PVC sleeves vertically along the front faces of both wooden mounting rails using durable pan-head wood screws, spacing the segments six inches apart to complete the slot framework.

Idea 5: Corner Cord and Hose Reels
Setup Method
The corner cord and hose reel layout utilizes the often neglected, intersecting structural angles of a garage corner to mount large, sweeping storage spools for heavy extension cables and air lines. This concept relies on heavy-duty wooden half-circles mounted projecting outward from the corner seam, providing a wide curved radius that prevents delicate rubber hoses or copper wires from kinking or cracking during tight winding maneuvers. By placing these large-diameter spools directly into a corner boundary, the bulky utility lines remain completely out of primary walking paths while remaining highly accessible for workshop operations.
To assemble this corner utility storage reel, cut two identical matching semi-circular disks out of a sheet of three-quarter-inch thick plywood, making each disk feature a radius of ten inches. Cut a central square connecting block out of a solid four-by-four timber post, matching the desired vertical height of your hose spool, which should measure approximately eight inches. Sandwich the solid timber block between the two plywood semi-circles, securing the components together from the top and bottom faces using heavy construction adhesive and deep wood screws. Mount two heavy-duty steel L-brackets to the flat rear intersecting edges of the wooden reel assembly using short machine bolts. Position the completed spool directly into the garage wall corner, driving three-inch structural screws through the steel brackets directly into the corner framing studs to anchor the high-tension cable reel safely.
Idea 6: The Folding Workbench Panel
Step-by-Step Guide
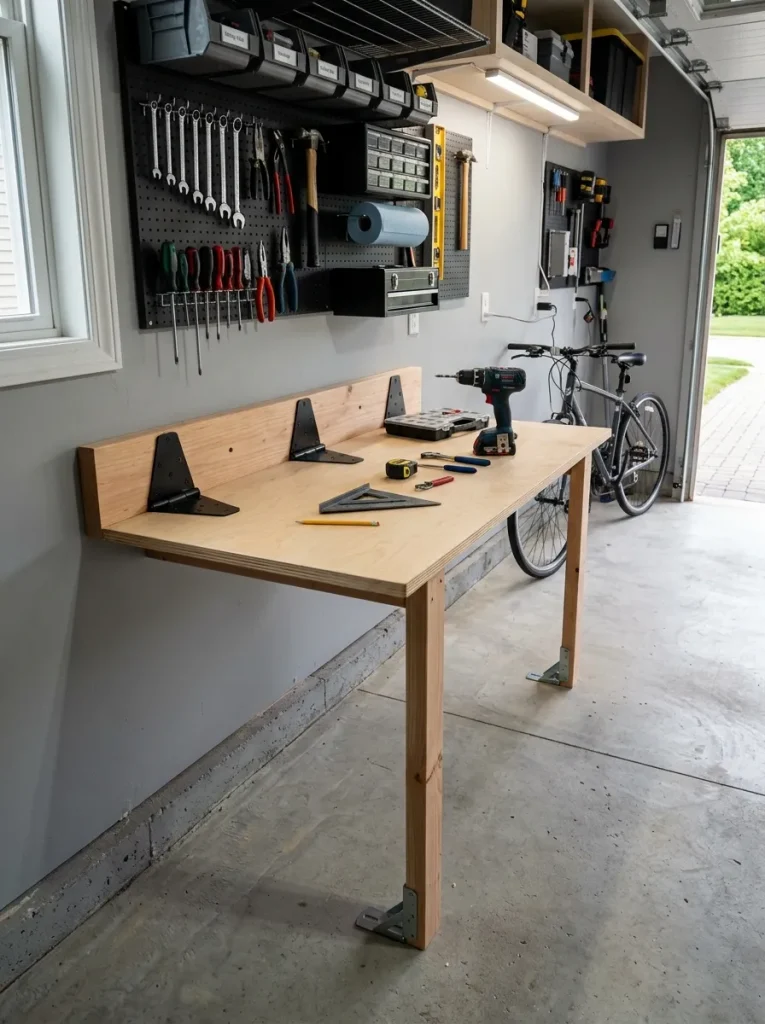
The folding workbench panel is a high-utility space-saving structure that provides a rigid, expansive horizontal workspace when needed, then folds completely flat against the wall frame when work concludes. This design is highly valuable for small single-car garages where maintaining open floor space for vehicle parking is an absolute daily operational requirement. The assembly uses heavy-duty steel gate hinges and folding structural legs to support high downward forces during manual fabrication tasks, ensuring a solid working platform that resists rocking or shifting during use.
To assemble this folding workspace, cut a solid sheet of three-quarter-inch birch plywood or butcher block countertop material to your desired dimensions, with a standard size measuring twenty-four inches deep by forty-eight inches wide. Mount a heavy-duty two-by-four wooden ledger board horizontally to the wall studs at a precise height of thirty-six inches from the garage floor using lag screws. Attach the rear edge of your plywood workbench panel to the fixed wooden ledger board using three heavy-duty steel strap hinges, ensuring the panel can swing upward fluidly. Construct two independent folding legs out of two-by-four lumber, attaching them to the underside front corners of the workbench using locking card-table hinges that snap into a rigid ninety-degree position. Lift the panel upward to extend the legs for an instant work zone, then fold the legs flat to drop the bench surface downward against the wall.
Idea 7: Inter-Stud Magnetic Hardware Strips
Execution Process
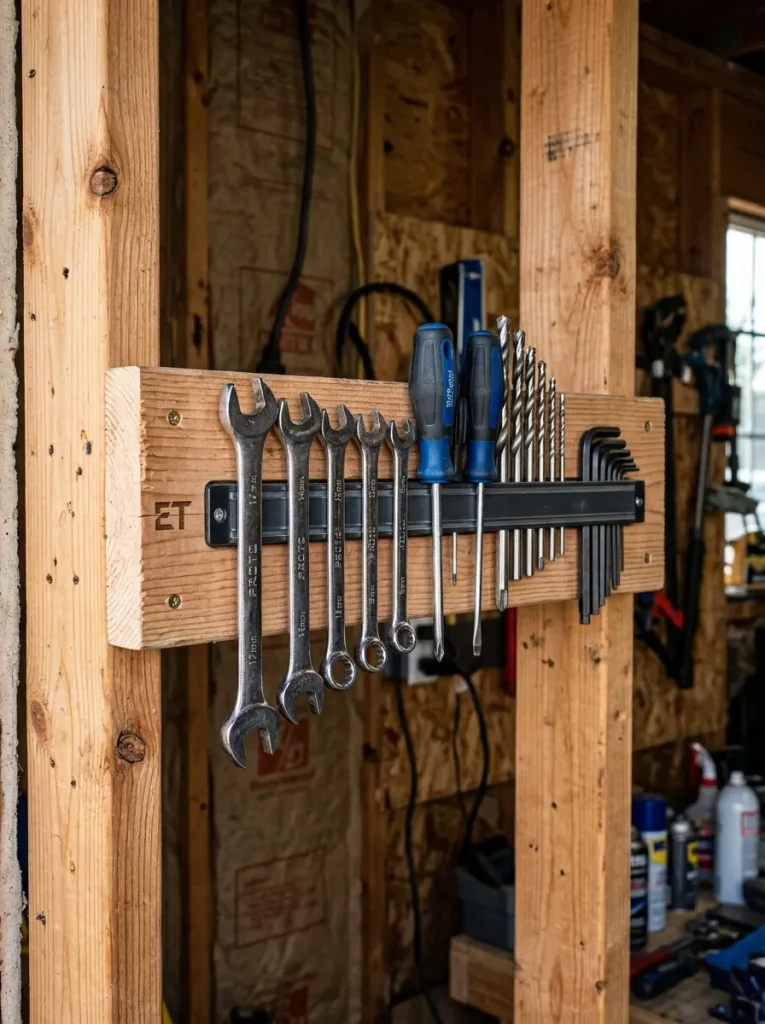
The inter-stud magnetic hardware strip system capitalizes on the shallow, recessed wall cavities located directly between exposed vertical studs to mount powerful hidden storage strips for small metallic tools and hardware items. This technique uses high-strength neodymium magnetic bars recessed into flush-mounted wooden backing blocks, allowing wrenches, screwdrivers, drill bits, and pliers to cling directly to the wall surface without using bins or hooks. This layout delivers a highly organized, clean look that maximizes shallow wall depths that are otherwise considered dead space within unfinished garage spaces.
To create this magnetic tool storage array, measure the exact horizontal clearance between two adjacent vertical wall studs, which typically measures fourteen and one-half inches in standard residential construction framing. Cut a length of two-by-four lumber to match this internal dimension exactly, ensuring a tight friction-fit when placed horizontally between the studs. Use a router tool equipped with a straight carving bit to mill a long, half-inch-deep rectangular channel across the center face of the cut wood block. Embed a high-strength magnetic bar assembly into the routed channel, securing it firmly from behind using a layer of heavy-duty polyurethane construction adhesive. Slide the completed magnetic block horizontally into the open stud cavity at eye level, driving two-inch wood screws diagonally through the sides of the block directly into the vertical studs to lock the hardware array in place.
Idea 8: Suspended Extension Ladder Joist Hooks
How to Make
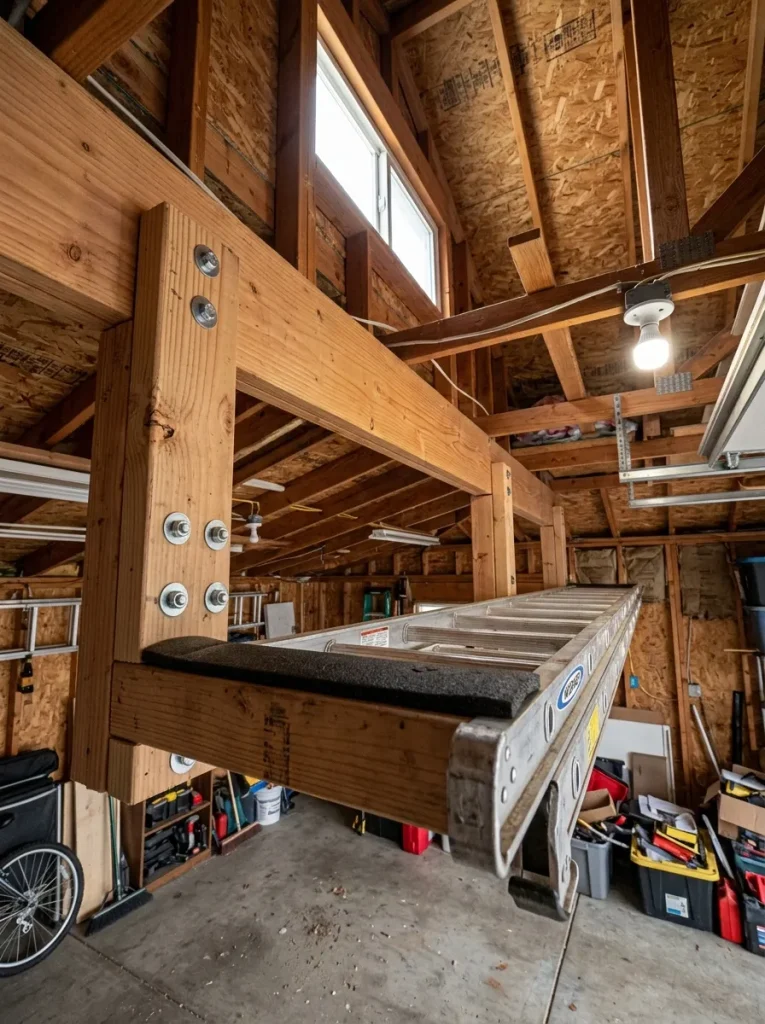
The suspended extension ladder joist hook setup solves the difficult problem of storing long, heavy aluminum or fiberglass extension ladders that otherwise consume massive amounts of linear wall or floor space. This design uses custom-shaped, extra-wide wooden brackets lined with protective foam padding that hang directly from overhead ceiling joists or exposed collar ties. By lifting the heavy ladder horizontally into the high ceiling frame of the garage, the tool is kept completely out of sight while remaining safe from accidental vehicle impacts or atmospheric ground moisture.
To manufacture this high-elevation ladder rack, cut four matching L-shaped arm segments out of a sheet of three-quarter-inch thick structural plywood, making each arm feature an internal horizontal carrying shelf measuring eight inches wide. Glue and clamp the plywood pieces together in pairs to create two ultra-thick, double-ply heavy-duty support brackets capable of bearing significant hanging loads. Line the inner horizontal shelf surfaces of both brackets with a strip of self-adhesive closed-cell foam padding to prevent scratching the ladder rails during loading maneuvers. Locate two ceiling joists spaced approximately six to eight feet apart along your garage ceiling path using a stud finder tool. Fasten the vertical legs of the wooden brackets directly into the sides of the ceiling joists using three-inch steel lag bolts, then slide your extension ladder horizontally onto the suspended brackets to clear floor space below.
Idea 9: Giant Plywood Mobile Bin Carts
Setup Method
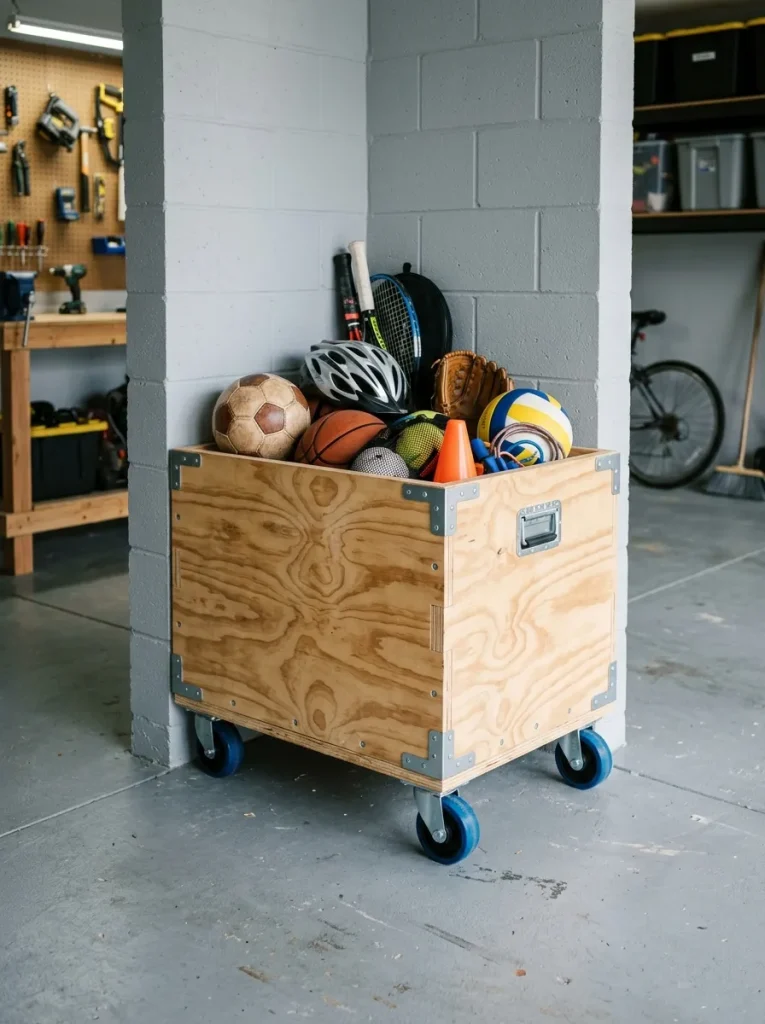
The giant plywood mobile bin cart is a heavy-duty rolling storage box designed to consolidate oversized, awkward gear like sports balls, lawn chairs, or scrap lumber into a single moveable compartment. This concept relies on thick plywood construction reinforced with internal corner blocks and equipped with heavy-duty locking caster wheels that allow the unit to roll effortlessly across concrete surfaces. By building a mobile storage cart, homeowners can quickly shift large volumes of gear out of the way when sweeping the garage floor or rearranging the space for large maintenance projects.
To construct this heavy-duty mobile cart, cut a base panel measuring twenty-four inches wide by thirty-six inches long out of a sheet of three-quarter-inch thick exterior grade plywood. Cut two matching side panels measuring twenty-four inches high by thirty-six inches long, and two matching end panels measuring twenty-four inches high by twenty-two and one-half inches wide. Assemble the four side panels into a large rectangular box frame over the base panel, reinforcing every internal vertical corner seam with a square two-by-two wooden support cleat. Apply waterproof wood glue along all intersecting joint lines, securing the panels firmly with two-inch pocket hole fasteners driven from the exterior surfaces. Flip the box assembly upside down, and install four heavy-duty three-inch polyurethane locking caster wheels to the four bottom corners using thick pan-head machine screws to complete the robust mobile bin system.
Idea 10: Slotted PVC Screwdriver Dock
How to Create
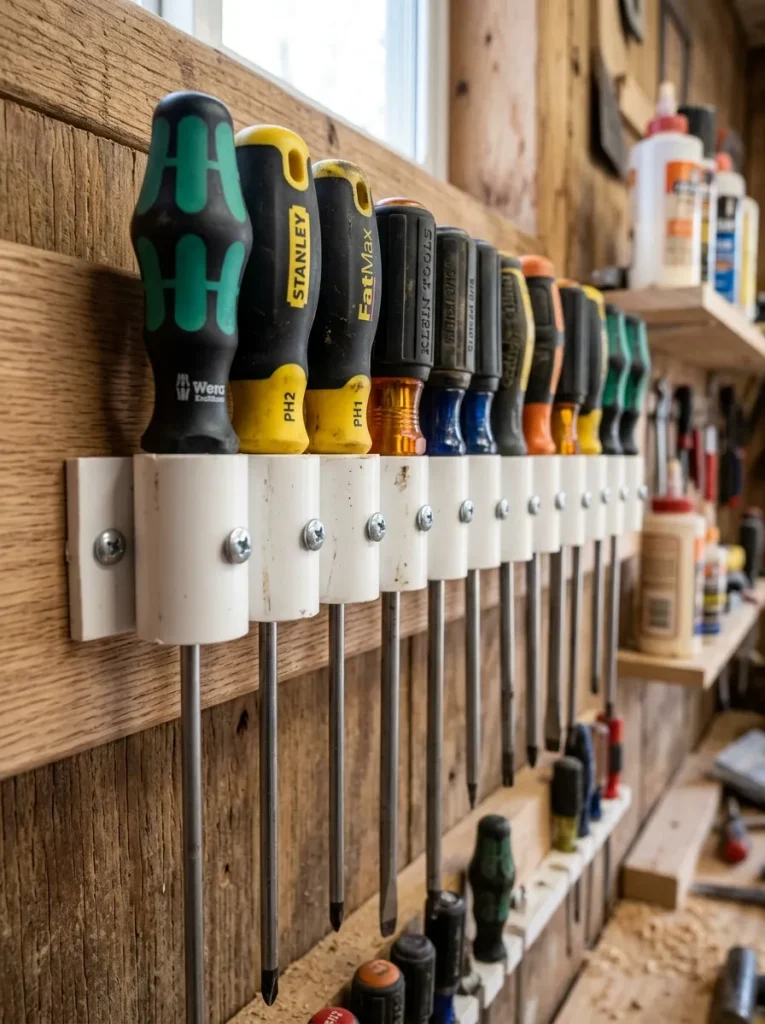
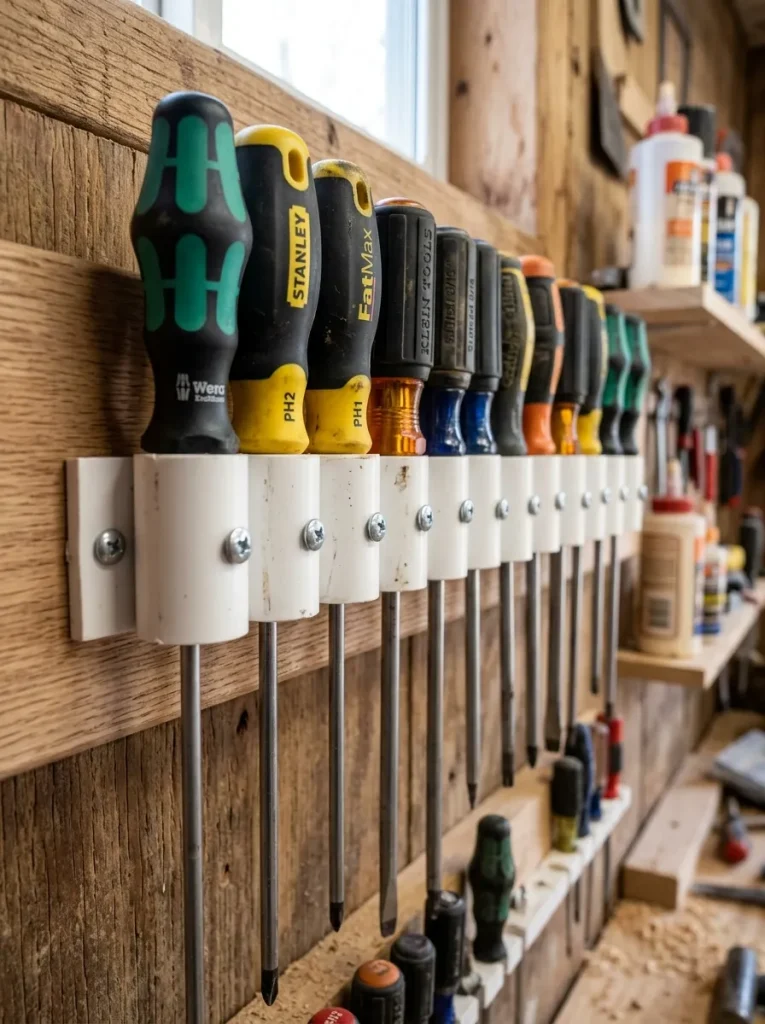
The slotted PVC screwdriver dock is a highly focused, compact tool organizer that organizes large collections of hand tools by their handle diameters along a neat horizontal wall bar. This design utilizes small diameter PVC plumbing pipes cut into short, matching vertical sleeves that hold each tool independently with the tip oriented safely downward for instant visual size selection. This layout eliminates the clutter of messy toolbox drawers, keeping your primary repair tools within arm’s reach of your primary workbench or vehicle repair zone.
To build this compact tool dock, select an eight-foot length of thin-walled one-inch diameter PVC plumbing pipe and cut it into several small segments measuring exactly two inches in length using a pipe cutter. Use a file to smooth the plastic edges, removing any burs or structural shards from the cutting process. Cut a piece of two-by-four framing lumber to twenty-four inches in length to serve as your horizontal wall-mounting track. Align the small PVC cylinders vertically side by side along the front face of the wooden board, ensuring their top lips are perfectly flush with the top edge of the wood. Drive a single one-inch pan-head wood screw through the inner back wall of each PVC sleeve directly into the wood backing track, then mount the completed dock horizontally onto your workbench wall frame.
Common Beginner Mistakes and How to Avoid Them
One of the most dangerous errors made during the assembly of heavy-duty garage storage systems is overestimating the weight-bearing capacity of standard drywall anchors or thin wood paneling. Relying on superficial wall fixings to hold heavy automotive tools, lumber racks, or suspended ceiling bins will inevitably cause structural failure, leading to property damage or severe physical injury. To prevent this hazard entirely, every primary load-bearing bracket, ceiling track, or wall ledger board must be fastened directly into the solid wood structural framing studs or ceiling joists of the building using thick steel lag screws. Another frequent oversight is failing to verify absolute level alignment across long horizontal runs of shelving or sliding overhead tracks. Garages are intentionally built with sloped concrete floors to facilitate water drainage, meaning that measuring upward from the floor level will result in crooked, unstable shelves that cause round items to roll off continuously. Always utilize a high-quality digital spirit level or a self-leveling laser level line to plot your construction boundaries independently of the floor slope. Finally, using indoor-grade adhesives or untreated particle boards can cause systems to warp or delaminate due to high humidity levels; always select moisture-resistant exterior-grade plywood and water-resistant polyurethane adhesives for utility environments.
Practical Tips for Better Results
| Tip Category | Actionable Strategy | Expected Outcome |
|---|---|---|
| Weight Capacity | Drive heavy-duty steel lag screws at least two full inches into the center of framing studs. | Ensures maximum structural load capacity and prevents shelf sag under heavy tool weights. |
| Floor Leveling | Utilize a self-leveling laser line when plotting horizontal wall cleat locations across sloped garage walls. | Guarantees perfectly level shelving structures regardless of uneven concrete floor pitches. |
| Material Selection | Choose exterior grade ACX plywood sheets rather than cheap particle board for custom tool boxes. | Prevents material warping, delamination, and mold growth caused by seasonal humidity shifts. |
| Hardware Labeling | Apply high-contrast vinyl labels to the front faces of suspended ceiling storage totes using waterproof markers. | Allows for instant visual identification of hidden holiday gear from ground level without unstacking. |
Styling, Presentation, or Organization Ideas
Integrating handmade storage fixtures into a cohesive garage layout requires thoughtful aesthetic curation and color planning to ensure the workspace feels like an extension of the home rather than a cluttered warehouse. Consider painting all custom wooden shelf brackets, French cleat walls, and tool docks in a matching semi-gloss slate gray or clean bright white finish, which seals the raw lumber against grease stains while creating a highly professional modern design look. Grouping mechanical tools by function—such as establishing a distinct automotive zone, a lawn care corner, and an electrical hardware station—allows the garage to flow logically during complex multi-stage repair projects. Utilize matching heavy-duty black plastic storage bins with yellow lids across your high-elevation shelving units to create a uniform, balanced visual pattern that hides colorful household clutter from direct view. For wall-mounted hand tool displays, utilize high-contrast black backboards behind your French cleats to make individual wrenches and drivers pop visually, making it immediately obvious if a specific item has not been returned to its designated dock at the end of the workday.
Budget or Time Planning
Reclaiming your garage space through systematic handmade construction can be accomplished affordably by following a structured project timeline and a well-managed budget strategy. A complete array of wall-mounted shelves, PVC tool racks, and rolling bin carts can be manufactured for less than one hundred and fifty dollars total, primarily sourcing raw materials from standard framing lumber cuts and large plywood sheets available at any local building supply yard. To optimize your labor hours efficiently, dedicate a single four-hour block on a Saturday morning to performing all linear lumber cuts, sanding steps, and bracket pre-assembly tasks simultaneously, rather than setting up tools for individual items across multiple weekdays. Spend the first hour mapping stud lines and processing your primary two-by-four lengths to establish a high-efficiency assembly line layout on your garage floor workspace. Allocate the next two hours to structural anchoring steps that require heavy drilling and lag screw fastening into wall studs and ceiling joists. Utilize the final hour of your project window to mount lightweight organizers like the PVC screwdriver docks and style your storage bins, leaving your floor completely clear for vehicle parking by Sunday evening.
Creative Expansion and Advanced Inspiration
Once you have successfully mastered these foundational garage framing and organization methods, you can expand your utility portfolio by introducing advanced mechanical integrations that maximize spatial utility even further. Consider transforming a standard stationary overhead storage shelf into a motorized drop-down platform system utilized by a heavy-duty electric winch and steel cable pulleys to lower heavy gear down to chest height via a wall switch control. Advanced woodworkers can also experiment with embedding low-voltage LED strip lighting directly into routed channels along the underside of French cleat modules, providing automated shadow-free task lighting across the entire workbench surface when a tool is removed. Another inspired variation involves combining mobile tool carts with folding engineering by constructing a rolling matching cabinet system that locks together using heavy steel toggle latches to form a massive multi-axis portable work island for large-scale construction tasks. These advanced updates turn a basic home improvement task into an extraordinary architectural workshop feature that maximizes spatial performance while providing ongoing creative project inspiration for years to come.