10 Paper Plate Crafts Kids Ideas
Paper plate crafts represent one of the most versatile, accessible, and engaging creative activities for young children. This comprehensive DIY tutorial provides ten structured, step-by-step methods to transform a simple household item into beautiful, interactive toys and home decor pieces. Crafting with paper plates serves as an excellent foundational activity for early childhood development, allowing kids to explore shapes, textures, and spatial awareness while building fine motor skills through cutting, painting, and gluing. By utilizing inexpensive everyday supplies, parents and educators can create structured learning environments that double as entertaining artistic sessions. Readers will discover how to manipulate standard paper plates using various techniques such as folding, layering, and precise cutting to construct durable projects. Each featured concept provides clear guidance on managing materials, handling layout planning, and achieving a polished, aesthetic final result. These activities function beautifully as classroom decoration, party accents, or interactive elements for imaginative play at home, demonstrating that impactful artistic development does not require complex or expensive resources.
Why Paper Plate Crafting Remains a Popular Design Trend
The persistent popularity of paper plate crafting within modern Pinterest ideas stems from its exceptional balance of practical value, design relevance, and beginner-friendly accessibility. As families and educators increasingly seek low-tech, high-engagement activities, the humble paper plate stands out as an ideal canvas for a minimalist style or vibrant, colorful home decor. This specific type of handmade creation carries immense DIY appeal because it requires zero specialized artistic background, ensuring that every child experiences immediate success without feeling overwhelmed by technical demands. From a design perspective, the circular shape and rigid yet pliable texture of a standard plate offer an excellent foundational structure for geometric balance and creative transformation. The inherent structural stability allows the finished pieces to stand independently, hang symmetrically, or function as kinetic objects that move when touched. Furthermore, these budget ideas emphasize sustainability and resourcefulness, showing children how to repurpose simple household items into beautiful aesthetic items, thereby fostering a lifelong appreciation for practical design and creative project execution.
Materials and Preparatory Requirements
Executing a successful paper plate creative project requires proper organization, safe tools, and structured preparation before the crafting session begins. The primary materials consist of standard uncoated white paper plates in various sizes, which absorb water-based paints and adhesives much more effectively than glossy, plastic-coated alternatives. Additional essential components include washable acrylic or tempera paints, heavy-duty construction paper, non-toxic liquid school glue, glue sticks, safety scissors, and various embellishments like yarn, googly eyes, and markers. To prepare the workspace, cover a flat table with reusable oilcloth or butcher paper to capture spills, and arrange all tools in shallow trays within easy reach of the children. Adult supervisors should pre-cut complex internal shapes or punch necessary holes ahead of time to maintain a smooth, stress-free tutorial flow for younger participants. Proper planning involves selecting projects that align with the child’s current developmental stage, ensuring that tasks like scissor work or intricate painting match their physical capabilities for an enjoyable experience.
Idea 1: Interactive Paper Plate Sunshine Clock
How to Create
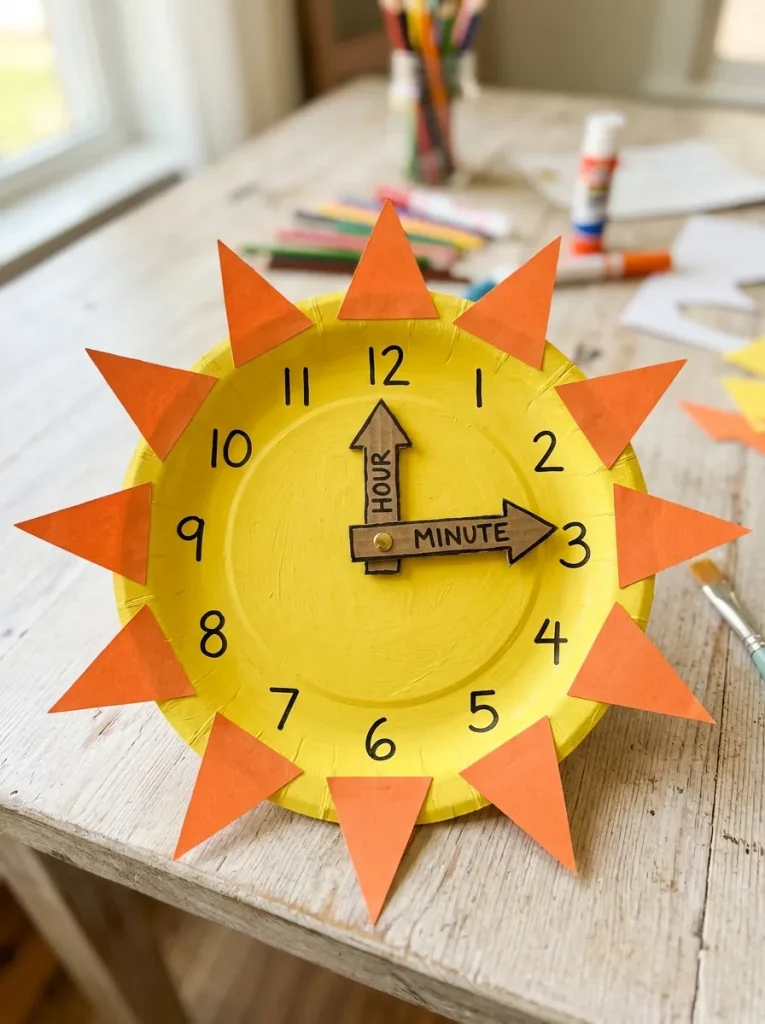
The interactive paper plate sunshine clock combines colorful home decor with an educational, beginner-friendly tool designed to teach children how to read analog time displays. This concept utilizes the natural circular shape of the plate to mimic a classic clock face, while bright yellow and orange construction paper triangles radiate outward to simulate a cheerful sun. The center of the plate features bold, highly visible numbers ranging from one to twelve, spaced evenly around the perimeter to ensure accurate time representation. Two movable clock hands, cut from stiff cardboard and painted in contrasting shades, sit at the very center, secured by a single metal fastener that allows them to rotate freely. This project serves a dual purpose, functioning as a vibrant piece of wall decoration for a playroom or classroom while acting as a tactile learning device. Children gain a deep understanding of time management and spatial orientation as they physically manipulate the hands during daily routines or scheduled educational games.
The assembly process begins by applying a smooth, uniform layer of bright yellow washable tempera paint across the entire front surface of a standard nine-inch paper plate. While the paint dries completely, assist the child in cutting out twelve identical triangles from orange construction paper to serve as the sunbeams, and two elongated arrows from a scrap piece of cardboard for the clock hands. Use a black permanent marker to carefully write the numbers twelve, three, six, and nine at the cardinal positions on the plate, then fill in the remaining numerical values to maintain even, professional spacing. Apply a small dab of liquid school glue to the underside rim of each orange triangle, pressing them firmly around the back perimeter of the plate so they extend outward uniformly. Carefully punch a small hole through the exact center of the plate and through the base of both cardboard hands using a sharp hole punch or a utility knife. Insert a brass paper fastener through the minute hand, the hour hand, and the center hole, spreading the metal prongs flat against the back of the plate to allow smooth, unhindered rotation.
Idea 2: Geometric Paper Plate Bird Mask
How to Create
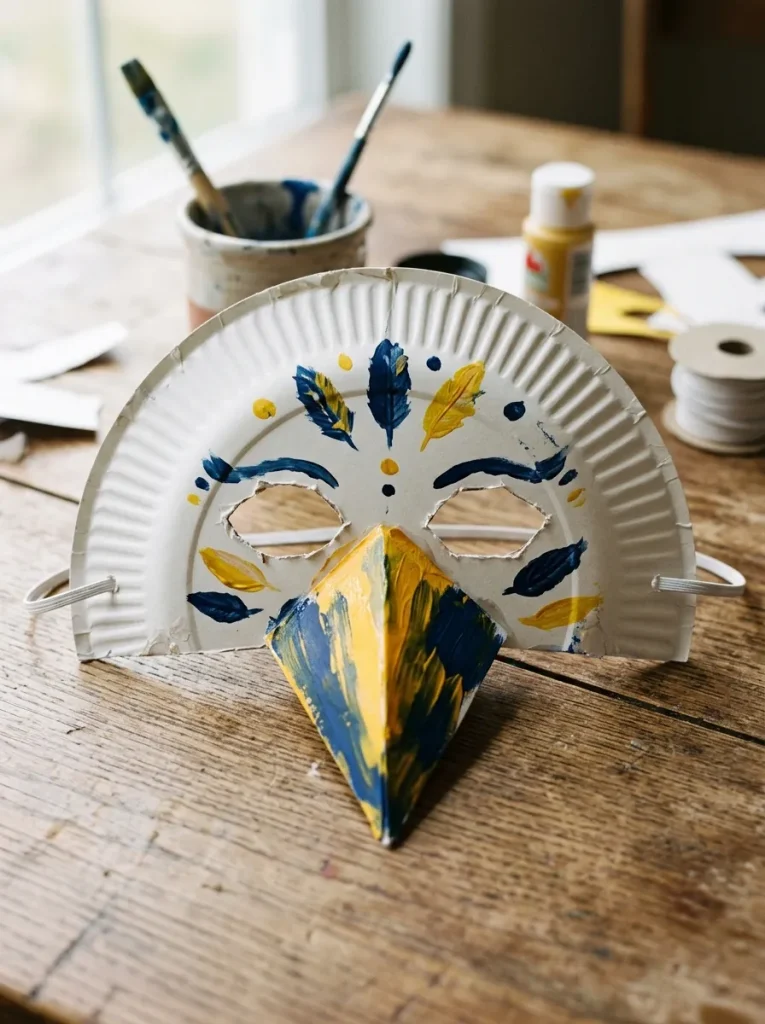
The geometric paper plate bird mask offers a wonderful introduction to theatrical play and minimalist style design through simple structural folding and symmetrical cutting techniques. This project transforms a basic two-dimensional plate into a wearable, three-dimensional accessory that contours naturally to a child’s face, making it excellent for imaginative storytelling. The design relies on clean lines, where half of a paper plate forms the main brow and cheek structure, while a folded triangular insert creates a sharp, projecting beak that adds depth. By selecting bold, solid color palettes, the finished mask takes on a sophisticated, modern aesthetic that looks beautiful when displayed on a bedroom wall or worn during backyard games. This beginner friendly project teaches children the fundamentals of facial symmetry, spatial proportions, and structural balance, showing them how flat surfaces can easily change into dynamic forms.
To construct this wearable mask, cut a standard paper plate exactly in half using sharp safety scissors, reserving one half for the main face shield and the other half for the structural beak. On the primary half, mark two symmetrical oval openings roughly two inches apart near the straight cut edge, then carefully cut out these eye holes to ensure clear visibility for the wearer. Take the remaining half of the plate, cut a wide triangle from the center section, and fold it precisely down the middle to create a sharp, protruding three-dimensional beak shape. Apply a generous line of quick-drying craft glue along the top flat edge of the folded triangle, pressing it firmly between the two eye cutouts on the front face of the mask. Paint the entire outer surface using contrasting colors, such as a deep navy blue for the face shield and a bright golden yellow for the beak, ensuring full coverage over the plate texture. Once the paint dries completely, punch a small hole on each outer edge of the mask, thread a comfortable piece of elastic string through the openings, and tie secure knots to complete the project.
Idea 3: Textured Woven Paper Plate Bowl
How to Create
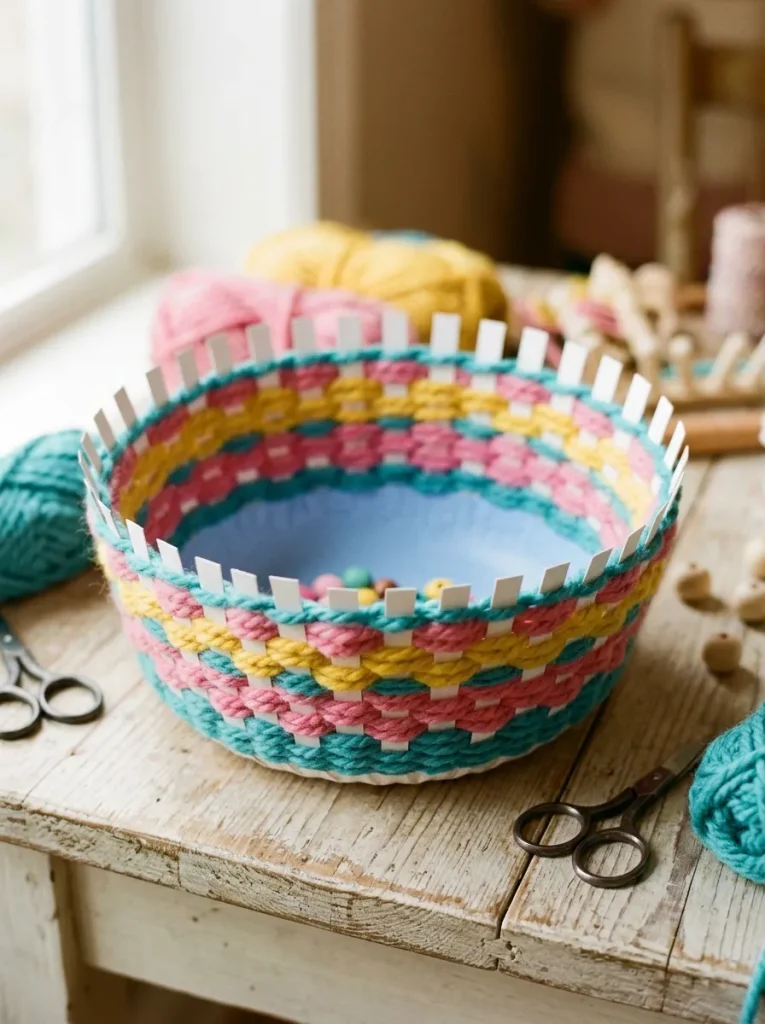
The textured woven paper plate bowl introduces children to basic textile patterns and structural manipulation, converting a flat circular object into a functional, three-dimensional storage container. This project relies on cutting equidistant radial slits around the perimeter of the plate and weaving colorful yarn continuously through the resulting tabs to build up sturdy, decorative walls. The finished product exhibits a beautiful, handmade texture that easily holds lightweight items like keys, paperclips, or hair accessories, making it an excellent piece of practical home decor. Engaging in this weaving process refines fine motor coordination, encourages patience, and teaches children the rhythmic, alternating patterns of over-and-under construction. The natural tension of the yarn draws the outer rim of the plate upward, creating a elegant flared bowl shape that showcases both the painted interior and the complex threadwork.
Begin the setup method by selecting a heavy-duty paper plate and drawing an inner circle roughly four inches in diameter directly in the center to serve as the solid base of the bowl. Use a ruler to mark an odd number of radial lines—ideally nine or eleven—extending from the outer edge of the inner circle straight to the outermost rim of the plate. Carefully cut along these marked lines with safety scissors to create separate, flexible tabs that remain firmly attached to the solid circular base. Paint the interior base of the bowl with a solid acrylic color to ensure a polished look, allowing it to dry thoroughly before proceeding to the structural weaving phase. Tie the end of a long strand of thick, colorful yarn around the base of one of the structural tabs, securing it with a simple double knot. Guide the child to weave the yarn over the first tab, under the second tab, and over the third, repeating this alternating sequence continuously around the plate. As the layers build up, gently pull the yarn to draw the tabs upward into a bowl shape, tying on new colors of yarn as needed, and securing the final row with a knot glued to the inner rim.
Idea 4: Kinetic Paper Plate Hot Air Balloon
How to Create
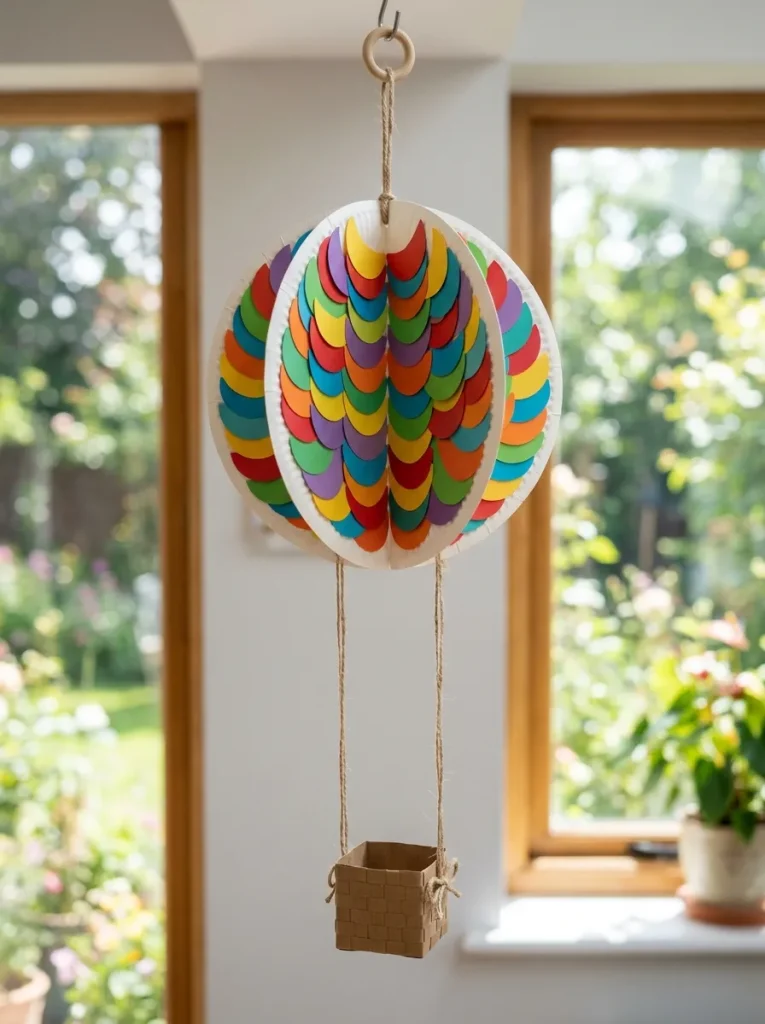
The kinetic paper plate hot air balloon is a captivating hanging decoration that introduces movement, layering, and three-dimensional depth into traditional children’s paper crafting. This design features a standard paper plate acting as the expansive, colorful balloon canopy, which is connected by thin support strings to a small, rectangular construction paper basket hanging below. By cutting out contrasting curved panels from bright cardstock and layering them vertically on the plate surface, the balloon achieves an appealing optical depth that mimics real stitched fabric. When suspended from the ceiling near a window or vent, the lightweight structure catches gentle air currents, spinning slowly to provide continuous visual interest and a whimsical aesthetic to any room. This creative project helps young crafters understand the principles of balance, suspension, and aerodynamic movement while working with everyday craft supplies.
To execute this project step by step, paint the entire curved surface of a paper plate in a neutral background shade, such as sky blue or crisp white, to provide a clean foundation. Cut four identical, wide crescent shapes from different vibrant sheets of construction paper, making sure the outer curve of each crescent matches the curvature of the plate rim. Apply adhesive along the outer edges of these paper crescents and affix them to the plate in a symmetrical, overlapping pattern that converges at the top and bottom center points. Next, cut out a small two-inch square from brown cardstock to represent the woven passenger basket, using a dark marker to draw a simple crisscross texture across the surface. Cut two identical six-inch pieces of sturdy yarn or baker’s twine, gluing the top end of each string to the lower back rim of the decorated plate. Attach the bottom ends of these parallel strings to the backside of the brown paper basket, ensuring the basket hangs perfectly level and straight beneath the balloon. Secure a loop of monofilament fishing line or additional yarn to the top rim of the plate, creating a reliable hanging mount for easy display.
Idea 5: Symmetrical Paper Plate Butterfly
How to Create
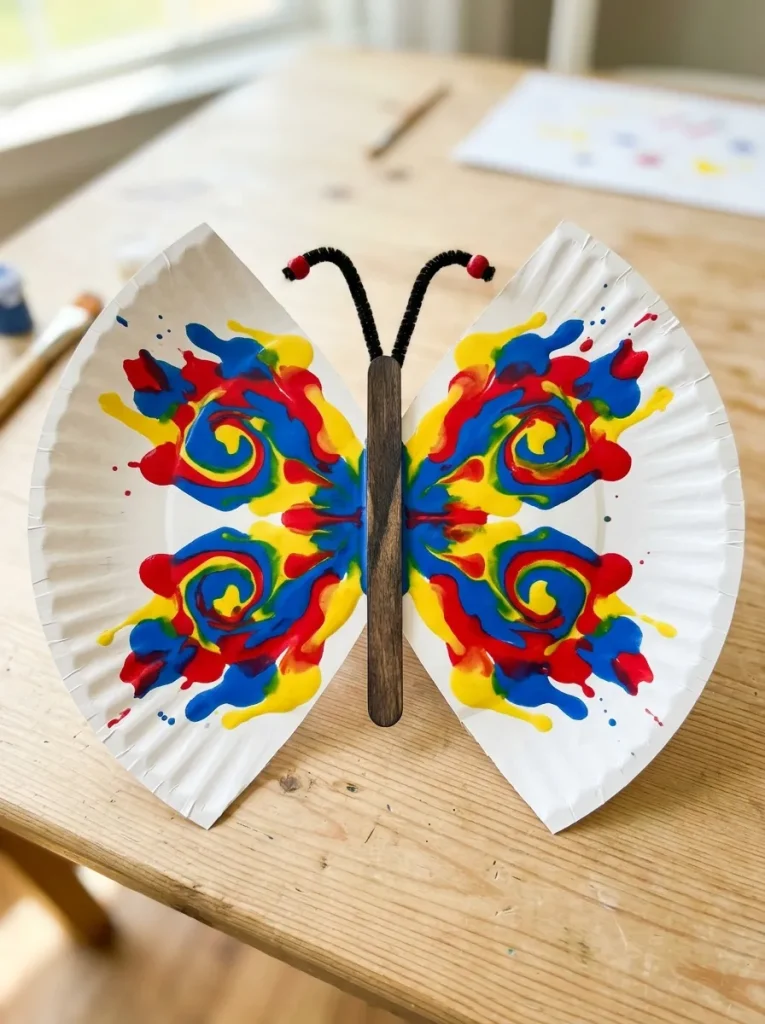
The symmetrical paper plate butterfly project provides an exceptional hands-on lesson in biology and geometry, demonstrating how bilateral symmetry operates in both art and nature. This design utilizes a single paper plate cut into specific segments that are inverted and reassembled to form wide, elegant wings attached to a central body corridor. The true artistic appeal of this craft lies in the painting process, where children apply vibrant paint blotches to one side of the wing structure and fold it over to create a mirrored duplicate. This simple yet magical printing technique guarantees a perfectly balanced, vibrant design that mimics the intricate markings found on real butterfly wings. The finished product functions beautifully as temporary window decor, party banners, or standalone art pieces that celebrate organic shapes and bold color combinations.
The creation process begins by folding a large paper plate precisely in half to establish a crisp centerline, then unfolding it flat on the workspace. Draw two wide, opposing triangular wedges along the left and right outer rims, cutting them out carefully so that the remaining shape resembles an elegant hourglass or a figure eight. Save the cut-out side wedges, as they can be trimmed down and repurposed later to form the central body and head of the butterfly structure. Instruct the child to squeeze small droplets of various bright tempera paints onto only the left half of the prepared paper plate wing template. Immediately fold the right half of the plate over onto the wet paint, pressing down firmly across the entire surface to transfer the wet pigments evenly. Carefully unfold the plate to reveal the beautiful, perfectly symmetrical design, setting it aside in a well-ventilated area until the paint dries completely. Glue a long wooden craft stick or a strip of dark construction paper down the center fold line to represent the body, and attach two thin pipe cleaners to the top to serve as delicate antennae.
Idea 6: Decorative Paper Plate Handsel Garden
How to Create
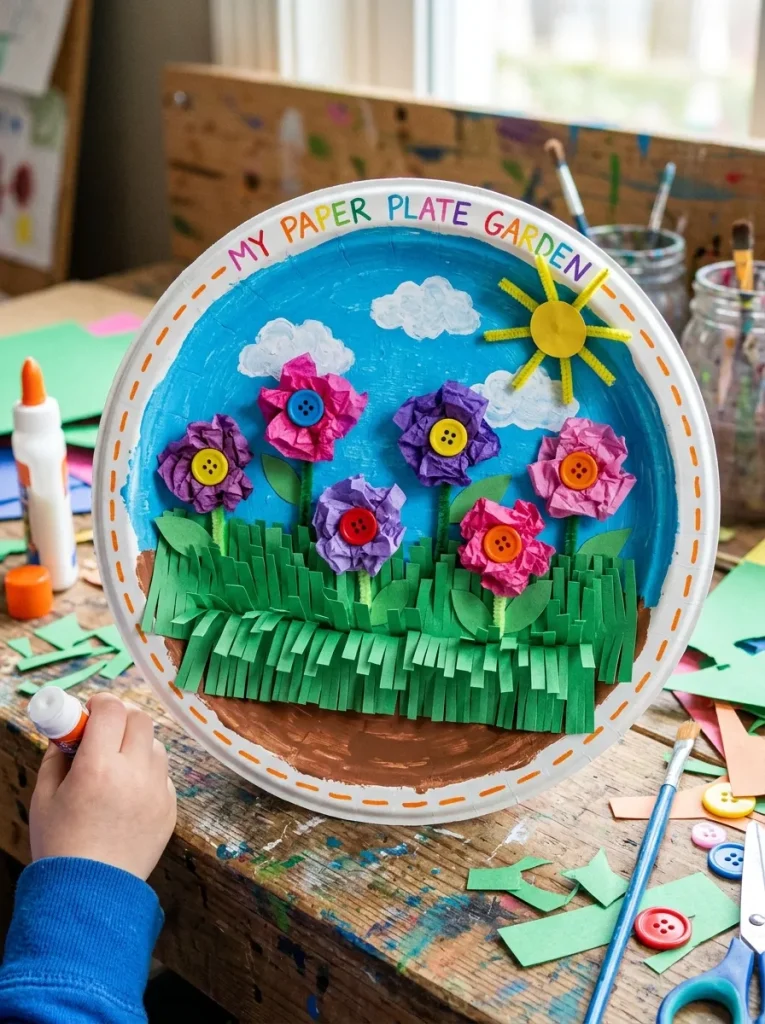
The decorative paper plate handsel garden transforms a simple dinner plate into a textured, low-relief landscape sculpture filled with vibrant handmade flora. This concept uses the circular boundary of the plate as a natural frame for a miniature garden, where layers of green paper grass house individual flowers made from tissue paper and button centers. The structured rim of the plate provides an excellent border, giving the entire piece the appearance of a framed decorative plate that can be displayed proudly on a shelf. This activity teaches children about spatial layering, depth perception, and botanical anatomy by breaking a garden scene down into background, midground, and foreground elements. It encourages tactile exploration as kids crinkle, tear, and layer different paper weights to create a realistic, multi-textured botanical display.
To begin assembly, paint the top two-thirds of a paper plate a light, solid blue to represent a clear daytime sky, and paint the remaining lower third a rich earth-toned brown. Cut a wide strip of green construction paper matching the width of the plate, and use safety scissors to snip a continuous fringe along the top edge, creating realistic blades of grass. Apply glue to the solid bottom edge of this green strip, securing it over the brown section of the plate so the delicate grass fringes stand outward in three dimensions. To create the flowers, cut small squares of brightly colored tissue paper, instruct the child to crumple them tightly around the eraser end of a pencil, and dip the base in school glue. Press these textured tissue paper blooms firmly into the grass layer, spacing them out evenly to ensure a balanced, visually appealing distribution of colors. Complete each flower by gluing a colorful plastic button or a small circle of yellow felt into the center of the tissue paper petals, adding a delightful touch of mixed-media texture.
Idea 7: Minimalist Paper Plate Tambourine
How to Create
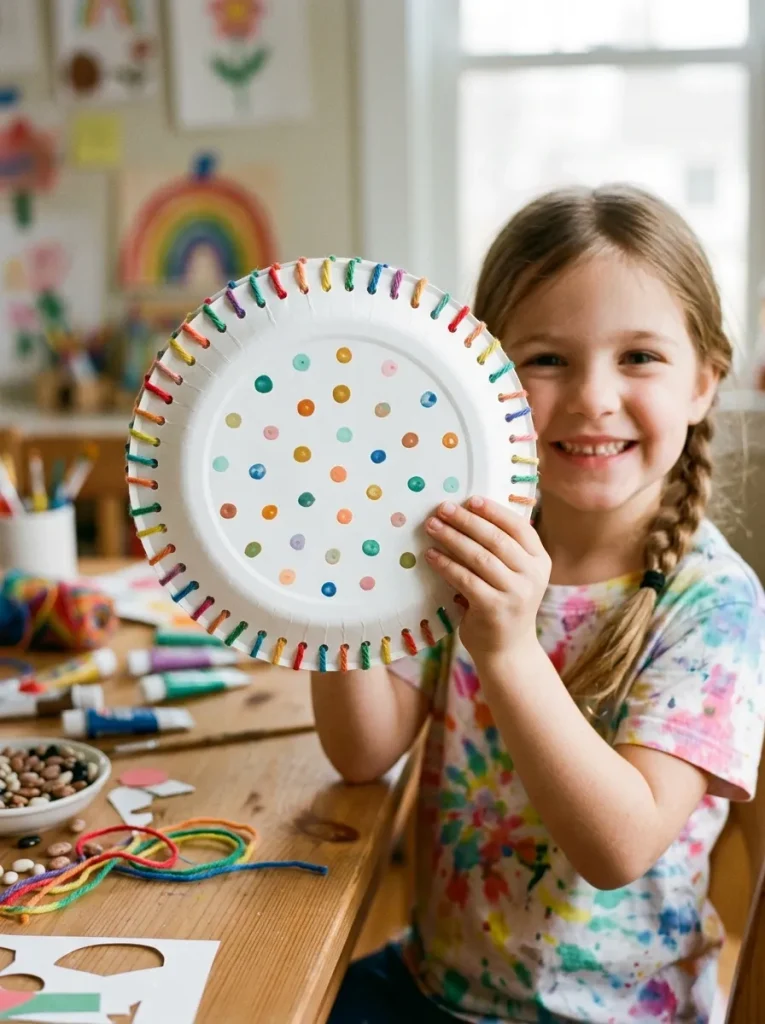
The minimalist paper plate tambourine bridges the gap between visual arts and musical expression, allowing children to build a functional, rhythmic percussion instrument using simple materials. This project fastens two identical paper plates rim-to-rim, creating a hollow sound chamber that contains metal bells, dried beans, or small beads that rattle when shaken. The exterior design focuses on clean lines, where patterns or simple line drawings accentuate the circular shape without overwhelming the piece. This craft introduces children to basic physics and sound resonance while providing an active outlet for musical play, rhythm practice, and dance accompaniment. The double-plate construction offers great structural durability, ensuring that the instrument survives enthusiastic handling during energetic classroom music sessions or home play.
The assembly method starts by placing two matching paper plates face-down on the workspace, allowing the child to paint the flat outer back surfaces using a cohesive, limited color palette. Once dry, use a hole punch to create clean openings spaced roughly two inches apart around the entire outer rim of both individual plates, making sure the holes align perfectly when the plates are stacked face-to-face. Place a handful of dried garbanzo beans, small pebbles, or metallic jingle bells directly into the center bowl of the bottom upward-facing plate. Align the second plate over the top, rim-to-rim, so the punched holes line up precisely, enclosing the musical filling safely within the center chamber. Thread a long piece of vibrant yarn or sturdy embroidery floss through the aligned holes using a simple whipstitch or blanket stitch around the entire perimeter. Secure the ends of the yarn with a tight double knot, adding a drop of school glue to the knot to prevent it from unraveling during musical use.
Idea 8: Three-Dimensional Paper Plate Aquarium
How to Create
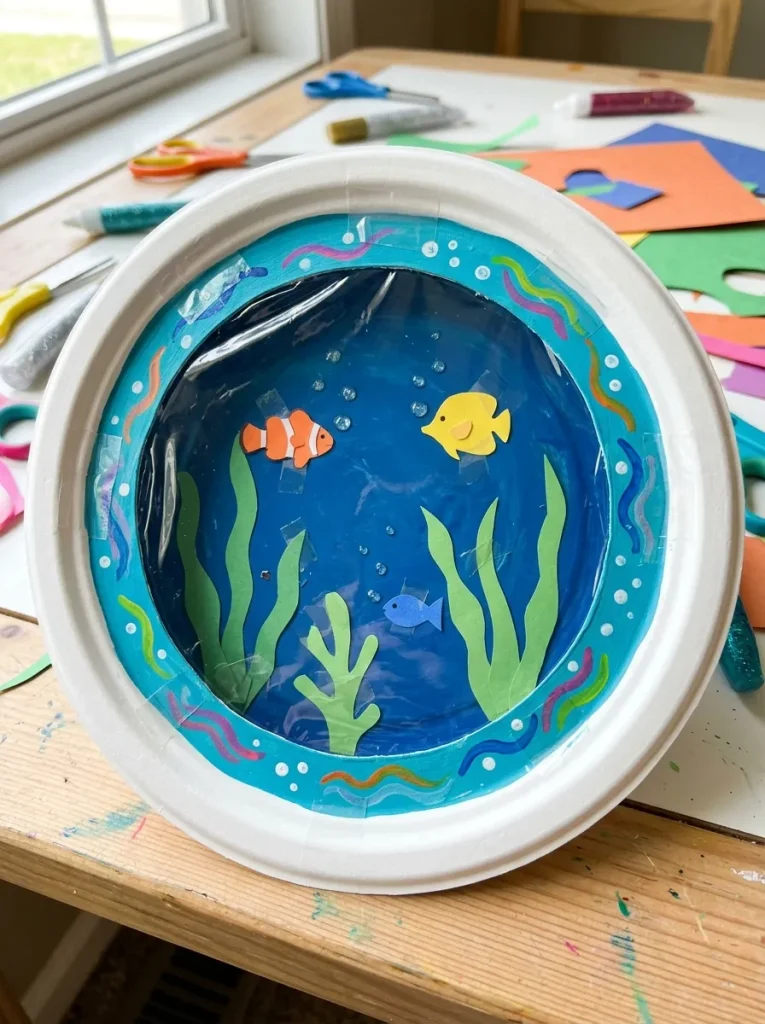
The three-dimensional paper plate aquarium uses a clever double-layer viewing window design to simulate a vibrant underwater ecosystem inside a compact diorama. This project uses one complete paper plate as the solid oceanic background, while a second plate has its center removed to form an open frame covered in clear plastic wrap. By separating the two layers with small foam spacers or cardboard tabs, a realistic sense of depth is achieved, making handmade sea creatures appear to swim in open water. This advanced yet accessible craft teaches children about marine biology, perspective, and structural assembly, helping them understand how to isolate background elements from floating foreground figures. The finished aquarium stands out as an impressive piece of three-dimensional home decor that captures the playful energy of a real fish tank without any maintenance.
The execution process begins by painting the entire interior surface of the first paper plate with wavy gradients of dark blue and turquoise acrylic paint to represent the deep ocean water. While that dries, cut out small marine shapes—such as tropical fish, sea turtles, and starfish—from bright cardstock sheets, decorating them with fine-tip markers or glitter. Glue green construction paper strips twisted into spiral seaweed shapes onto the bottom rim of the blue background plate, and scatter real sand or beige paper scraps along the bottom to mimic the ocean floor. Take the second paper plate and carefully cut away the entire flat center circle, leaving only the sturdy outer ribbed rim to serve as the aquarium viewing frame. Stretch a piece of clear plastic kitchen wrap tightly across the back of this rim, securing it firmly with clear tape to create a transparent glass window effect. Apply thick double-sided foam tape or small blocks of corrugated cardboard along the rim of the background plate, then press the window frame plate firmly on top to seal the beautiful underwater scene.
Idea 9: Kinetic Paper Plate Spiral Snake
How to Create
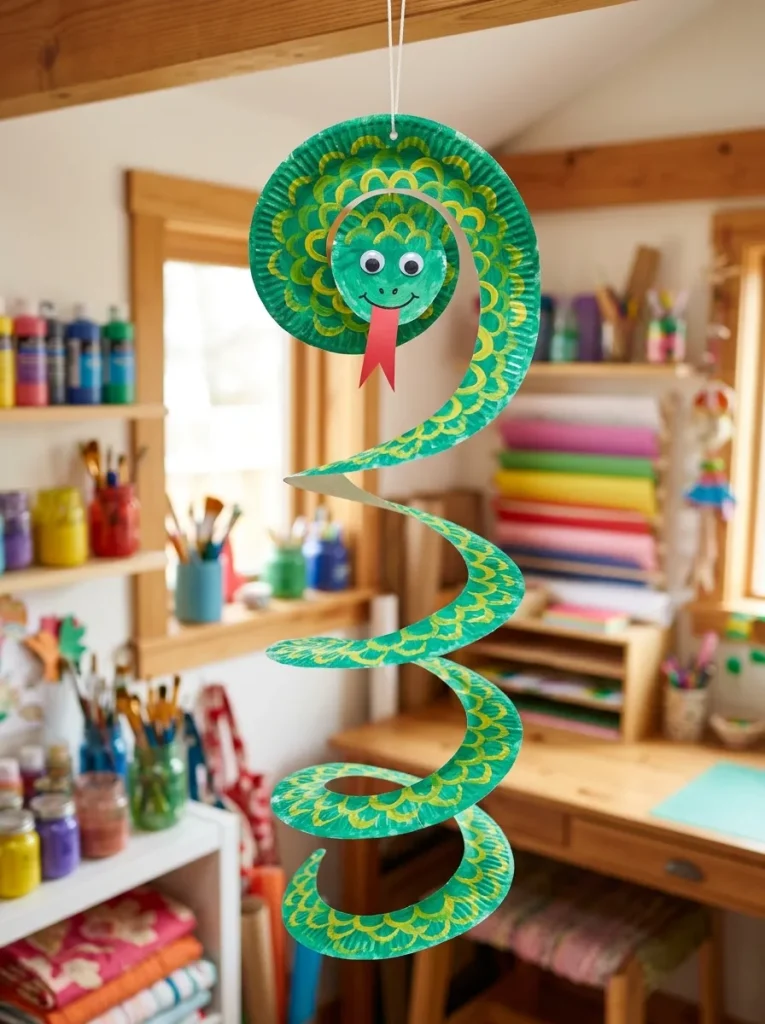
The kinetic paper plate spiral snake is an exceptional example of transforming a flat, rigid circle into a fluid, elongated three-dimensional kinetic sculpture through continuous concentric cutting. This design relies on a single paper plate decorated with repetitive patterns, which is then cut in a continuous spiral from the outer edge inward to the exact center point. The center of the plate forms the raised head of the snake, while the outer rim unravels to create a long, bouncy body that sways and stretches gracefully when suspended. This project provides a fascinating lesson in geometry, curves, and kinetic motion, demonstrating how simple lines can completely alter the structural integrity of a material. Children love watching their static drawings instantly transform into a lively, spring-like toy that reacts dynamically to the slightest breeze or touch.
To create this kinetic project, instruct the child to paint both sides of a standard paper plate with a vibrant base color like emerald green or bright red, ensuring complete coverage. Once the base coat is dry, use contrasting paint or markers to apply detailed scale patterns, stripes, or geometric dots across the entire surface to create an appealing reptilian texture. Use a pencil to lightly sketch a continuous spiral line starting from the outer rim and winding inward toward the center, keeping the path roughly one inch wide throughout. Carefully cut along this sketched pencil line using sharp safety scissors, working slowly from the outside edge until reaching the circular center island. Cut a small fork-tongued shape from red construction paper and glue it to the underside of the central island, which now functions as the snake’s head. Attach two small wiggle eyes to the head, punch a tiny hole near the nose, and thread a piece of string through it to hang the snake from the ceiling.
Idea 10: Seasonal Paper Plate Holiday Wreath
How to Create
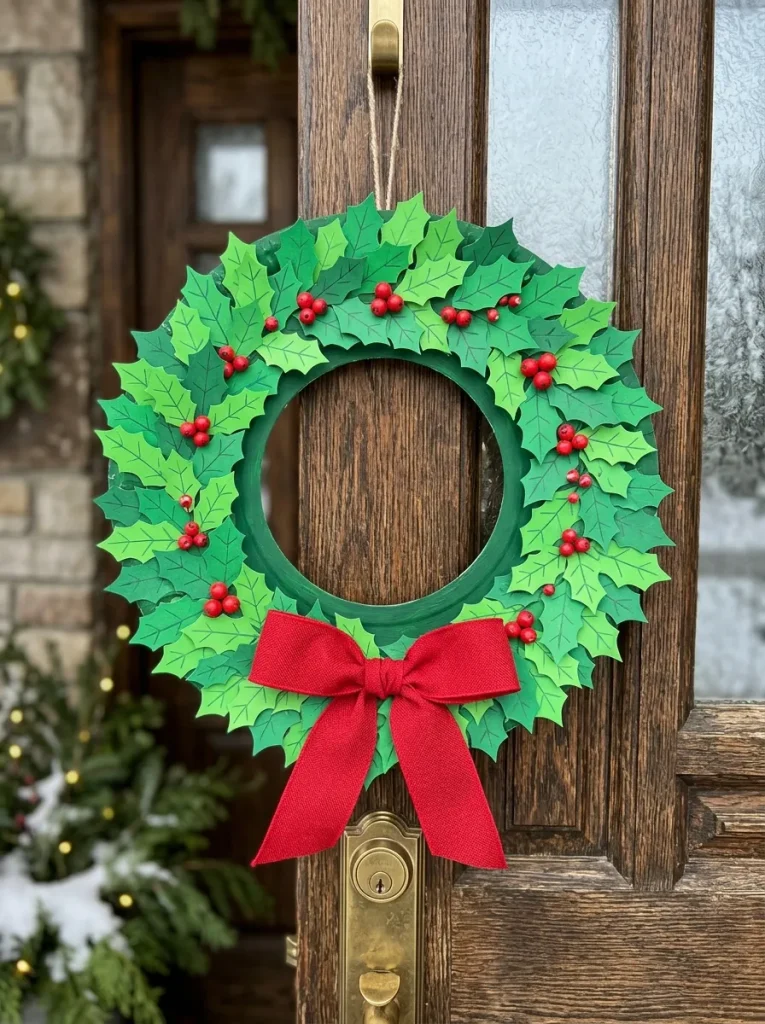
The seasonal paper plate holiday wreath offers a highly adaptable, beginner-friendly framework for celebrating various holidays and changing seasons through festive front door decoration. This project involves removing the center of a paper plate to create a sturdy, lightweight ring that serves as the foundation for attaching themed cutouts, faux leaves, or paper ribbons. Whether designing a green holly wreath for winter, a pastel egg wreath for spring, or a spooky orange wreath for autumn, the core structure remains reliably simple and effective. This activity encourages long-term planning and thematic thinking, as children select color schemes and iconic symbols that match specific times of the year. The finished wreath is incredibly lightweight, allowing it to hang safely from interior doors, windows, or walls using simple, non-damaging adhesive hooks.
Begin the setup method by folding a large paper plate gently in half without creasing the outer edges, then cut out the semi-circular center portion along the inner rim line. Unfold the plate to reveal a clean, perfect circular ring that will function as the durable structural base for the seasonal wreath. Paint this structural ring in a solid color that matches the seasonal theme, such as a rich forest green for winter or a warm golden yellow for autumn displays. Assist the child in cutting out numerous themed shapes from colored cardstock, such as maple leaves, blooming flowers, holiday ornaments, or star shapes, depending on the chosen motif. Layer these paper cutouts around the painted ring, overlapping them slightly to hide the plate surface underneath, and secure them firmly using a non-toxic glue stick. Tie a wide fabric ribbon into a neat bow and glue it directly to the top or bottom center of the wreath to add a professional, elegant touch.
Common Beginner Mistakes and How to Avoid Them
When guiding children through paper plate craft tutorials, identifying and preventing common procedural mistakes ensures a frustration-free and rewarding artistic experience. The most frequent error is using glossy, plastic-coated paper plates, which possess a slick moisture-resistant barrier that causes water-based paints to bead up and school glue to slide off completely. Always select inexpensive, uncoated matte paper plates, as their exposed cellulose fibers readily absorb pigments and adhesives for long-lasting structural integrity. Another common pitfall is applying excessive amounts of liquid school glue, which saturates the paper fibers, causing the plate to warp, wrinkle, and take hours to dry. Teach children to apply glue in small, controlled dots or to use a simple glue stick for lightweight paper attachments to maintain a flat, clean surface. Additionally, structural failure often occurs when heavy objects are attached to a flimsy plate without proper reinforcement. If a project requires supporting substantial weight, simply nest two or three plates directly inside one another before starting construction to instantly double the structural strength of the base.
Practical Tips for Achieving Better Crafting Results
| Crafting Challenge | Recommended Practical Solution | Expected Artistic Outcome |
|---|---|---|
| Paint peeling or flaking off surfaces | Mix a few drops of liquid school glue directly into the tempera paint before application | A flexible, durable paint layer that resists cracking when the plate is folded |
| Marker ink bleeding into painted bases | Ensure the base acrylic coat is completely dry and use oil-based or permanent markers | Sharp, clean lines and highly legible details that do not smudge over time |
| Curving edges warping during drying | Place a heavy book over the dry, unpainted reverse side of the plate overnight | A perfectly flat, stable foundational canvas ideal for precise geometric alignments |
| Flimsy hanging attachments tearing | Reinforce punched holes with clear adhesive tape or plastic reinforcement rings | Sturdy suspension loops that hold up over long periods without tearing through paper |
Styling, Presentation, and Organizational Ideas
Presenting finished handmade paper plate crafts around the home or classroom transforms simple children’s projects into a curated gallery of vibrant visual inspiration. To display three-dimensional items like masks or wreaths elegantly, arrange them symmetrically along a neutral-colored wall using removable adhesive hooks that protect the underlying paint. Kinetic projects, such as spirals and hot air balloons, show off their movement best when suspended at varying heights from an overhead tension rod placed inside a bright window frame or doorway. For flat or low-relief projects, consider grouping them inside large, shadow-box frames to create an organized, professional display that highlights the creative work while keeping dust away. Organization during the crafting process is equally important; store left-over paper plate scraps, trimmed rims, and uncut plates in labeled, clear plastic bins sorted by size. Keeping materials systematically organized makes it easy to jump into a creative project at a moment’s notice, turning crafting into a natural, stress-free part of the daily routine.
Strategic Budget and Time Planning
| Project Management Phase | Key Action Items & Milestone Tasks | Estimated Time Investment | Allocated Budget Requirements |
|---|---|---|---|
| Phase 1: Material Sourcing | Purchase bulk packs of uncoated paper plates, basic washable paints, and non-toxic adhesives | 30 minutes total sourcing time | Minimal expenditure using basic household supplies |
| Phase 2: Workspace Setup | Cover tables with protective sheets, portion paint into pallets, and pre-cut complex templates | 15 minutes preparation | Zero cost using existing newspapers or drop cloths |
| Phase 3: Active Crafting | Guide children through the step-by-step painting, cutting, assembly, and detail decoration | 45 to 60 minutes active creation | Variable based on chosen embellishments |
| Phase 4: Curing and Drying | Allow projects to sit undisturbed in a well-ventilated area until all adhesives and paints set | 2 to 3 hours passive drying | No financial investment required |
Creative Expansion and Advanced Artistic Inspiration
Once children master basic paper plate crafting techniques, they can expand their skills by experimenting with advanced artistic concepts that challenge their problem-solving and spatial reasoning. Introduce multi-plate assembly methods where multiple plates are cut, slotted, and interlocked to build complex three-dimensional animals, architectural models, or large-scale wall murals. Incorporate mixed-media elements by blending traditional paper crafting with recycled materials like cardboard egg cartons, plastic bottle caps, aluminum foil, and natural found objects like twigs and dried leaves. Explore advanced surface decoration techniques like paint scraping, mosaic paper collaging, or intricate stenciling to add rich textures and patterns to the plate surfaces. Crafters can also experiment with papier-mâché overlays, applying thin layers of newsprint soaked in flour paste over a shaped paper plate base to create incredibly strong, lightweight sculptures that last for years. These advanced challenges encourage children to view simple everyday materials not just as single-use items, but as flexible structural building blocks capable of bringing any imaginative idea to life.